Desserts · Part 2 of 3: Instructions
Two-Chip Bakery Cookies with Crispy Edges Step-by-step instructions
- Prep
- Cook
- Total
- Serves
- 12
Before you start
Before starting, cube the butter and place it in the refrigerator to keep it cold. Roughly chop the dark and milk chocolate bars into irregular pieces, from small shards to larger chunks.
Line a baking sheet with parchment paper. Measure all the dry ingredients and have them ready. If you plan to chill the shaped cookies, make room in the refrigerator. Preheat the oven to 380°F (193°C) when you are ready to bake.
Ingredients at a glance (11)
- 3/4 cup cold unsalted butter, cubed
- 1 cup dark brown sugar
- 1/2 cup granulated sugar
- 2 cold large eggs
- 2 tsp vanilla bean extract
- 2 1/4 cups all-purpose flour
- 2 tsp cornstarch
- 1 tsp baking soda
- 4 oz dark chocolate bar, rough-chopped
- 4 oz milk chocolate bar, rough-chopped
- Flaky sea salt, for sprinkling, to taste
Instructions
Mix the dough
- Cream the cold butter and sugarsIn a large mixing bowl, beat the cold cubed butter with the dark brown sugar and granulated sugar until the mixture is dense and combined, about 2 to 3 minutes. The butter should remain slightly chunky; do not overbeat. Add the cold eggs and vanilla bean extract, and beat until just incorporated. The mixture will look thick and creamy, not fluffy.Look for The butter-sugar mixture is thick, creamy, and slightly grainy, with no visible butter chunks.Tip Keep the butter and eggs cold to ensure a dense, chewy texture. Overbeating warms the dough.
- Sift the dry ingredientsSift the all-purpose flour, cornstarch, and baking soda into a separate bowl. Sifting aerates the flour and ensures even distribution of the cornstarch and baking soda. Whisk the dry ingredients together after sifting to combine thoroughly.Look for The dry mixture is uniform and free of lumps.Tip Sifting is not optional here; it helps create the tender, dense crumb.
- Fold in the dry ingredientsAdd the dry ingredients to the butter-sugar mixture. Use a rubber spatula to fold them in gently, mixing only until no streaks of flour remain. The dough will be thick and slightly sticky. Do not overmix, as that can develop gluten and make the cookies tough.Look for The dough is cohesive and pulls away from the bowl, but still soft.Tip Scrape the bottom of the bowl to ensure the dry ingredients are fully incorporated.
- Fold in the chopped chocolateAdd the rough-chopped dark chocolate and milk chocolate to the dough. Fold with the spatula until the chocolate pieces are evenly distributed throughout the dough. The dough will be studded with chocolate chunks of varying sizes.Look for Chocolate chunks are evenly distributed, and the dough is thick and chunky.Tip Reserve a few chocolate pieces to press onto the tops of the cookies before baking for a prettier finish.
After this phase, you should have a thick, cohesive dough with visible chocolate chunks. The dough should be slightly sticky but hold together when pressed. It should not be overly soft or greasy. If it is, refrigerate it for 15 minutes before shaping.
Shape and bake
- Shape the cookie moundsLine a baking sheet with parchment paper. Scoop the dough into tall, craggy mounds, about 3 tablespoons each. Do not flatten them. Space the mounds at least 2 inches apart to allow for spreading. For the best texture, chill the shaped cookies in the refrigerator for 30 minutes before baking, if time allows.Look for The mounds are tall, uneven, and hold their shape.Tip Chilling the dough helps the cookies spread less and keeps the centers dense.
- Bake the cookiesPreheat the oven to 380°F (193°C). Bake the cookies for 11 minutes, until the edges are caramelized and deep golden brown. The centers will look slightly underdone and puffed. Remove the baking sheet from the oven and let the cookies cool on the sheet for 5 minutes.Look for The edges are deep golden and set, while the centers are puffed and pale.Safe temperature 160°F (71°C) internal temperature (egg dishes)Tip Do not overbake; the cookies will continue to set as they cool on the hot pan.
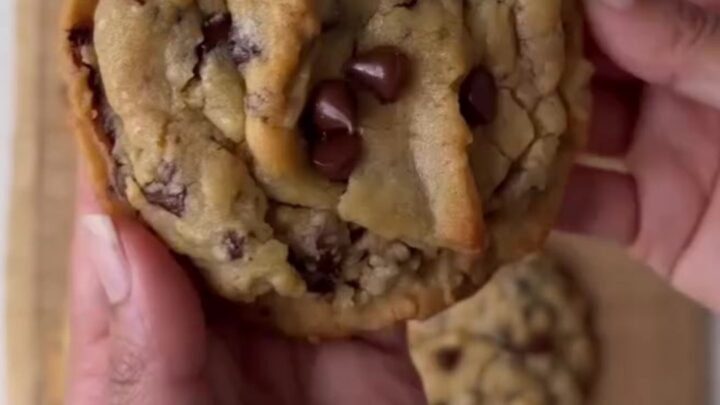
The shaped mounds should be tall and craggy, not smooth or flat. As they bake, the edges will spread and caramelize, while the centers will puff up.
After 11 minutes, the edges will be deep golden brown, and the centers will look slightly underdone. The kitchen will smell of caramelized butter and chocolate.
Finish and serve
- Finish with flaky saltImmediately after removing the cookies from the oven, sprinkle each with flaky sea salt. The salt will stick to the warm surface and enhance the chocolate flavor. Let the cookies cool completely on the baking sheet for at least 10 minutes before serving.Look for The salt glistens on the warm cookies, and the edges are crisp.Tip Use a light hand with the salt; a little goes a long way.
After sprinkling with salt, the cookies should cool on the pan until the centers are set but still soft. The edges will crisp as they cool. When you pick one up, the edges should be firm and the center should bend slightly. The chocolate should be molten and glossy.
Common mistakes
Overbeating the butter and sugar can warm the mixture and cause the cookies to spread too much. Beat just until combined. Overmixing the flour can develop gluten and result in tough cookies. Fold the dry ingredients gently.
Baking the cookies too long will dry them out and eliminate the desired gooey center. Always remove them from the oven when the edges are golden but the centers are still pale. Finally, do not skip the flaky salt; it balances the sweetness and enhances the chocolate.
How to tell it’s done
The cookies are done when the edges are deep golden brown and caramelized, and the centers are puffed and look slightly underdone. The internal temperature of the cookies should reach at least 160°F (71°C) to ensure the eggs are fully cooked.
Let the cookies rest on the hot baking sheet for 5 minutes; they will continue to set. The centers will sink slightly and become dense and chewy.
- Egg dishes: 160°F (71°C) in the thickest part
Up next · Part 3 of 3
4 variations · storage & make-ahead · 5 answers · printable card
Tips, FAQ & printable recipe (Part 3)← Back to the ingredients (Part 1)