Desserts · Part 2 of 3: Instructions
Tropical Mango Danish with Passionfruit Cream: Flaky and Ready to Serve Step-by-step instructions
- Prep
- Cook
- Total
- Serves
- 6
Before you start
Set the oven rack to the middle position and heat the oven to 400°F (200°C). Line a rimmed baking tray with parchment paper. Thaw the puff pastry in the refrigerator overnight or until it is cool and flexible but still firm to the touch. Soften the cream cheese at room temperature for about 30 minutes so it beats smooth without lumps.
Chill the heavy cream until very cold so it whips quickly. Peel and score the mango, cut the cubes and slice a few pieces for fanning. Halve the passionfruit and scoop out the pulp and seeds into a small bowl. Grate the hard white cheese on a box grater and keep the shavings covered on a plate. Wash and dry the red berries and set them aside.
Ingredients at a glance (9)
- 1 sheet puff pastry, store-bought or made ahead, thawed
- 8 oz cream cheese, softened
- 1/3 cup confectioners' sugar
- 1/2 cup heavy cream, cold
- 3 passionfruit, ripe, halved
- 1 ripe mango, peeled and sliced
- 1/4 cup finely grated hard white cheese, such as Parmesan
- 1/2 cup small red berries, such as raspberries
- 1 egg, beaten, for brushing
Instructions
Cream and fruit preparation
- Prepare the mango and passionfruitPeel the mango, then slice it in half around the pit. Score the flesh into a neat cube grid, cut the cubes free and set aside, then slice a few pieces thinly for fanning. Halve the passionfruit and scoop out the orange pulp and seeds.Look for Mango cubes hold their shape and the passionfruit pulp looks glossy and orange.Tip Chill the mango briefly so the cubes stay firm and clean.
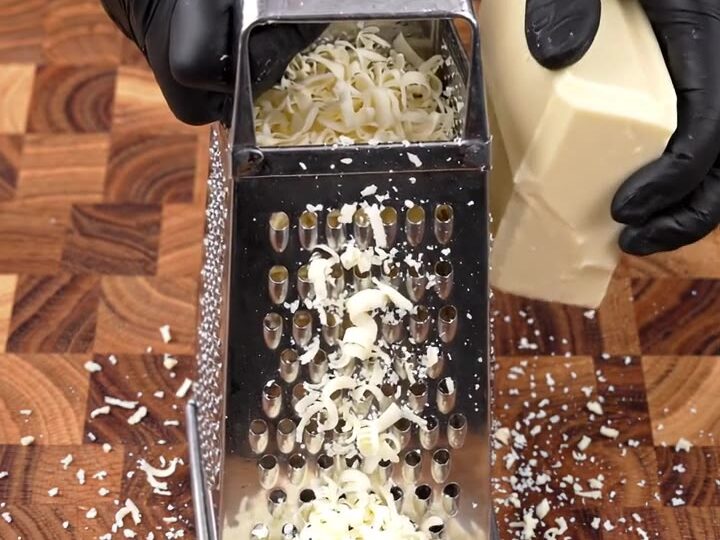
- Grate the cheeseGrate the hard white cheese on the fine side of a box grater until you have fine, curly shavings. Keep the shavings in a small bowl so they are ready for the final topping.Look for The cheese falls in fine, feathery shavings onto the board.Tip Grate the cheese just before topping so it stays dry and light.
- Whip the passionfruit creamBeat the softened cream cheese and confectioners' sugar until smooth. Whip the cold heavy cream to soft peaks, then fold it into the cream cheese mixture with the passionfruit seeds until thick and smooth.Look for The cream is thick, smooth and holds a soft peak on the spoon.Tip Fold gently so the cream stays light and airy.
The cream should be thick, smooth and hold a soft peak when you lift the beater. The mango cubes should be firm and clean-edged, and the passionfruit pulp should look glossy and orange with the seeds evenly distributed. Before moving on, check that the cream is not warm or loose, because a soft cream will spread and blur the layers during baking.
If it looks slack, chill it for 10 minutes in the refrigerator, then pipe it onto the pastry. Also confirm that the mango slices are dry, since surface moisture can make the pastry soggy in the oven. Once the components are set, you can assemble quickly and keep the pastry cold until it goes into the hot oven.
Assembling on the pastry
- Cut and fill the pastryHeat the oven to 400°F (200°C). Unroll the puff pastry, cut it into six rectangles and lay them on the parchment-lined tray. Pipe or spoon the cream down the center of each rectangle, leaving a border.Look for Each rectangle has a neat center strip of cream with clean edges.Tip Score a faint border around the edges for a higher, flakier rim.
- Top with passionfruit and mangoSpoon the passionfruit pulp over the cream, then arrange fanned slices of mango on top. Brush the pastry edges with beaten egg and add the mango cubes between the slices so the top looks full and colorful.Look for The fruit covers the cream and the pastry edges shine with egg wash.Tip Pat the mango dry first so it does not weep on the pastry.
- Bake until goldenBake for 12 to 15 minutes, until the pastry is deep golden and puffed around the edges. Let the danishes rest on the tray for 10 minutes so the cream sets and the pastry firms.Look for The pastry is golden brown, puffed and the layers look flaky at the edges.Tip Rotate the tray halfway through for even browning.
The pastry rectangles should be neatly spaced on the parchment with cream in a clean center strip and fruit arranged over the top. The pastry edges should look even and lightly brushed with beaten egg, and the mango fan should sit flat without sliding. Check that the cream does not reach the edges, because it will push the layers apart and prevent a clean rise.
Look for even coverage of passionfruit and mango, and make sure the tray has room between the rectangles so the heat circulates. If the pastry feels soft or sticky, return the tray to the refrigerator for 10 minutes before baking so the layers keep their shape.
Baking and finishing
- Finish with cheese and berriesSprinkle the grated white cheese over the warm danishes, then scatter the small red berries on top. Serve while the pastry is still crisp and the fruit is fresh.Look for The top is dusted with pale cheese and bright red berries.Tip Add the berries just before serving so they stay bright.
- Serve the finished danishCup a baked danish in both hands to check the flaky layers, then transfer it to a serving plate. Serve the danishes at room temperature, with extra passionfruit and mango on the side if you like.Look for The pastry is crisp, layered and filled with fruit and cream.Tip Serve within a few hours for the best crispness.
The baked danishes should be deep golden, puffed around the edges and crisp when tapped gently. The cream should look set and moist, and the mango should look slightly glossy from the oven heat. After resting for 10 minutes, the cream firms and the pastry crisps further. Before topping with the grated cheese and red berries, check that the pastry is not pale in the center, because pale pastry means it needs a few more minutes. Add the cheese while the danishes are still warm so it softens slightly, then scatter the berries just before serving so they stay bright and fresh.
Common mistakes
The most common problem is a soggy base. This happens when the mango is wet, the cream is too warm and loose, or the pastry was not kept cold before baking. Pat the mango slices dry and keep the cream chilled until piping. Overfilling is another mistake: too much cream spreads toward the edges and stops the pastry from puffing.
Pipe a moderate line down the center only. Opening the oven door early can also deflate the pastry, so wait until the edges have set before checking. Finally, adding the berries too early can make them bleed onto the pastry, so add them at the very end for clean color and a crisp finish.
How to tell it’s done
The danishes are done when the pastry is deep golden brown all over, puffed around the edges and crisp when tapped. The cream should look set and moist with no shiny wet patches on the surface, and the mango should be tender at the edges. The passionfruit seeds should look dark and glossy. Because this recipe has no meat, poultry or eggs cooked to a safe temperature, you judge doneness by color and texture rather than a thermometer. Let the danishes rest on the tray for 10 minutes before serving so the cream firms and the pastry crisps, and check that the layers look flaky when you lift one gently.
Up next · Part 3 of 3
4 variations · storage & make-ahead · 5 answers · printable card
Tips, FAQ & printable recipe (Part 3)← Back to the ingredients (Part 1)