Desserts · Part 2 of 3: Instructions
Triple Chocolate Salted Caramel Brownie Bars with Caramel Swirls Step-by-step instructions
- Prep
- Cook
- Total
- Serves
- 16
Before you start
Gather all the ingredients and equipment before you melt any chocolate, because the batter moves quickly once the chocolate is warm. Line the 9 by 13-inch metal pan with parchment paper, letting it hang over two sides so you can lift the finished brownie out. Heat the oven to 350°F (175°C) and set the rack in the center.
Chop the dark chocolate, milk chocolate and hazelnuts on a wooden board, chop the soft caramel pieces, and grate a small portion of dark chocolate for the topping. Measure the flour, cocoa powder and salt into a bowl and whisk them together. Let the eggs come to room temperature so they blend smoothly into the warm chocolate. Having the caramel sauce and white chocolate ready means you can drizzle and swirl quickly before the batter starts to set.
Ingredients at a glance (15)
- 4 oz dark chocolate, chopped
- 2 oz milk chocolate, chopped
- 1/2 cup unsalted butter, cut into pieces
- 1 cup granulated sugar
- 2 large eggs, at room temperature
- 1 tsp vanilla extract
- 1/2 cup all-purpose flour
- 1/4 cup unsweetened cocoa powder
- 1/4 tsp fine sea salt
- 1/2 cup hazelnuts, roughly chopped
- 1/2 cup soft caramel pieces, chopped
- 1/4 cup caramel sauce
- 2 oz white chocolate, melted
- 1 oz dark chocolate, grated into curls and shavings
- flaky sea salt for serving
Instructions
Melt, mix and pour the batter
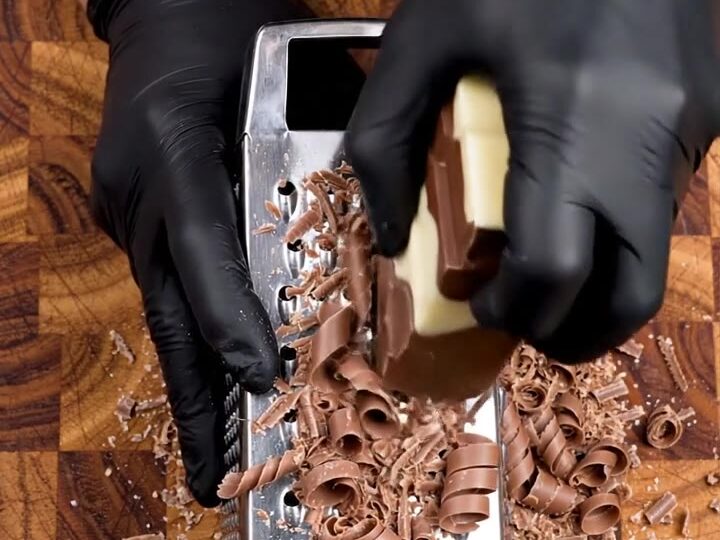
- Chop and grate the chocolateChop the dark chocolate, milk chocolate and hazelnuts on a wooden cutting board with a sharp knife. Chop the soft caramel pieces and set them aside. Grate a small portion of dark chocolate with a box grater into curls and shavings for the top.Look for Chocolate in small irregular chunks and fine curls ready on the board.Tip Chill the grating chocolate for ten minutes so it shreds cleanly without smearing.
- Prepare the pan and batterHeat the oven to 350°F (175°C). Line a 9 by 13-inch metal baking pan with parchment paper, letting it overhang the sides. Melt the butter with the chopped dark and milk chocolate in a heatproof bowl set over simmering water, stirring until smooth. Whisk in the sugar, then the eggs one at a time and the vanilla.Look for A smooth, glossy chocolate base with no streaks of butter.Safe temperature 160°F (71°C) internal temperature (egg dishes)Tip Keep the bowl off direct heat so the chocolate melts gently and does not seize.
The melted chocolate and butter should be smooth and glossy, with the eggs and sugar fully blended in. After you fold in the flour, cocoa, salt, hazelnuts and caramel pieces, the batter should look thick and even with no dry streaks of flour showing. Spread it evenly into the lined pan, filling the corners so the brownie bakes at the same rate across the surface.
Before moving on, check that the batter is level and that no pockets of unmixed flour remain, because those spots bake unevenly and can leave dry patches in the finished bars. A quick tilt of the pan will show whether the batter has settled evenly. If the chocolate has begun to thicken too much while you work, return the bowl briefly to the warm water to keep the batter smooth and glossy.
Drizzle, swirl and bake
- Fold in dry ingredients and mix-insWhisk the flour, cocoa powder and fine sea salt together, then fold them into the chocolate batter until just combined. Fold in the chopped hazelnuts and caramel pieces. Spread the batter evenly into the parchment-lined pan.Look for A thick, glossy batter with no dry streaks of flour.Tip Stop folding as soon as the flour disappears to keep the bars dense and fudgy.
- Drizzle and swirl the toppingsMelt the white chocolate until smooth. Drizzle the melted white chocolate and the caramel sauce over the batter in lines. Drag a skewer or toothpick through the drizzles in loose, crisscrossing strokes to form a web-like pattern.Look for Pale and dark ribbons forming a web across the surface.Tip Use short, light strokes so the caramel and white chocolate stay visible as ribbons.
The surface should show pale white chocolate and dark caramel ribbons forming a loose web, with no large puddles of one topping. The skewer strokes should be light and crisscrossing, leaving the colors visible rather than blended into brown. Place the pan in the oven and bake for about 30 minutes.
At the end, the surface should look set and dry, the edges should begin to pull away slightly from the paper, and the center should look fudgy rather than wet. Check that the toothpick comes out with moist crumbs, not wet batter. If the top still looks glossy and loose in the middle, bake a few minutes more and check again.
Cool, lift and slice
- Bake until set and fudgyBake on the center rack for about 30 minutes, until the surface looks set and fudgy and a toothpick inserted near the center comes out with moist crumbs. Cool the brownie completely in the pan on a wire rack, about 2 hours.Look for Top looks dry and set, edges pull slightly from the paper.Safe temperature 160°F (71°C) internal temperature (egg dishes)Tip Expect a few moist crumbs on the toothpick; the center should not look wet.
- Lift, slice and finishLift the cooled brownie from the pan using the parchment overhang. Cut into 16 bars with a sharp knife. Sprinkle each bar with the grated dark chocolate curls and a pinch of flaky sea salt before serving.Look for Clean, firm edges and a glossy cut face showing caramel ribbons.Tip Wipe the knife between cuts for neat, sharp edges on every bar.
The brownie should cool completely in the pan on a wire rack, which takes about 2 hours. It is ready to lift when the surface feels firm and the edges look set and pull cleanly from the paper. Use the parchment overhang to lift the whole slab onto a board. The cut face should look dense and glossy, with visible caramel ribbons, chunks of chocolate and hazelnut pieces. Make sure the brownie is fully cool before cutting, because a warm slab will smear and crumble. Trim the edges if you want neat squares, then cut into 16 bars with a sharp knife, wiping the blade between cuts.
Common mistakes
The most common mistake is overbaking. Brownies continue to firm as they cool, so a long bake turns the crumb dry and crumbly instead of fudgy and dense. Pull the pan when the surface looks set and a toothpick shows moist crumbs. Another frequent error is overmixing once the flour goes in. Folding until the flour just disappears keeps the bars tender and prevents a tough, bready texture.
Be careful with the melted chocolate too: if it gets too hot or the bowl touches the simmering water, it can seize and turn grainy. Keep the heat gentle and stir until smooth. Finally, cutting the brownie before it has cooled completely causes the caramel ribbons and chocolate to smear, so give it the full cooling time before slicing.
How to tell it’s done
The brownie is done when the surface looks set and dry, the edges have begun to pull slightly away from the parchment, and the center looks fudgy and dense rather than wet. A toothpick inserted near the center should come out with moist crumbs, not raw batter. Because the batter contains eggs, the finished brownie should reach 160°F (71°C) in the center to be cooked through. Use an instant-read thermometer for certainty. Once cooled, the bars should hold a clean edge when cut, and the caramel should appear as set, glossy ribbons rather than soft, sticky streaks.
- Egg dishes: 160°F (71°C) in the thickest part
Up next · Part 3 of 3
4 variations · storage & make-ahead · 5 answers · printable card
Tips, FAQ & printable recipe (Part 3)← Back to the ingredients (Part 1)