Appetizers · Part 2 of 3: Instructions
Trash Can Nachos: Every Chip Loaded in 30 Minutes Step-by-step instructions
- Prep
- Cook
- Total
- Serves
- 6
Before you start
Get everything hot and within reach before the first chip goes into the can, because assembly moves fast. Brown and season the beef, drain it well, and confirm it has reached temperature. Rinse and warm the beans, and heat the queso until it pours in a smooth ribbon — thin it with a splash of milk if needed. Shred the cheddar if it is not already shredded, drain the pico de gallo so it does not weep water into the layers, and count out the jalapeño slices.
Ingredients at a glance (8)
- 10 oz tortilla chips (about 8 cups, sturdy restaurant-style)
- 1 lb ground beef (85% lean)
- 2 tbsp taco seasoning
- 1 cup black beans, drained and rinsed
- 2 cups white queso, hot and pourable
- 1 cup shredded cheddar, melted
- 1/3 cup pickled jalapeños, sliced
- 1/2 cup pico de gallo, well drained
Instructions
Cook the components
- Set up the can and platterStand a clean, open-ended 28-ounce tin can in the center of a wide, sturdy platter. Keep the chips, cooked components and toppings within arm's reach, because the layering goes quickly once the queso is hot. A level can now means a clean release later.Look for The can sits straight and steady with clear space around it for the tower to spread.Tip Wipe the can completely dry inside; water droplets soften the first layer of chips.
- Brown the taco beefBrown the ground beef in a large skillet over medium-high heat, breaking it into small crumbles as it cooks, about 6 minutes. Stir in the taco seasoning with a splash of water and simmer until the meat is evenly coated and the pan is nearly dry. The beef must reach an internal temperature of 160°F (71°C).Look for Every crumble is browned with no pink remaining, and the spices smell toasty.Safe temperature 160°F (71°C) internal temperature (ground meat)Tip Drain the excess fat before adding the seasoning so the layers stay crisp instead of greasy.
- Warm the black beansDrain and rinse the black beans in a colander, then warm them in a small saucepan over low heat for 3 to 4 minutes, just until heated through. Cover and set aside off the heat. Warm beans spread smoothly between layers instead of cooling the queso the moment they touch it.Look for The beans steam gently and look glossy, with no liquid pooling in the pan.Tip Rinsing removes the starchy can liquid that can make the layers taste flat.
- Heat the queso until pourableWarm the white queso in a saucepan over low heat, stirring often, until it flows smoothly off the spoon, 3 to 5 minutes. If it thickens, loosen it with a splash of milk. Hot, pourable queso is the glue of this tower, sinking into every layer instead of sitting on top.Look for The queso ribbons off the spoon in a slow, continuous stream with no clumps.Tip Keep the heat low; scorching queso turns grainy and will not cascade properly.
By the end of this phase, everything that goes into the can is hot and ready at the same time. The beef is deeply browned, coated in seasoning, drained of excess fat and registers 160°F (71°C) at its thickest point. The beans are steaming and glossy, and the queso pours off the spoon in a slow ribbon with no clumps. The can stands level on the platter, dry inside, with all components arranged around it. Smell is the best guide: toasty spices, warm beans and creamy cheese, with no scorched dairy.
Layer and cap the tower
- Build the first layerSpoon a generous layer of tortilla chips into the bottom of the can, then add a spoonful of taco beef, a scatter of black beans and a pour of hot queso. Press down very gently so the layer settles without crushing the chips, which need to stay crisp under the cheese.Look for The queso just reaches the edges of the layer without flooding the chips.Tip Angle the chips upright against the can wall; they hold toppings better that way.
- Repeat the layersRepeat the chips, beef, beans and queso three more times, working quickly while everything is hot, and finish with a final layer of chips. Pack each layer lightly and keep the stack level from side to side so the can lifts away cleanly at the reveal.Look for The can is filled nearly to the top with four even, distinct layers.Tip Reserve the biggest, most intact chips for the top layer; they carry the toppings.
- Cap with cheddar and toppingsFinish the top with the shredded cheddar, a scatter of pickled jalapeños and spoonfuls of pico de gallo. Let the stack sit for about 60 seconds so the hot queso below and the cheddar on top meld into one molten cap that will drape over the chips as the can lifts.Look for The cheddar looks glossy and softened, starting to melt into the queso beneath it.Tip Drain the pico well; watery salsa slides off the tower and pools on the platter.
The can should now be filled nearly to the top with four even layers — chips, beef, beans and queso — each distinct but gently settled, with no crushed chip dust at the bottom.
The top carries a final layer of chips under the shredded cheddar, jalapeños and pico de gallo, and after the 60-second rest the cheddar looks glossy and is beginning to melt into the queso beneath it. Tip the can slightly if needed: nothing should slide or slosh, which would mean a layer is too wet. The platter around the can should still be clean.
The pull and the table
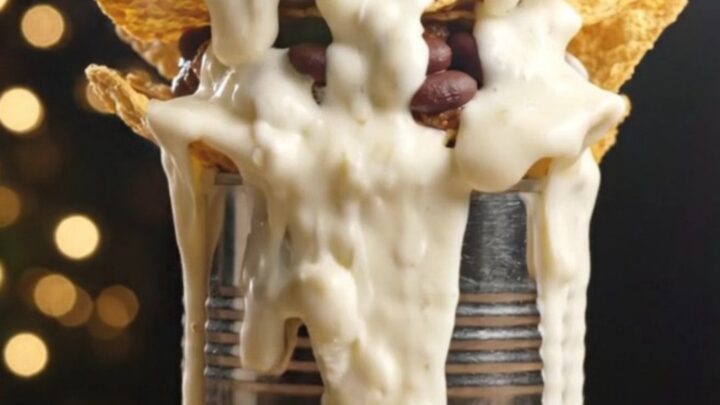
- Lift the canGrip the can firmly with both hands and slide it straight up in one slow, steady motion, letting the molten cheese, beef and beans cascade down over every chip. If anything sticks, wiggle the can gently side to side rather than yanking it, which can topple the tower.Look for The tower holds its shape as the can clears the top, cheese ribboning down the sides.Tip A slight twist as the can clears the top helps release any chip clinging to the wall.
- Serve it hotServe immediately while the queso is still pourable and the chips are crisp at the edges. Set the extra pickled jalapeños and pico de gallo alongside, hand out forks, and let everyone dig in from the platter. This is a dish that rewards speed, so bring it straight to the table.Look for Steam rises from the top and the cheese still stretches as forks pull away.Tip Warm the platter under hot tap water first so the queso stays molten longer.
The can has cleared the top in one slow motion, and the tower stands on the platter with cheese ribboning down its sides and beef and beans visible at every level. Steam should rise from the top, the cheddar cap should stretch when a fork pulls away, and the outer chips should still snap when bitten.
Look for even coverage: if a band of dry chips shows near the middle, pour a little extra warm queso over that spot. The whole reveal to first bite should take under a minute, because this dish is at its absolute peak in the first five minutes after the lift.
Common mistakes
The most common failure is queso that is too thick: cold or overheated cheese sauce clumps instead of cascading, leaving dry pockets deep in the tower. Keep it over low heat and thin it until it pours. The second mistake is overpacking — pressing the layers down hard crushes the chips into a dense block that will not fall apart attractively.
Pack lightly, just enough to level each layer. Undrained beef and watery pico de gallo are the quiet saboteurs: both release liquid that softens the chips from below, so drain both thoroughly. Finally, do not yank the can.
How to tell it’s done
The beef is done when it reaches an internal temperature of 160°F (71°C), reads fully browned with no pink crumbles, and the seasoned pan liquid has reduced to nearly dry. The queso is ready when it flows off the spoon in a slow, continuous ribbon without clumping or separating.
The beans are done when steaming hot throughout. The finished tower is ready to serve the moment the can clears the top: the cheese should still be flowing and stretching, the top cheddar glossy and melted into the queso, and the exposed chips crisp at their edges.
- Ground meat: 160°F (71°C) in the thickest part
Up next · Part 3 of 3
4 variations · storage & make-ahead · 5 answers · printable card
Tips, FAQ & printable recipe (Part 3)← Back to the ingredients (Part 1)