Desserts · Part 2 of 3: Instructions
Toasted Flour Cinnamon Apple Cookies Step-by-step instructions
- Prep
- Cook
- Total
- Serves
- 12
Before you start
Before starting, gather all your ingredients and equipment. Grate the apples and chop the walnuts. Have a dry skillet ready for toasting the flour, and line a baking sheet with parchment paper.
Preheat the oven to 340°F (170°C) when you're ready to bake. The dough comes together quickly, so having everything prepped will make the process smooth.
Ingredients at a glance (6)
- 1 cup all-purpose flour
- 4 tart green apples, grated
- 1 cup granulated sugar
- 1 tsp ground cinnamon
- 1 cup coarsely chopped walnuts
- Powdered sugar, for dusting, to taste
Instructions
Phase 1: Toasting and Simmering
- Toast the flourPlace a dry skillet over low heat and add the all-purpose flour. Stir constantly with a wooden spoon for about 5 to 7 minutes, until the flour turns a delicate pale tan color and smells nutty. Immediately transfer the toasted flour to a plate to cool completely.Look for The flour should be lightly browned and fragrant, not scorched.Tip Keep stirring to avoid burning; the flour can go from toasted to burnt quickly.
- Simmer the apple fillingIn the same skillet, combine the grated apples, granulated sugar, ground cinnamon, and chopped walnuts. Cook over medium heat, stirring occasionally, until the apples are caramelized and jammy, about 10 minutes. Remove from heat and let cool slightly.Look for The filling should be thick and glossy, with the apples softened and the liquid reduced.Tip Grate the apples just before cooking to prevent browning.
The flour should be a delicate pale tan color and smell nutty, but not burnt. The apple filling should be thick, glossy, and reduced, with the apples tender and the liquid caramelized.
The aroma of cinnamon and toasted nuts will fill your kitchen. Allow both to cool slightly before proceeding.
Phase 2: Shaping and Stuffing
- Form the dough discsOnce the toasted flour is cool, transfer it to a mixing bowl. Add water gradually (about 1/4 cup) and stir until a soft dough forms. Knead briefly on a floured surface, then divide into 12 equal portions. Flatten each portion into a small disc about 3 inches wide.Look for The dough should be pliable but not sticky.Tip If the dough is too dry, add a teaspoon of water at a time.
- Stuff the cookiesPlace a generous spoonful of the apple-walnut filling in the center of each dough disc. Carefully pinch the edges together to seal, forming a neat dome shape. Place the stuffed cookies on a parchment-lined baking sheet, spacing them about 2 inches apart.Look for The filling should be fully enclosed, with no cracks.Tip Moisten the edges with a little water if they don't stick together.
The dough discs should be pliable and easy to handle, not sticky. When you pinch the edges together, they should seal without cracking. The filled cookies should be neat domes, with no filling visible. If any cracks appear, press the dough to seal them.
Phase 3: Baking and Dusting
- Bake the cookiesPreheat the oven to 340°F (170°C). Bake the cookies for 20 minutes, until they are pale golden on the outside. Remove from the oven and let cool on the baking sheet for 5 minutes, then transfer to a wire rack.Look for The cookies should be lightly browned and firm to the touch.Tip Baking time may vary; start checking at 18 minutes.
- Dust and serveWhile the cookies are still warm, sift a generous layer of powdered sugar over the top. Serve warm for the best texture, or allow to cool completely and dust again before serving.Look for The sugar should create a snowy white coating.Tip Dusting while warm helps the sugar adhere slightly.
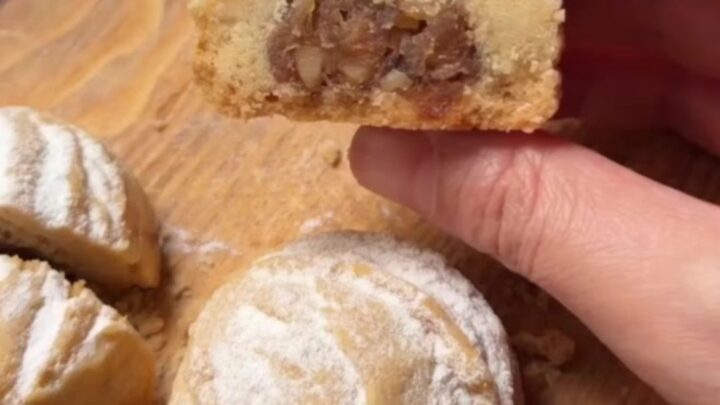
The cookies should be pale golden and firm to the touch, with a slight crackle on the surface. The filling should be bubbling inside, but not leaking out. After dusting with powdered sugar, they should look like snowy mounds, ready to be broken open to reveal the glistening apple core.
Common mistakes
One common mistake is over-toasting the flour, which can make it bitter. Keep the heat low and stir constantly. Another issue is undercooking the filling, resulting in a watery mixture that can make the cookies soggy.
Cook the filling until it's thick and jammy. Finally, be careful not to overfill the cookies, as the filling can burst out during baking. A generous spoonful is enough.
How to tell it’s done
The cookies are done when they are pale golden on the outside and feel firm to the touch. The internal temperature of the filling should be hot and bubbly, but since there are no raw proteins, the visual cues are key.
Let them cool for a few minutes before dusting with powdered sugar, as the sugar will melt slightly on the warm surface, creating a delicate glaze.
Up next · Part 3 of 3
4 variations · storage & make-ahead · 5 answers · printable card
Tips, FAQ & printable recipe (Part 3)← Back to the ingredients (Part 1)