Desserts · Part 2 of 3: Instructions
Thick Bakery-Style M&M Cookies with Soft Centers Step-by-step instructions
- Prep
- Cook
- Total
- Serves
- 12
Before you start
Before you start, make sure your butter and eggs are cold straight from the refrigerator. Measure out all your ingredients and have them ready to go. Line two baking sheets with parchment paper to prevent sticking.
If you have a stand mixer, use the paddle attachment; otherwise, a hand mixer works perfectly. Preheat your oven to 375°F (190°C) so it’s ready when you are. This recipe comes together quickly, so having everything prepped will make the process smooth and enjoyable.
Ingredients at a glance (10)
- 1 cup cold unsalted butter, cubed
- 1 cup dark brown sugar, packed
- 1/2 cup granulated sugar
- 2 large cold eggs
- 2 tsp vanilla bean paste
- 2 1/2 cups all-purpose flour
- 1 tsp baking soda
- 1 tsp kosher salt
- 1 1/2 cups M&M candies, divided
- 1 cup chocolate chunks or chopped chocolate
Instructions
Cream the Butter and Sugars
- Cream the Butter and SugarsIn a large mixing bowl, beat the cold cubed butter with the dark brown sugar and granulated sugar on medium speed until light and fluffy, about 2 to 3 minutes. Scrape down the sides of the bowl as needed. Add the cold eggs one at a time, beating well after each addition, then beat in the vanilla bean paste until fully combined. The mixture should look creamy and slightly lighter in color.Look for The butter-sugar mixture turns pale and fluffy, with no visible lumps of butter.Tip Using cold butter and eggs helps the cookies stay thick and tall—don't warm them to room temperature.
- Mix the Dry IngredientsIn a separate bowl, whisk together the all-purpose flour, baking soda, and kosher salt until evenly combined. Gradually add the dry ingredients to the butter mixture, mixing on low speed just until no streaks of flour remain. Be careful not to overmix, which can make the cookies tough.Look for The dough comes together into a cohesive, slightly sticky mass with no dry patches.Tip Sift the flour if it's lumpy to ensure even distribution of the leavener.
- Fold in the Mix-insGently fold in 1 cup of the M&M candies and the chocolate chunks using a rubber spatula until they are evenly distributed throughout the dough. Reserve the remaining 1/2 cup of M&M candies for pressing onto the tops of the cookies before baking.Look for The candies and chocolate are evenly dispersed, with some peeking through the dough.Tip Chill the dough for 30 minutes if it feels too soft to shape—this helps the cookies hold their height.
The butter and sugars should be beaten until light and fluffy, with no visible lumps of butter. The mixture will look pale and creamy, and the grains of sugar will be almost dissolved. When you add the eggs and vanilla, the mixture should be smooth and glossy, with a slight sheen. This is the foundation of your cookie dough, so take your time to get it right. If the mixture looks curdled, don’t worry—it will come together once you add the flour.
Shape and Bake
- Shape Tall Dough MoundsScoop the dough into 4-ounce portions (about 1/2 cup each) and shape them into tall, rough mounds. Do not flatten them—the height is what gives the cookies their thick, bakery-style look. Place the mounds on a parchment-lined baking sheet, spacing them about 3 inches apart to allow for spreading.Look for The dough mounds are tall and craggy, not smooth balls.Tip Use a large cookie scoop or your hands to form the mounds; keep them uneven for a rustic appearance.
- Press Extra M&Ms on TopGently press the remaining 1/2 cup of M&M candies onto the tops and sides of the dough mounds, making sure they stick. This ensures every cookie has a colorful, candy-studded surface.Look for The tops are covered with a generous layer of M&Ms, with some chocolate chunks visible.Tip Press the candies in gently so they stay put during baking but don't get buried in the dough.
- Bake Until Edges CaramelizeBake the cookies in a preheated 375°F (190°C) oven for 11 minutes, or until the edges are golden brown and caramelized. The centers will still look slightly soft and underdone—this is what creates the soft-baked texture. Remove the baking sheet from the oven and let the cookies cool on the sheet for 5 minutes before transferring to a wire rack.Look for The edges are deeply golden and crisp, while the centers are puffed and slightly glossy.Safe temperature 160°F (71°C) internal temperature (egg dishes)Tip For a more caramelized edge, bake for an extra minute, but watch closely to avoid overbaking.
The dough mounds should be tall and rough, with M&Ms and chocolate chunks visible on the surface. When they come out of the oven, the edges should be deeply golden and caramelized, while the centers are puffed and slightly glossy.
The aroma of baking butter and chocolate will fill your kitchen—this is a good sign. Let the cookies cool on the baking sheet for a few minutes before transferring them to a wire rack. They will be soft and delicate right out of the oven, so handle them gently.
Cool and Enjoy
- Cool and SetAllow the cookies to cool on the baking sheet for 5 minutes, then transfer them to a wire rack to cool completely. The centers will continue to set as they cool, leaving them soft and chewy. Serve warm for the ultimate gooey experience, or at room temperature.Look for The cookies firm up slightly but remain tender in the middle when gently pressed.Tip If serving warm, break one open to reveal the soft, stretchy center—this is the signature texture.
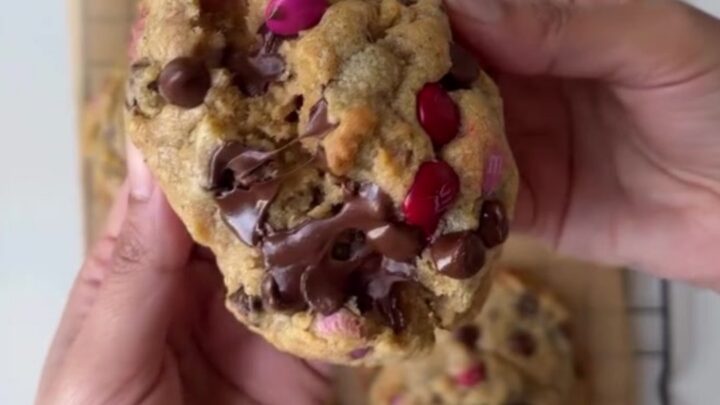
- Break Open and EnjoyFor the full experience, break a warm cookie in half to see the gooey chocolate chunks and colorful candy shells. The contrast of crunchy edges and soft center is what makes these cookies irresistible. Store any leftovers in an airtight container at room temperature for up to 4 days.Look for The cookie pulls apart with a soft, chewy middle and melted chocolate streaks.Tip Warm leftover cookies for 10 seconds in the microwave to revive the gooey texture.
After cooling, the cookies should have a crisp exterior and a soft, chewy interior. When you break one open, you’ll see melted chocolate chunks and colorful candy shells. The center should be moist and tender, not raw or doughy. If the cookies are too soft, they may need a few more minutes in the oven next time. If they’re too hard, you may have overbaked them. The perfect cookie is a balance of textures—crunchy edges, chewy middle, and melty chocolate.
Common mistakes
One common mistake is overmixing the dough after adding the flour, which can develop gluten and result in tough cookies. Mix just until no streaks of flour remain. Another pitfall is using warm butter, which causes the cookies to spread too much and lose their thickness.
Always use cold butter straight from the fridge. Also, don’t flatten the dough mounds—keeping them tall is essential for the bakery-style look. Finally, resist the urge to open the oven door during baking, as temperature fluctuations can affect how the cookies rise.
How to tell it’s done
The cookies are done when the edges are golden brown and caramelized, but the centers still look slightly soft and underdone. This is the key to achieving a soft-baked center. To check, gently press the edge of a cookie—it should be firm and crisp, while the center gives slightly.
If you prefer a more well-done cookie, bake for an additional minute, but be careful not to overbake, as the centers will continue to set as they cool. For food safety, the eggs in this recipe are fully cooked when the cookies reach an internal temperature of 160°F (71°C).
- Egg dishes: 160°F (71°C) in the thickest part
Up next · Part 3 of 3
4 variations · storage & make-ahead · 5 answers · printable card
Tips, FAQ & printable recipe (Part 3)← Back to the ingredients (Part 1)