Desserts · Part 1 of 3: Ingredients
Thick Bakery-Style Chocolate Chip Cookies: 4-Ounce Molten Center
- Prep
- Cook
- Total
- Serves
- 8
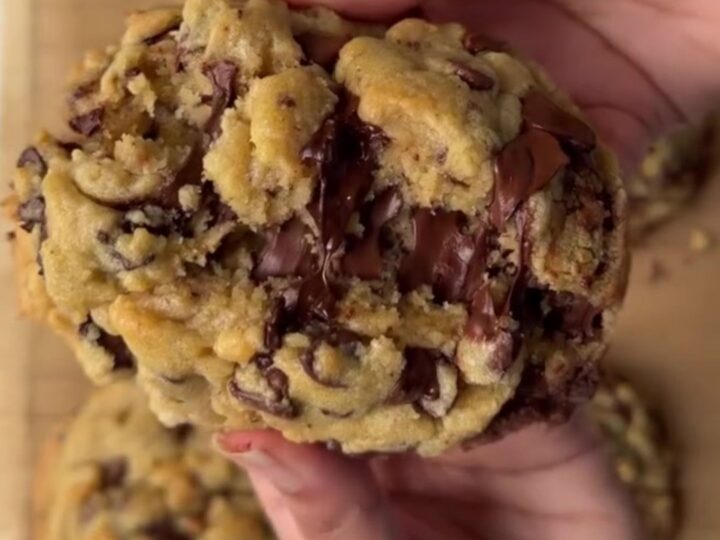
These are the cookies that make people stop mid-bite and stare. Each one weighs a full four ounces, with a shatteringly crisp golden shell that gives way to a soft, almost molten center studded with pools of melted milk chocolate. The secret is cold butter, a long freeze, and a hot oven — the same technique used by the best bakery shops.
A great chocolate chip cookie is all about contrast: a crunchy edge, a chewy middle, and chocolate that melts into ribbons. This recipe delivers that contrast on a grand scale. Each cookie is a hefty four ounces, so it bakes up thick and tall, with a crust that cracks open to reveal a soft, almost underbaked center.
The method is simple — cold butter, a quick mix, and a two-hour freeze — but every step matters. The cold dough hits the hot oven and sets the edges before the center has a chance to cook through, creating that signature molten texture. No special equipment or complicated techniques are required, just a little patience.
Ingredients
- 1 cup cold unsalted butter, cubed
- 1 cup dark brown sugar, packed
- 3 tbsp white sugar
- 1 large cold egg
- 1 large egg yolk
- 1 tbsp vanilla bean paste
- 2 cups all-purpose flour
- 1 tsp baking soda
- 1 tsp kosher salt
- 12 oz milk chocolate chunks or chips
Why this recipe works
The method relies on a simple scientific principle: cold dough, hot oven. When the frozen dough balls hit the 350°F oven, the exterior begins to set almost immediately, forming a crisp golden shell. The interior, still cold, takes longer to warm up, so it stays soft and gooey while the outside gets that satisfying crunch.
This temperature contrast is what creates the dramatic molten center that makes these cookies so special. The cold butter also helps the cookies hold their shape as they bake, giving them that tall, thick bakery-style appearance.
The ratio of brown sugar to white sugar is also key. Dark brown sugar adds moisture and a hint of molasses, which keeps the centers chewy and soft, while the smaller amount of white sugar helps the edges crisp and caramelize. The extra egg yolk adds richness and tenderness without making the dough too wet.
Together, these ingredients create a cookie that is crisp on the outside, tender on the inside, and packed with deep, caramelized flavor. The two-hour freeze is not optional; it is the step that ensures the cookies bake up thick and tall rather than spreading into thin, flat discs.
Notes and substitutions
Use cold butter straight from the fridge. This is not the time for softened butter; cold butter creates steam as it bakes, which helps the cookies rise and stay thick. Dark brown sugar gives the deepest flavor, but light brown sugar works in a pinch.
Vanilla bean paste adds a beautiful speckled look and intense vanilla flavor, but pure vanilla extract is a fine substitute. For the chocolate, choose a good-quality milk chocolate bar that you chop into chunks — the irregular shards melt into puddles better than uniform chips.
You will need a stand mixer or a hand mixer for this recipe. A 4-ounce cookie scoop is ideal for portioning the dough, but a measuring cup works just as well. The dough is quite stiff because of the cold butter, so a sturdy spatula for folding in the chocolate is helpful. If you do not have a baking stone, a heavy-duty baking sheet lined with parchment paper will work. Make sure your oven is fully preheated before baking; an accurate oven temperature is crucial for the contrast between the crisp exterior and molten center.
- vanilla bean paste: 1 tablespoon vanilla extract (add with the egg)
- milk chocolate chunks: Semisweet or dark chocolate chunks for a less sweet cookie
- dark brown sugar: Light brown sugar (the cookies will be slightly less molasses-forward)
- all-purpose flour: Bread flour for a chewier texture (use the same weight)
Equipment
- Stand mixer with paddle attachment
- Large baking sheet
- Parchment paper
- 4-ounce cookie scoop or measuring cup
- Wire rack
- Plastic wrap or airtight container
Up next · Part 2 of 3
6 steps · 17 min of cooking · what to look for at each stage
Step-by-step instructions (Part 2)