Dinner · Part 2 of 3: Instructions
Tender Short Rib Lasagna Rolls for a Gourmet Dinner Step-by-step instructions
- Prep
- Cook
- Total
- Serves
- 6
Before you start
Before beginning, ensure that the beef short ribs are fully cooked, shredded, and cooled to room temperature. Having the noodles cooked and drained in advance will make the assembly phase much smoother.
Clear a large workspace on the counter to lay out the pasta sheets, as this will allow for efficient spreading of the filling. Keep all ingredients within easy reach, including the cheese, to ensure the rolls are assembled and placed into the oven promptly.
Ingredients at a glance (4)
- 12 sheets lasagna noodles, cooked al dente
- 2 lbs beef short ribs, cooked and shredded
- 15 oz ricotta cheese
- 2 cups shredded mozzarella cheese
Instructions
Pasta and filling preparation
- Prepare the pasta and fillingCook the lasagna noodles in boiling salted water until al dente. Drain well and lay them flat on a clean surface. In a medium bowl, combine the shredded short ribs with the ricotta cheese, mixing until thoroughly combined into a spreadable consistency.Look for The noodles should be pliable but firm to the touch.Tip Pat the noodles dry with a clean kitchen towel to ensure the filling stays in place while rolling.
At the end of this phase, the noodles should be perfectly al dente and cool enough to handle. The short rib and ricotta mixture should be thick, creamy, and well-distributed, with no large clumps of meat or cheese.
Check that the mixture is uniform in texture, as this ensures each roll is equally flavorful. If the mixture feels too loose, place it in the refrigerator for ten minutes to firm up before assembly.
Assembly of the rolls
- Assemble the rollsSpread a generous tablespoon of the beef and ricotta mixture onto each lasagna noodle. Starting from one short end, roll the noodle tightly into a cylinder. Place the rolls seam-side down into a large baking dish.Look for The rolls should be snug against each other in the baking dish.Tip Use a light hand when spreading the filling to prevent the rolls from becoming too bulky to hold their shape.
The rolls should be tightly packed and uniform in size, sitting snugly in the baking dish. Each roll should be oriented seam-side down to prevent it from unrolling during the baking process. Ensure that there is a light layer of filling at the bottom of the dish if desired to prevent sticking. Check that the rolls are evenly spaced, which allows for consistent heat distribution and proper cooking of the pasta.
Final bake and serving
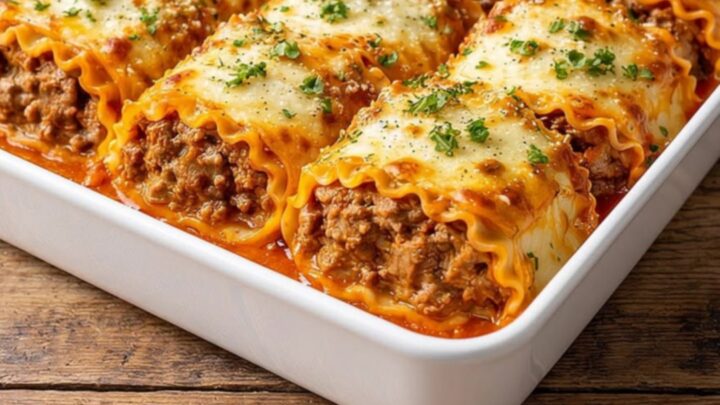
- Bake and finishTop the rolls with the shredded mozzarella cheese. Bake in a preheated oven at 375°F (190°C) for 25 minutes or until the cheese is melted and slightly golden. Ensure the center of the rolls reaches 145°F (63°C) for the meat. Let rest for 5 minutes before serving.Look for The cheese should be bubbly and browned on the edges.Safe temperature 145°F (63°C) internal temperature (steaks, chops and roasts)Tip Cover the dish with foil for the first 15 minutes if the cheese starts to brown too quickly.
The dish should smell aromatic and savory, with the cheese fully melted and bubbling. The filling should be thickened and clinging to the rolls rather than pooling at the bottom.
Before serving, the rolls should appear firm and hold their shape when lifted with a spatula. If the center still looks pale or the cheese has not browned, continue baking for an additional three minutes until the desired golden color is achieved.
Common mistakes
A common mistake is overcooking the lasagna noodles, which leads to them tearing during the rolling process; aim for a firm al dente texture. Another issue is using too much filling, which can cause the rolls to burst open while baking.
Ensure the rolls are placed seam-side down in the dish to maintain their shape. Finally, avoid using a filling that is too watery, as this will prevent the rolls from holding together properly when served.
How to tell it’s done
The lasagna rolls are done when the mozzarella topping is completely melted with light golden spots. Using a digital meat thermometer, verify that the center of the meat filling has reached an internal temperature of at least 145°F (63°C). Allow the dish to rest for five minutes after removing it from the oven to let the internal structure set, which makes serving much easier.
- Steaks, chops and roasts: 145°F (63°C) in the thickest part, then a 3-minute rest
Up next · Part 3 of 3
2 variations · storage & make-ahead · 3 answers · printable card
Tips, FAQ & printable recipe (Part 3)← Back to the ingredients (Part 1)