Dinner · Part 2 of 3: Instructions
Ten-Minute Sheet Pan Crepe Pizza Without Kneading Step-by-step instructions
- Prep
- Cook
- Total
- Serves
- 4
Before you start
Before starting, gather all ingredients and equipment. Preheat the oven to 400°F (200°C). Line a large baking sheet with parchment paper, ensuring it covers the bottom and comes up the sides slightly. Measure out the flour, milk, oil, and salt.
Shred the kaşar cheese if not pre-shredded, slice the sucuk into thin rounds, dice the bell peppers, and have the corn kernels ready. This recipe comes together quickly, so having everything prepped makes the process smooth and enjoyable.
Ingredients at a glance (9)
- 2 large eggs
- 2 cups milk
- 3 tbsp vegetable oil
- 1 cup plus 2 all-purpose flour
- 1/2 tsp salt
- 2 cups shredded kaşar cheese
- 8 oz sliced beef sucuk
- 1/2 cup diced red and green bell peppers
- 1/2 cup sweet corn kernels
Instructions
Blend and Spread the Batter
- Blend the BatterIn a blender, combine the eggs, milk, vegetable oil, all-purpose flour, and salt. Blend on high for 30 seconds until the mixture is completely smooth and no lumps remain. The batter should be pourable and about the consistency of heavy cream.Look for The batter is silky, bubble-free, and thin enough to pour easily.Tip Blend just until smooth; over-blending can make the crepe tough.
- Prepare the PanLine a large baking sheet with parchment paper, leaving some overhang on the edges. Pour the batter onto the center of the sheet, then tilt the pan to spread it into an even, thin layer that reaches all the way to the edges. The layer should be about 1/8-inch thick.Look for The batter covers the entire sheet evenly without pooling.Tip Use an offset spatula to help spread the batter if needed.
After blending, the batter should be silky and smooth with no lumps. When poured onto the sheet pan, it should spread easily and evenly, covering the entire surface in a thin, even layer. The batter should be about 1/8-inch thick, resembling a thin crepe. If there are any bubbles, they will settle during baking. The pan is ready for toppings once the batter is evenly distributed.
Top and Bake
- Add the ToppingsScatter the shredded kaşar cheese evenly over the batter, leaving a small border at the edges. Arrange the sliced beef sucuk on top, then sprinkle with the diced red and green bell peppers and sweet corn kernels. Press the toppings gently into the batter so they adhere.Look for The cheese and toppings cover the surface in an even layer.Safe temperature 160°F (71°C) internal temperature (egg dishes)Tip Distribute the sucuk and peppers so every slice gets some of each.
- Bake the PizzaPlace the baking sheet in the oven and bake at 400°F (200°C) for 25 minutes, until the crust is golden brown and puffed at the edges, and the cheese is melted and bubbly. The eggs in the batter must reach 160°F (71°C) to be fully cooked.Look for The edges are deep golden, the cheese is blistered in spots, and the top is set.Safe temperature 160°F (71°C) internal temperature (egg dishes)Tip Rotate the pan halfway through for even browning.
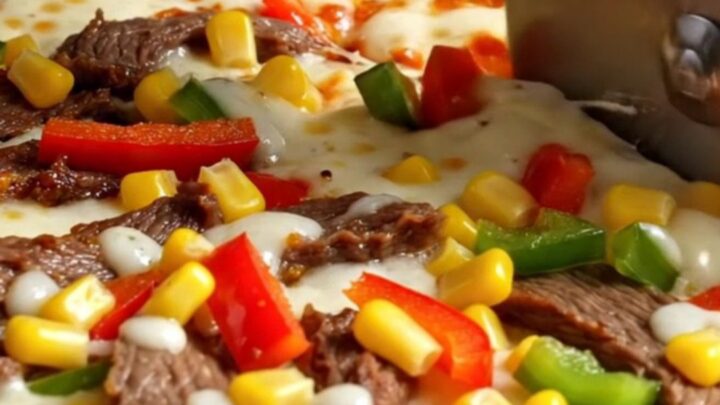
After adding the toppings, the pizza should be covered with a generous layer of cheese, sucuk slices, peppers, and corn. The cheese will melt and bubble as it bakes, and the edges of the crust will turn golden brown and crisp.
The kitchen will smell of toasted cheese and spices. By the end of baking, the pizza should be puffed at the edges and the cheese should be lightly browned in spots. Check that the crust is crisp underneath before removing from the oven.
Slice and Serve
- Slice and ServeRemove the pizza from the oven and let it cool on the pan for 5 minutes. Use a pizza wheel or a sharp knife to cut it into squares or rectangles. Serve hot, pulling apart the slices to show the cheese pull.Look for The cheese stretches when you separate the slices.Tip For extra crispness, slide the pizza off the parchment and onto a cutting board before slicing.
Once out of the oven, the pizza should be golden, bubbling, and irresistible. Let it rest for a few minutes, then slice into squares or rectangles with a pizza wheel. The cheese should pull in long, gooey strands when you separate the slices. Serve hot, and enjoy the contrast of crispy edges, tender center, and savory toppings.
Common mistakes
A common mistake is overloading the pizza with too many toppings, which can make the crust soggy. Stick to the amounts given or adjust the baking time if adding extra ingredients. Another issue is not spreading the batter evenly, leading to uneven cooking.
Take time to tilt the pan and use a spatula to ensure an even layer. Over-blending the batter can incorporate too much air, causing the crust to puff unevenly; blend just until smooth. Finally, be sure to preheat the oven fully before baking to achieve a crisp crust.
How to tell it’s done
The pizza is done when the crust is golden brown and puffed at the edges, and the cheese is melted and bubbly with some browned spots. The eggs in the batter must reach an internal temperature of 160°F (71°C) to ensure they are fully cooked.
To check, insert an instant-read thermometer into the thickest part of the pizza, avoiding the toppings. The crust should be crisp underneath, and the top should be set and slightly firm to the touch. Let the pizza rest for a few minutes before slicing to allow the cheese to set slightly.
- Egg dishes: 160°F (71°C) in the thickest part
- Steaks, chops and roasts: 145°F (63°C) in the thickest part, then a 3-minute rest
Up next · Part 3 of 3
4 variations · storage & make-ahead · 5 answers · printable card
Tips, FAQ & printable recipe (Part 3)← Back to the ingredients (Part 1)