Dinner · Part 2 of 3: Instructions
Sweet Vidalia BBQ Beef Short Ribs: 5-Ingredient Crockpot Wonder Step-by-step instructions
- Prep
- Cook
- Total
- Serves
- 6
Before you start
Pat the short ribs dry with paper towels. If they have any large fat caps, trim them slightly, but leave some fat for flavor. Slice the onions thinly so they soften and caramelize evenly.
Measure out the brown sugar and have the BBQ sauce bottle ready. No need to sear the meat—this is a true dump-and-go recipe. Ensure your slow cooker is clean and dry before adding the ingredients.
Ingredients at a glance (4)
- 5 lb bone-in English-cut beef short ribs
- 3 medium Vidalia onions, thinly sliced
- 1/2 cup packed light brown sugar
- 2 cups thick Kansas City-style BBQ sauce
Instructions
Layer and Sauce
- Layer the Ribs and AromaticsPlace the beef short ribs in the bottom of a 7-quart slow cooker, arranging them in a single layer as much as possible. Scatter the sliced Vidalia onions evenly over the ribs, then sprinkle the brown sugar over the onions.Look for The ribs should be mostly covered by the onions and sugar, creating a sweet base.Tip If the ribs are very thick, trim any large fat caps so they fit snugly in the cooker.
- Pour Over the BBQ SaucePour the BBQ sauce evenly over the onions and ribs. Use a spoon or spatula to spread it so that the sauce coats the top of the meat and drips down between the pieces.Look for The sauce should form a thick, glossy layer over the onions.Tip Don't stir—layering keeps the onions on top where they soften and caramelize.
At the end of this phase, the slow cooker contains a neat layer of ribs, topped with a blanket of raw onions and brown sugar, all covered by a glossy pour of BBQ sauce.
The colors are deep and appetizing—mahogany sauce against the pale onions. The cooker is ready to go, and the anticipation builds.
Slow Cook to Tender
- Slow Cook on LowCover the slow cooker and cook on low heat for 8 hours, or until the meat is fork-tender and easily pulls away from the bone. Avoid lifting the lid during cooking to keep the heat steady. Let it rest for 3 minutes before slicing.Look for The sauce will be bubbling gently around the edges and the meat will look deeply browned.Safe temperature 145°F (63°C) internal temperature (steaks, chops and roasts)Tip If your slow cooker runs hot, check at 7 hours. The meat should shred easily with a fork.
- Check for DonenessAfter 8 hours, use tongs to gently test a rib. The meat should be so tender that it begins to pull apart with minimal pressure. If it's still firm, continue cooking for 30-60 minutes more. Let it rest for 3 minutes before slicing.Look for The meat should be falling off the bone and the sauce thickened.Safe temperature 145°F (63°C) internal temperature (steaks, chops and roasts)Tip If you prefer a thicker sauce, remove the ribs and simmer the sauce on the stovetop for 10 minutes.
After hours of gentle bubbling, the kitchen smells sweet and smoky. The sauce has darkened to a rich mahogany, and the meat is visibly shrinking from the bones. The onions have collapsed into a soft, jammy mass. A gentle poke with a fork shows the meat ready to fall apart.
Rest and Serve
- Rest and ServeTurn off the slow cooker and let the ribs rest in the sauce for 10 minutes. Using a carving fork, lift the ribs out of the cooker, letting excess sauce drip off, and place them on a serving platter. Spoon some of the onions and sauce over the top.Look for The ribs should be glistening with sauce and the onions jammy and caramelized.Safe temperature 145°F (63°C) internal temperature (steaks, chops and roasts)Tip Letting the meat rest allows the juices to redistribute, keeping it moist.
- Finish with Extra SauceServe the ribs hot, with any remaining sauce from the cooker passed at the table. The sauce will have reduced and intensified in flavor—perfect for spooning over mashed potatoes or rice.Look for The sauce should be thick enough to coat the back of a spoon.Tip Skim off any excess fat from the sauce before serving, if desired.
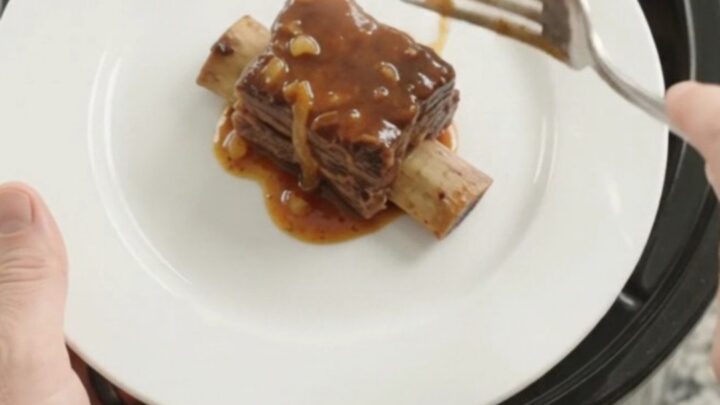
The ribs are lifted out of the cooker, glistening with sticky sauce, and placed on a serving plate. The onions cling to the meat, and the sauce pools around the base. The meat is so tender it nearly falls off the fork, and the first bite is a perfect balance of sweet, tangy, and beefy.
Common mistakes
One common mistake is lifting the lid to check on the ribs, which lets heat escape and extends cooking time. Trust the process and keep the lid on. Another is using too-thin BBQ sauce, which can become watery and not cling to the meat.
Stick with thick, rich sauces. Also, don't overcrowd the slow cooker—if the ribs are stacked too high, they won't cook evenly. Use a 7-quart cooker for best results. Finally, don't skip the resting time; it helps the meat stay juicy.
How to tell it’s done
The short ribs are done when a fork inserted into the thickest part of the meat twists easily with no resistance. The meat should be pulling away from the bone, and the sauce should have thickened and darkened.
For food safety, the internal temperature of the beef should reach at least 145°F (63°C) when measured with an instant-read thermometer, but because of the long cooking time, it will likely be much higher. Let the ribs rest for at least 3 minutes before serving to allow the juices to settle.
- Steaks, chops and roasts: 145°F (63°C) in the thickest part, then a 3-minute rest
Up next · Part 3 of 3
4 variations · storage & make-ahead · 5 answers · printable card
Tips, FAQ & printable recipe (Part 3)← Back to the ingredients (Part 1)