Dinner · Part 2 of 3: Instructions
Sweet Glazed Meatloaf for a Comforting Dinner Step-by-step instructions
- Prep
- Cook
- Total
- Serves
- 6
Before you start
Before beginning, ensure all ingredients are at room temperature to promote even cooking. Preheat the oven to 375°F (190°C) and prepare a loaf pan with a sheet of aluminum foil, leaving enough excess to lift the finished meatloaf out easily.
Measure out the glaze ingredients and have them ready to mix while the loaf is in its first stage of baking. Organize the workspace to allow for efficient mixing and shaping, keeping the process clean and orderly from start to finish.
Ingredients at a glance (6)
- 2 lb ground meat
- 1 cup breadcrumbs
- 1 egg, lightly beaten
- 1/2 cup ketchup
- 1/4 cup brown sugar
- chopped green herbs, for serving
Instructions
Mixing the meat base
- Prepare the meat mixtureIn a large bowl, combine the ground meat, breadcrumbs, and egg. Mix gently until just incorporated, being careful not to overwork the meat to maintain a tender final texture.Look for The mixture should be uniform and hold its shape when pressed together.Tip Mix by hand using a light touch to prevent the meatloaf from becoming dense or tough.
The mixture should look consistent with the breadcrumbs and egg fully incorporated into the ground meat. It should feel slightly tacky but not overly sticky, and it should hold its shape well when pressed into a mound in the bowl before transferring to the pan.
Baking the meatloaf
- Form and bake the loafTransfer the mixture into an aluminum foil loaf pan. Shape it into an even loaf. Bake in a preheated oven at 375°F (190°C) until lightly browned.Look for The meatloaf should be firm to the touch and shrinking slightly from the edges of the pan.Tip Ensure the loaf is shaped evenly to promote uniform cooking throughout the process.
The meatloaf should be baked until it is firm to the touch and the edges have started to pull away slightly from the sides of the pan. It will look set and brown, providing a solid foundation for the sweet glaze to sit on during the final step.
Glazing and final cook
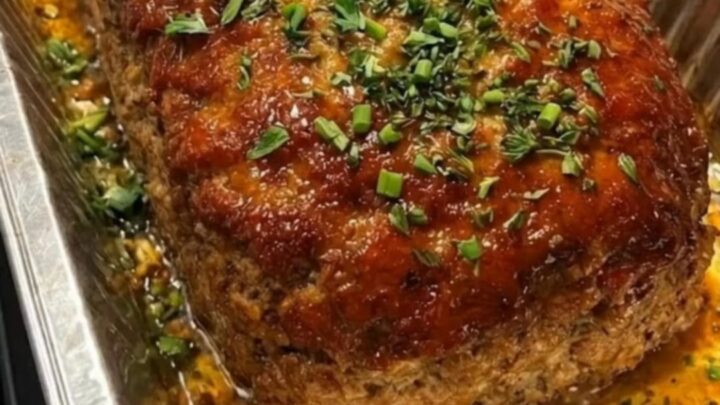
- Glaze and finish cookingWhisk together the ketchup and brown sugar in a small bowl. Spread the glaze evenly over the meatloaf. Continue baking until the internal temperature reaches 160°F (71°C) for ground meat and eggs. Let it rest for 10 minutes before slicing and garnishing with chopped green herbs.Look for The glaze should be bubbly, caramelized, and dark red, with the meat fully cooked through.Safe temperature 160°F (71°C) internal temperature (ground meat)Tip The resting period is essential to allow the juices to redistribute, ensuring every slice remains moist.
The glaze should be bubbling slightly and have turned a deep, glossy red color. The aroma should be sweet and savory. Check with a thermometer to ensure the center has reached the required temperature, then remove to rest before slicing for the final presentation.
Common mistakes
Avoid overworking the meat mixture, as this will lead to a dense, tough texture instead of a tender bite.
Another common mistake is skipping the resting period; slicing the meatloaf immediately after it comes out of the oven causes the juices to escape, leading to a dry result.
Additionally, be careful not to apply the glaze too early, as the high sugar content can cause it to burn before the meat is fully cooked through to the center of the loaf.
How to tell it’s done
The meatloaf is perfectly cooked when it reaches an internal temperature of 160°F (71°C). At this point, the center will be firm, and the juices should run clear. Using a meat thermometer is the most reliable way to ensure safety and quality.
Once the target temperature is hit, remove the loaf from the oven and allow it to rest for at least 10 minutes. This resting time is vital, as it allows the internal juices to settle, ensuring the slice remains juicy.
- Ground meat: 160°F (71°C) in the thickest part
- Egg dishes: 160°F (71°C) in the thickest part
Up next · Part 3 of 3
2 variations · storage & make-ahead · 3 answers · printable card
Tips, FAQ & printable recipe (Part 3)← Back to the ingredients (Part 1)