Breakfast · Part 2 of 3: Instructions
Sweet Corn Arepas Stuffed with Melted Quesillo Cheese Step-by-step instructions
- Prep
- Cook
- Total
- Serves
- 2
Before you start
Before starting, ensure all ingredients are at room temperature to allow for even blending. Prepare your workspace by setting out the blender and the cast-iron griddle. Measure the corn, masarepa, and sugar precisely to ensure the batter consistency is correct.
Have your quesillo cheese sliced into thick pieces so it is ready for immediate addition to the griddle. Ensure your spatula is clean and ready for flipping the delicate corn cakes without breaking them.
Ingredients at a glance (6)
- 300 g fresh sweet yellow corn kernels
- 60 g masarepa cornmeal
- 30 g panela sugar
- 1/4 cup milk
- 2 tbsp salted butter
- 150 g thick quesillo cheese
Instructions
Batter preparation
- Prepare the batterCombine the fresh sweet yellow corn kernels, masarepa cornmeal, panela sugar, milk, and a portion of the butter in a high-speed blender. Blend the mixture on high speed until it reaches a thick, uniform consistency. The batter should be smooth enough to pour onto the griddle but thick enough to hold its shape while cooking.Look for The mixture is thick and uniform.Tip Do not over-blend the corn, as keeping a bit of texture can add to the authenticity of the corn cake.
The batter must look thick and creamy, similar to a pancake batter but with more body due to the corn solids. There should be no large lumps of cornmeal remaining, and the color should be a vibrant, uniform yellow. Check the consistency with a spoon; it should coat the back of the spoon heavily without running off too quickly. If it is too thin, add a tiny bit more masarepa.
Griddling the cakes
- Sear the corn cakesHeat a cast-iron griddle over medium heat and grease it lightly with the remaining salted butter. Pour the corn batter onto the griddle to form two circular cakes. Cook for approximately 4 minutes per side. Ensure the cakes develop a deep, caramelized golden-brown color on the exterior before flipping them carefully with a spatula.Look for The cakes are caramelized and golden brown.Tip Use a heavy-bottomed cast iron pan for the best heat distribution and crust development.
The corn cakes should sound a gentle sizzle when they hit the buttered griddle. Watch for small bubbles forming on the surface as they cook, which indicates that the leavening is working and the interior is becoming light. The bottom should be a rich, caramelized brown. Once you see the edges firming up and turning golden, it is time to flip. The smell should be distinctly toasted and sweet.
Stuffed completion
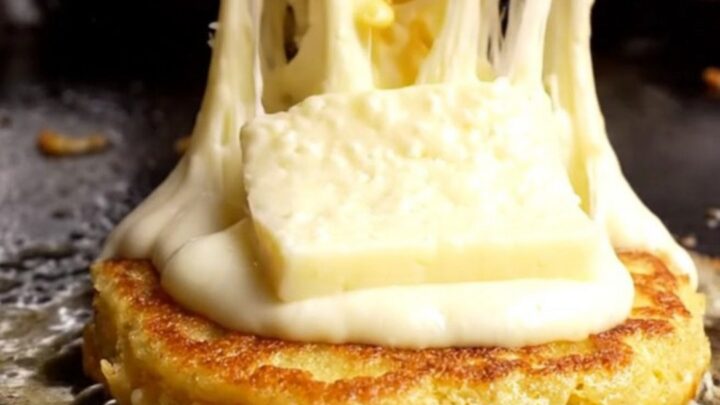
- Melt the cheeseOnce the corn cakes are flipped, place the thick slices of quesillo cheese onto one of the cakes and cover it with the second cake to form a sandwich. Continue cooking for a few additional moments until the cheese is thoroughly melted and creates a dramatic stretch when pulled apart. Serve immediately while hot.Look for The cheese is melted and stretchy.Tip Press down lightly with your spatula to encourage the cheese to melt faster through the center.
The final phase involves the transformation of the cheese. The arepas should feel slightly springy to the touch. As you sandwich the cheese, keep an eye on the edges; if they start to melt out, turn the heat down slightly.
The final product should be steaming, with the cheese visibly softened through the center. Ensure the arepas are served while the cheese is still at its peak elasticity for the best texture.
Common mistakes
A common mistake is using canned corn instead of fresh, which lacks the necessary starch and moisture balance required for the batter. Another error is neglecting the heat control; if the griddle is too hot, the sugars in the corn and panela will burn quickly, creating a bitter taste.
Avoid flipping the arepas too early, as they need to set firmly on one side to prevent tearing. Ensure the cheese is not sliced too thin, or it will disappear into the batter.
How to tell it’s done
The arepas are done when both sides are caramelized to a deep golden-brown color and the interior is fully set. The quesillo cheese should be soft and elastic, showing a distinct stretch when the arepa is pulled apart.
If the cheese is still firm, continue cooking on low heat for another minute, ensuring the corn exterior does not darken too quickly. The final result should be a balance of a crispy crust and a hot, molten cheese center.
Up next · Part 3 of 3
2 variations · storage & make-ahead · 3 answers · printable card
Tips, FAQ & printable recipe (Part 3)← Back to the ingredients (Part 1)