Desserts · Part 2 of 3: Instructions
Sugar-Free Turtle Lush Dessert with Toasted Pecans Step-by-step instructions
- Prep
- Cook
- Total
- Serves
- 12
Before you start
Before beginning, gather all your ingredients and equipment to ensure a smooth assembly process. Ensure your pre-made cream cheese filling and chocolate pudding are chilled and ready to spread.
Clear a flat space in your refrigerator to accommodate the baking pan, as quick chilling between steps helps maintain clean layers. If your chopped pecans are not already toasted, toast them in a dry skillet over medium heat for three to five minutes until fragrant, then let them cool completely before starting.
Ingredients at a glance (7)
- 1 sugar-free pecan crust, store-bought or made ahead
- 1 1/2 cups sugar-free cream cheese filling, store-bought or made ahead
- 2 cups sugar-free chocolate pudding, store-bought or made ahead
- 2 cups sugar-free whipped cream
- 1/3 cup sugar-free caramel sauce
- 1/3 cup sugar-free chocolate sauce
- 1/2 cup toasted chopped pecans
Instructions
Base and Cream Cheese Layer
- Spread Cream Cheese LayerSpread the sugar-free cream cheese filling evenly over the bottom of the sugar-free pecan crust, smoothing it into a flat layer with a spatula.Look for The cream cheese layer is smooth and spread evenly.Tip Ensure the pre-made crust is completely cold before adding the filling.
At the end of this first phase, the cream cheese filling should be spread in an even, smooth sheet from edge to edge, completely sealing the pecan crust. There should be no crumbs lifting up into the white layer, indicating a well-set and clean base.
Pudding and Whipped Cream Layers
- Add Chocolate PuddingCarefully spread the sugar-free chocolate pudding over the cream cheese layer, ensuring it forms a distinct, even layer without mixing into the cream cheese below.Look for The pudding forms a clean, distinct layer.Tip Use a gentle hand to avoid disturbing the cream cheese underneath.
- Apply Whipped CreamGently spread the sugar-free whipped cream over the chocolate pudding layer, smoothing the top to create a clean, white surface.Look for The whipped cream forms a flat, clean layer.Tip Dollop the whipped cream over the pudding first, then spread gently.
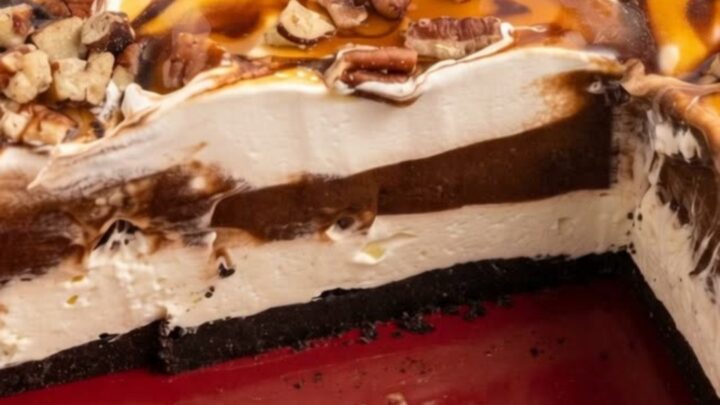
After completing this phase, the dark chocolate pudding layer should be fully set and covered by a fluffy, pristine white blanket of whipped cream. The top should be flat and smooth, with no chocolate pudding peeking through the whipped layer, ensuring a clean, striking contrast when the dessert is sliced.
Toppings and Chilling
- Drizzle SaucesDrizzle the sugar-free caramel sauce and sugar-free chocolate sauce back and forth over the whipped cream layer in a decorative, crisscross pattern.Look for The sauces form a beautiful, glistening web.Tip Warm the sauces slightly if they are too thick to drizzle smoothly.
- Add Pecans and ChillSprinkle the toasted chopped pecans evenly over the drizzled sauces, then refrigerate the dessert for at least 4 hours to let the layers set completely before slicing.Look for The dessert is cold and firm.Tip Wipe the knife with a warm, damp cloth between cuts for clean slices.
The finished dessert should showcase a glossy, glistening web of caramel and chocolate sauces resting on the whipped cream, generously topped with golden-brown toasted pecans.
When a slice is lifted, the layers must remain distinct and upright, with no sliding, dripping, or bleeding between the chocolate, cream cheese, and crust.
Common mistakes
One common mistake is assembling the dessert while the toasted pecans are still warm. Warmth will melt the whipped cream, turning your distinct layers into a muddy, runny mess.
Another error is failing to spread the cream cheese filling gently, which can tear up the crust and mix crumbs into the white layer. Finally, avoid rushing the chilling process; the dessert needs at least four hours in the refrigerator to fully set and stabilize.
How to tell it’s done
Since this is a chilled dessert that does not contain raw meats or raw eggs, doneness is determined by the texture and stability of the chilled layers. The lush is ready when the entire pan is cold and firm to the touch.
When you insert a sharp knife or a dessert server, it should slide through the layers cleanly, yielding a slice that holds its sharp, rectangular shape on the plate without collapsing or spilling onto the sides.
Up next · Part 3 of 3
2 variations · storage & make-ahead · 3 answers · printable card
Tips, FAQ & printable recipe (Part 3)← Back to the ingredients (Part 1)