Desserts · Part 2 of 3: Instructions
Sugar-Free Strawberry Angel Food Cake Lush Step-by-step instructions
- Prep
- Cook
- Total
- Serves
- 12
Before you start
Before starting the assembly, organize all equipment and ingredients on your workspace. Ensure the cream cheese has sat at room temperature for at least one hour to soften completely. Wash, dry, and hull the fresh strawberries, then slice them evenly.
Thaw the sugar-free whipped topping in the refrigerator if it was frozen. Prepare a clean 9x13-inch glass baking dish or a similar deep-sided serving dish to showcase the beautiful layers. Having everything ready ensures a smooth, quick assembly process.
Ingredients at a glance (6)
- 1 sugar-free angel food cake, store-bought or made ahead, cut into 1-inch cubes
- 8 oz cream cheese, softened
- 1 cup powdered sugar-free sweetener
- 8 oz sugar-free whipped topping, thawed
- 1 lb fresh strawberries, hulled and sliced
- 1/3 cup sugar-free strawberry glaze
Instructions
Prepping the Base and Cream Fillings
- Cube the Angel Food CakeCut the sugar-free angel food cake into uniform 1-inch cubes. Distribute the cake pieces evenly across the bottom of a 9x13-inch glass baking dish, pressing them down gently to form a consistent, snug base layer.Look for The cake pieces should cover the bottom of the dish completely without large gaps.Tip Use a serrated bread knife to cut the angel food cake cleanly without squishing its delicate structure.
- Prepare the Cream FillingIn a large mixing bowl, beat the softened cream cheese and powdered sugar-free sweetener together using an electric mixer on medium speed until the mixture is completely smooth and creamy. Gently fold in the thawed sugar-free whipped topping with a rubber spatula until fully incorporated.Look for The filling should be light, fluffy, and free of any cream cheese lumps.Tip Use a rubber spatula to fold the whipped topping gently so you do not deflate its airy volume.
The angel food cake is neatly cubed into uniform pieces, and the cream cheese mixture is completely smooth, light, and free of lumps, ready to be folded with the whipped topping.
Assembling the Layers
- Spread the Cream LayerSpoon the whipped cream cheese mixture over the cubed angel food cake base. Use an offset spatula to spread the cream evenly, ensuring it fills any spaces between the cake pieces and forms a smooth, flat top surface.Look for The cream layer should completely seal the cake underneath from edge to edge.Tip Dolloping the cream in several spots over the cake before spreading makes it much easier to level without disturbing the cake pieces.
- Glaze the Strawberries and LayerIn a medium bowl, combine the sliced fresh strawberries and the sugar-free strawberry glaze, tossing gently until every strawberry piece is well coated. Ladle the glazed strawberry mixture evenly over the cream cheese layer, spreading it to the edges of the dish.Look for The strawberries should form a vibrant, glossy, and complete top layer.Tip Ensure the strawberries are thoroughly dried after washing so the glaze adheres perfectly and does not run.
The cake cubes form an even base in the dish, topped by a smooth, level layer of the cream mixture. The fresh strawberries are thoroughly coated in the glossy glaze and spread evenly over the cream.
Chilling and Setting
- Chill the Dessert to SetCover the baking dish tightly with plastic wrap and transfer it to the refrigerator. Chill the dessert for at least 4 hours, or preferably overnight, to allow the layers to set firmly and the flavors to meld beautifully before slicing.Look for The dessert is ready when the cream layer is firm and a spatula cleanly lifts a slice.Tip Chilling for the full overnight period yields the cleanest, most defined slices.
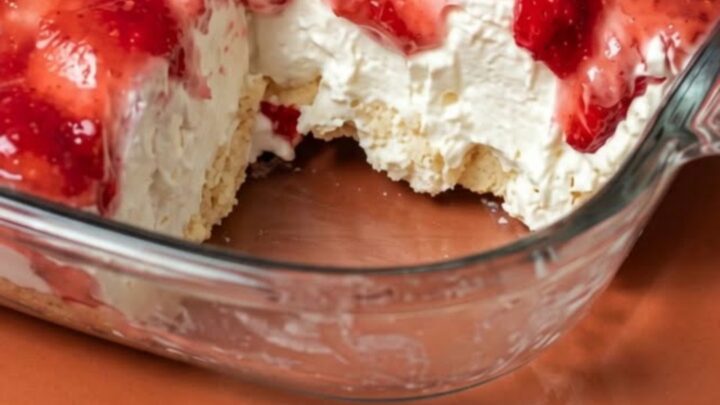
After several hours of chilling in the refrigerator, the dessert has firmed up completely. The distinct layers are clearly visible through the glass dish, and the top strawberry glaze is set, glossy, and absolutely beautiful.
Common mistakes
One common mistake is assembling the dessert with warm ingredients or wet strawberries. If the strawberries are still wet from washing, the excess water will dilute the glaze and cause the top layer to run, making the cake soggy.
Another error is failing to soften the cream cheese fully, which leads to white flecks of unblended cheese throughout the cream layer. Lastly, do not rush the chilling time; the dessert needs several hours to set properly so the layers merge into a cohesive slice.
How to tell it’s done
Because this is a no-bake assembled dessert, doneness is determined by the texture and stability of the layers after chilling.
The lush is ready when the cream cheese layer feels firm to a gentle touch and the strawberry glaze has set into a glossy, non-runny topping.
When you insert a spatula, it should slide cleanly through the layers, lifting a distinct, intact slice that holds its shape on the plate without collapsing or sliding apart.
Up next · Part 3 of 3
3 variations · storage & make-ahead · 4 answers · printable card
Tips, FAQ & printable recipe (Part 3)← Back to the ingredients (Part 1)