Desserts · Part 1 of 3: Ingredients
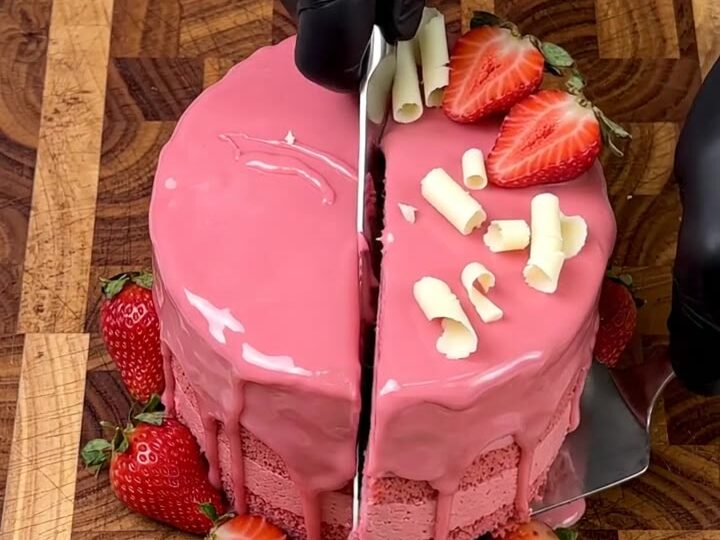
Strawberry Pink Velvet White Chocolate Mousse Cake
- Prep
- Cook
- Total
- Serves
- 12
This Strawberry Pink Velvet White Chocolate Mousse Cake is a stunning centerpiece that combines ruby strawberries, a fluffy white chocolate mascarpone mousse, and a tender pink velvet sponge, all wrapped in a glossy pink glaze. The layers create a beautiful cross-section that's as delicious as it is photogenic.
Perfect for birthdays, anniversaries, or any celebration, this cake delivers elegance and flavor in every bite. The preparation is straightforward, and the result is a tall, impressive dessert that will have everyone reaching for seconds.
Imagine a cake that tastes as beautiful as it looks—that's this Strawberry Pink Velvet White Chocolate Mousse Cake. Ruby strawberries bring a vibrant color and fresh tartness, while the white chocolate mascarpone mousse adds a creamy, luxurious texture. The pink velvet sponge provides a soft, tender crumb that soaks up the mousse beautifully.
Finished with a glossy pink glaze and crowned with berries and chocolate curls, this cake is a feast for the eyes and the palate. Whether you're a seasoned baker or a confident home cook, this recipe guides you through each step to create a showstopping dessert.
Ingredients
- 2 cups ruby strawberries, hulled and halved
- 8 oz Belgian white coverture chocolate, grated
- 1 cup mascarpone cheese, softened
- 1 1/2 cups heavy cream, cold
- 1/2 cup confectioners' sugar
- 1 tsp vanilla extract
- 1 9-inch pink velvet sponge cake layer (store-bought or made ahead)
- 1 cup diced strawberries
- 1 cup glossy pink glaze
Why this recipe works
The method layers flavors and textures in a way that builds a cohesive dessert. The ruby strawberries not only provide a striking visual border but also offer a bright, fruity contrast to the rich white chocolate mousse.
The mousse, made with mascarpone and whipped cream, is light yet stable, holding its shape while remaining airy on the tongue. The pink velvet sponge adds a delicate crumb that absorbs the mousse's moisture, creating a harmonious blend of soft, creamy, and juicy elements in every forkful.
Chilling the assembled cake is crucial—it allows the mousse to set completely, ensuring clean, sharp slices. The glossy pink glaze not only adds a professional finish but also seals in moisture, keeping the cake fresh. The technique of lining the pan with strawberry halves creates a beautiful exterior that looks like a work of art when unmolded. This recipe is designed to be forgiving, with each step building on the last to guarantee a stunning result.
Notes and substitutions
For the best flavor, use ruby strawberries if available; they have a distinct pink-red hue and a slightly floral sweetness. If you can't find them, regular strawberries work, but you may want to add a touch of pink food coloring to the mousse or glaze to maintain the pink aesthetic.
The white chocolate should be high-quality—look for one with at least 30% cocoa butter for smooth melting and a rich taste. Belgian coverture is ideal, but any good white chocolate bar will do.
The pink velvet sponge can be store-bought or made ahead. If making from scratch, a standard vanilla sponge with pink food coloring works perfectly. The mousse requires cold heavy cream for proper whipping; chill the bowl and beaters for best results. A springform pan is essential for easy unmolding, and a piping bag helps create even layers. If you don't have a piping bag, you can spread the mousse with a spatula.
- ruby strawberries: regular strawberries plus a few drops of red food coloring for the pink hue
- Belgian white coverture chocolate: high-quality white chocolate bars (at least 30% cocoa butter)
- mascarpone cheese: full-fat cream cheese, softened, for a slightly tangier mousse
- pink velvet sponge cake: store-bought white cake mix colored pink with food coloring
Equipment
- 9-inch springform pan
- box grater
- piping bag with round tip
- offset spatula
- cake server
- mixing bowls
- electric mixer
Up next · Part 2 of 3
7 steps · 30 min of cooking · what to look for at each stage
Step-by-step instructions (Part 2)