Desserts · Part 2 of 3: Instructions
Strawberry Mille-Feuille with Pistachio Cream: Crisp Pastry, Easy Assembly Step-by-step instructions
- Prep
- Cook
- Total
- Serves
- 8
Before you start
Gather every component before you start, because the stack assembles quickly and the cream should not sit at room temperature. Check that the puff pastry sheets are baked, golden and fully cooled, and set them flat on a board or tray. Hull the strawberries and pat them dry with paper towels, then slice the larger ones thinly and keep a few whole for the centre.
Chop the pistachios by hand and set them in a small pile. Grate the white chocolate after a short chill so it produces fine shavings and a few curls. Chill the heavy cream, the mixing bowl and the whisk for 15 minutes. Fit a piping bag with a star tip and have a serrated knife, a sieve for the powdered sugar and a small offset spatula ready on the counter.
Ingredients at a glance (8)
- 2 sheets baked puff pastry sheets
- 1 lb fresh strawberries, hulled, a few kept whole, the rest sliced
- 1/2 cup shelled pistachios, finely chopped, plus extra for garnish
- 1/2 cup pistachio cream or pistachio paste
- 2 cups cold heavy cream
- 1 cup vanilla pastry cream or mascarpone cream base
- 1/4 cup confectioners' sugar, plus extra for dusting
- 2 oz white chocolate, for grating and drizzling
Instructions
Prepare the pastry and fruit
- Prepare the pastry and fruitLay the baked puff pastry sheets on a board. Hull the strawberries, keep a few whole for the centre, and slice the rest thinly. Chop the pistachios and set them aside in a small pile for the garnish.Look for Pastry is golden, flat and fully crisp; berry slices are even and thin.Tip Pat the strawberries dry so the cream does not slip between the layers.
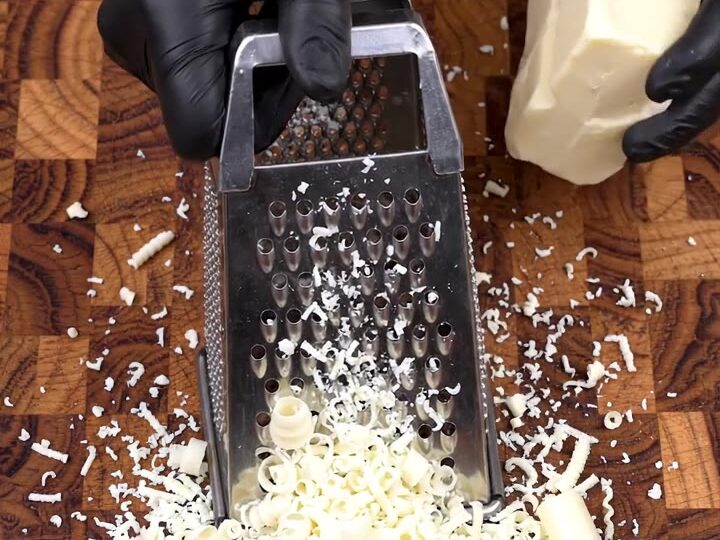
- Grate the white chocolateHold the block of white chocolate against the large holes of a box grater over the board. Grate until you have fine shavings, then curl a few longer ribbons. Set them aside for scattering.Look for Fine shavings fall freely and a few ribbons curl at the edges.Tip Chill the chocolate for 10 minutes first so it grates cleanly.
The pastry sheets are golden, flat and cool, and the strawberries are hulled, dry and sliced into even pieces. The pistachios are chopped into small, bright green pieces and the white chocolate has been grated into fine shavings with a few ribbons. Before moving on, check that the pastry has no soft or damp spots, since any softness will show in the finished layers. Keep the chilled fruit and garnishes covered until you need them so nothing dries out or warms up while the cream is being made.
Whip and pipe the creams
- Whip the vanilla creamWhip the cold heavy cream with the confectioners' sugar until soft peaks form. Fold in the vanilla cream base until smooth and glossy. Keep the cream chilled until you assemble.Look for The cream holds soft peaks and looks smooth and glossy.Tip Stop whipping as soon as peaks hold to keep the texture tender.
- Make the pistachio creamBeat the pistachio cream with a spoonful of the vanilla cream until it is smooth. Spoon it into a piping bag fitted with a star tip, ready for the rosettes.Look for The pistachio cream is pale green, smooth and piping-ready.Tip Warm the pistachio cream slightly so it pipes more easily.
- Layer the pastry and creamSet one pastry sheet on the board and spread a smooth layer of vanilla cream over it. Pipe pistachio cream rosettes down the length of the pastry in a green and cream pattern.Look for The cream is evenly spread and the rosettes sit in a neat row.Tip Work quickly so the cream stays firm and the rosettes keep their shape.
- Add the strawberriesArrange the sliced strawberries in overlapping rows across the cream. Place the whole strawberries in the centre of the layer for colour.Look for Overlapping slices cover the cream evenly with bright red edges.Tip Use the largest berries for the centre row so the stack looks full.
The heavy cream and vanilla cream base have been whipped to soft peaks and the cream looks smooth, glossy and set enough to hold its shape on a spoon. The pistachio cream is pale green, smooth and fits easily through the star tip. Before going on, lift the whisk and check that the peaks stand upright without curling. If the cream looks grainy, stop whipping immediately and fold it gently by hand. Keep the piping bag cool and the vanilla layer chilled so the rosettes hold their shape when placed on the pastry.
Assemble the stack
- Top and finish the stackSet the second pastry sheet on the assembled layers and press gently. Drizzle melted white chocolate over the top, dust with confectioners' sugar, and scatter the chopped pistachios and shavings.Look for The top sheet sits flat and the garnish covers the surface.Tip Press lightly so the layers bond without squeezing out the cream.
- Chill, cut and plateRefrigerate the stack for 60 minutes so the cream sets. Cut with a serrated knife using a sawing motion, and plate the slices on the board with pistachio pieces and extra sugar dust around them.Look for The cream is firm enough to hold clean slice edges.Tip Wipe the knife between cuts to keep every layer sharp.
The layers are built in order: pastry, vanilla cream, pistachio rosettes, strawberries, then the top pastry sheet. Each layer should sit level and each rosette should be evenly spaced along the length of the pastry. The strawberries should cover the cream in overlapping rows with the whole berries clustered in the centre.
Before you finish, press the top sheet gently and check that the stack is straight. Then add the white chocolate drizzle, the powdered sugar and the chopped pistachios, and chill the stack so the cream sets firm enough to slice cleanly.
Common mistakes
The most common mistake is letting the cream warm while you work, which makes it slack and causes the layers to slide. Keep the bowl chilled and assemble in small batches. A second mistake is using wet strawberries, since moisture seeps into the cream and softens the pastry; pat the fruit dry and slice it just before assembly.
Pressing too hard on the top pastry squeezes the cream out to the sides and flattens the rosettes, so set the sheet down lightly. Overfilling the piping bag makes the pistachio cream hard to control, so fill it only halfway. Finally, cutting before the stack has chilled makes the layers shift; give it the full resting time. Taking these steps avoids most of the problems and keeps the stack tall and tidy.
How to tell it’s done
This dessert is ready when the cream holds its shape and the stack is firm enough to lift a clean slice without the layers sliding. The pastry should look crisp and golden at the edges, and the cream should look smooth, glossy and set rather than soft. Press a slice gently with a finger: the pastry should spring back slightly and the cream should not spread.
A chilled stack that has rested for an hour will cut with clear, even bands of pastry, cream and fruit. If the cream still looks loose, return the stack to the refrigerator for another 15 minutes before serving. There is no heating step, so the texture is the main sign that the dessert is ready to serve.
Up next · Part 3 of 3
4 variations · storage & make-ahead · 5 answers · printable card
Tips, FAQ & printable recipe (Part 3)← Back to the ingredients (Part 1)