Dinner · Part 2 of 3: Instructions
Sticky Hawaiian Chicken Thighs: An Easy Three-Ingredient Sheet Pan Dinner Step-by-step instructions
- Prep
- Cook
- Total
- Serves
- 6
Before you start
Before starting, ensure the chicken is thoroughly thawed if previously frozen, as this is vital for safe and even cooking. Remove the chicken from the refrigerator about 20 minutes prior to seasoning to take the chill off, which helps the meat cook more uniformly.
Preheat your oven fully to the target temperature before placing the tray inside, as a hot oven is the secret to achieving that characteristic sticky, caramelized exterior on the chicken skin.
Ingredients at a glance (4)
- 6 pieces chicken thighs, bone-in and skin-on
- 1 cup tangy barbecue sauce
- 1 cup pineapple chunks, fresh or canned
- Scallions, sliced, for serving
Instructions
Preparation and Arrangement
- Prepare the ChickenPreheat the oven to 400°F (200°C). Line a large baking sheet with aluminum foil for easy cleanup. Arrange the chicken thighs skin-side up on the prepared pan, ensuring they are not touching for even cooking.Look for The oven is preheated and the chicken is arranged in a single layer.Tip Ensure the chicken is patted dry with paper towels before placing on the pan to encourage better skin crisping.
The baking sheet is lined with foil, and the chicken thighs are arranged skin-side up. The oven is preheated and ready to go. The chicken feels cool, and the surface is dry, which sets the stage for a perfectly crisp skin once the heat hits the fat.
Glazing and Roasting
- Glaze and BakeDrizzle the barbecue sauce generously over each chicken thigh, coating the skin thoroughly. Distribute the pineapple chunks around and between the chicken pieces on the tray. Place the tray in the oven and bake until the sauce is bubbling and the chicken is fully cooked.Look for The sauce is thick, bubbly, and deeply caramelized, and the chicken skin is golden brown.Safe temperature 165°F (74°C) internal temperature (poultry)Tip If the sauce starts to darken too quickly, loosely cover the edges of the chicken with foil.
The kitchen should smell of sweet, smoky barbecue sauce and roasted pineapple. The sauce on the chicken should be bubbling vigorously and deepening in color.
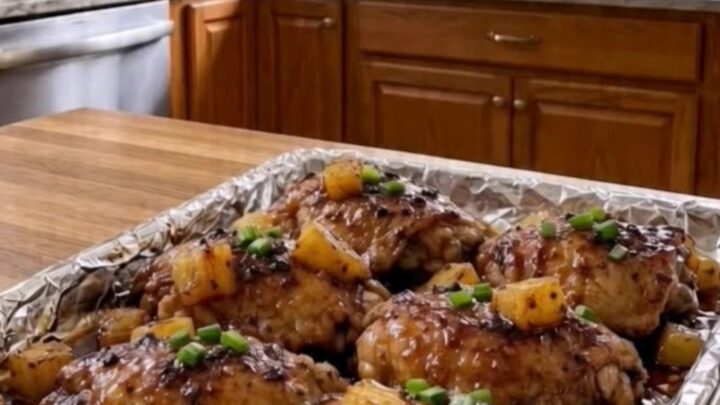
The pineapple chunks are soft and translucent, having released their juices into the pan to mingle with the chicken fat.
Resting and Serving
- Finish and ServeRemove the baking sheet from the oven and let the chicken rest for five minutes to allow the juices to redistribute. Garnish the glistening chicken with sliced scallions before serving immediately while hot.Look for The chicken is tender, juicy, and the pineapple has released its sweetness into the glaze.Tip Use the pan juices to drizzle over the chicken once more before serving for extra flavor.
The chicken has rested for the required five minutes, allowing the juices to settle and the glaze to thicken slightly more. The final dish looks glistening and vibrant, with the scallions providing a fresh, green contrast to the dark, caramelized glaze of the chicken.
Common mistakes
A common mistake is overcrowding the baking sheet, which causes the chicken to steam rather than roast. Ensure there is enough space between each thigh to allow hot air to circulate, which is necessary for the skin to crisp.
Another error is adding the pineapple too late; the fruit needs the full duration in the oven to release its sugars and soften properly, which is crucial for balancing the intensity of the barbecue sauce.
How to tell it’s done
The chicken is perfectly cooked when the internal temperature reaches 165°F (74°C) at the thickest part of the thigh. At this stage, the meat should pull away easily from the bone, and the juices should run clear.
The glaze will be reduced, thick, and dark, with the edges of the pineapple slightly charred and softened. Always use an instant-read meat thermometer to verify the temperature, as visual cues alone can be misleading.
- Poultry: 165°F (74°C) in the thickest part
Up next · Part 3 of 3
2 variations · storage & make-ahead · 3 answers · printable card
Tips, FAQ & printable recipe (Part 3)← Back to the ingredients (Part 1)