Desserts · Part 2 of 3: Instructions
Spooky Bloodshot Eyeball Mini Donuts Step-by-step instructions
- Prep
- Cook
- Total
- Serves
- 12
Before you start
Before beginning, ensure all ingredients are at room temperature to make assembly easier. Set up a clean, flat workstation on a counter or table. Lay out a large piece of parchment paper to catch any stray sugar or jam.
Have the strawberry jam stirred in a small bowl and the candy eyes opened and ready in a small dish for quick access. Clear enough space on a serving platter so that the finished donuts can be arranged immediately after decorating.
Ingredients at a glance (3)
- 12 count powdered sugar mini donuts, store-bought or made ahead
- 1/4 cup strawberry jam
- 12 count large candy eyes
Instructions
Donut arrangement
- Prepare the donutsPlace the powdered sugar mini donuts in rows on a parchment-lined baking sheet. Ensure there is enough space between each donut to work comfortably while filling the centers.Look for donuts are arranged in neat, orderly rowsTip Using a parchment-lined sheet makes cleanup much faster if any jam spills.
At this phase, the donuts should be arranged in neat, orderly rows. The powdered sugar should look pristine and undisturbed. Ensure the mini donuts are stable and not leaning against each other.
This preparation ensures that the subsequent filling process remains efficient and prevents any accidental smudging of the powdered sugar during the decoration stage.
Adding the filling
- Add the bloodshot centerUse a small spoon to carefully scoop a generous amount of strawberry jam into the center hole of each mini donut. Fill the hole until the jam is slightly visible to create the bloodshot look.Look for jam fills the donut hole and looks like a red centerTip If the jam is too thick, stir it in a small bowl until it reaches a smoother, more spreadable consistency before spooning.
The donuts should now feature a vibrant, red center of strawberry jam. The jam should be contained within the cavity of each donut. Check that the jam is not overflowing and that the surface of the jam is relatively level, which will provide a flat, stable base for the candy eyes in the next step.
Attaching the eyes
- Attach the candy eyesGently press one large candy eye directly into the center of the strawberry jam on each donut. Ensure the eye is centered and secure so it does not slide off the jam.Look for candy eyes are firmly set in the red jamTip Press firmly enough to anchor the candy into the jam, but be careful not to crush the delicate mini donut.
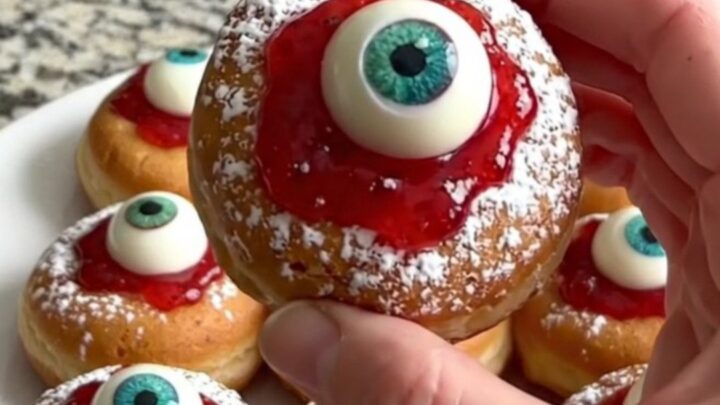
The final result should show clear, bright candy eyes centered in the red jam. The donuts should look like festive, spooky eyeballs. Check that every eye is firmly set and that no jam has smeared onto the surrounding powdered sugar. The entire display should be ready to transfer to a serving platter for immediate presentation.
Common mistakes
A common mistake is using too much jam, which can cause the filling to spill over the sides of the mini donut and mar the powdered sugar exterior. Another frequent issue is failing to press the candy eye firmly enough into the jam, which results in the eye sliding off after a few minutes.
Always start with a small amount of jam and add more only if necessary to fill the hole, and ensure the eye is gently but securely pressed into the center.
How to tell it’s done
These donuts do not require cooking, so doneness is determined by the visual appeal. The jam should be fully contained within the center of the donut, and the candy eye should be firmly anchored in the jam.
If the jam starts to bleed or the eye slides, it is likely that too much jam was used or the jam consistency is too loose. Simply wipe away excess or adjust the eye placement to ensure a clean, sharp look.
Up next · Part 3 of 3
2 variations · storage & make-ahead · 3 answers · printable card
Tips, FAQ & printable recipe (Part 3)← Back to the ingredients (Part 1)