Appetizers · Part 2 of 3: Instructions
Spiral Tortilla Ribbon Nachos with Warm Queso Step-by-step instructions
- Prep
- Cook
- Total
- Serves
- 4
Before you start
Set up the whole workstation before the first tortilla hits the skewer. Count out six corn-flour tortillas and warm them briefly so they roll without cracking. Lay out wooden skewers, a sharp chef's knife and a stable cutting board with a damp towel underneath so nothing slides. Measure the lime oil and chile-lime seasoning into a small bowl and set a large mixing bowl nearby for the sliced spirals.
Ingredients at a glance (8)
- 6 count corn-flour tortillas (6-inch), fresh and pliable
- 1 tbsp lime oil
- 1 tsp chile-lime seasoning
- 3 cups neutral frying oil, such as canola or vegetable
- 1 cup white queso, warmed until pourable
- 4 oz cooked taco beef, store-bought or made ahead
- Pickled jalapeño slices, for serving
- Mexican crema, for serving
Instructions
Roll, slice and season
- Roll the tortillas tightWrap one tortilla snugly around a wooden skewer, rolling from edge to edge with steady pressure so the cylinder holds its shape. Repeat with the remaining tortillas. Keep the rolls aligned on the skewers; a tight spiral is what makes the ribbons curl instead of unfolding in the oil.Look for Each roll should feel firm and springy, with no loose flap of tortilla sticking out at the seam.Tip Warm the tortillas for 10 seconds in the microwave first; pliable tortillas roll tighter and crack far less.
- Slice the spiral ribbonsHold the skewer steady on the cutting board and slice straight down through the rolled tortilla with a sharp knife, cutting rounds about 1/4 inch thick. Each slice releases into a tight spiral ribbon. Work slowly and let the knife do the cutting rather than pressing down.Look for The rounds should look like little coiled springs, uniform in thickness so they fry at the same rate.Tip Use the full length of the blade in one smooth stroke; sawing crushes the spiral and flattens the curl.
- Season the ribbonsSlide the spirals off the skewers into a large bowl. Drizzle with the lime oil and sprinkle the chile-lime seasoning over the top. Toss gently with your hands until every ribbon glistens and carries a light dusting of the seasoning on both sides.Look for Every spiral should look lightly coated, not soaked; excess oil drips and makes the frying oil foam.Tip Season just before frying so the salt draws out no moisture and the spirals stay crisp.
At the end of this phase, a large bowl holds a mound of pale, tightly coiled spiral ribbons, each one glistening lightly with lime oil and dusted with chile-lime seasoning. The coils should look uniform, like little springs, with no loose flaps or thick, doughy rounds mixed in.
Pick one up: it should hold its curl on its own without springing open. If several spirals have unwound, roll them again around the skewer and reslice. Nothing should feel wet or oily; excess oil at this stage only foams in the fryer later. The pile should smell of lime and chili.
Fry to crunchy curls
- Heat the frying oilPour the neutral oil into a heavy Dutch oven to a depth of about 2 inches and set it over medium-high heat. Clip on a deep-fry thermometer and bring the oil to 365°F (185°C). Adjust the heat as needed to hold that temperature steady before anything goes in.Look for The oil should shimmer and a ribbon dropped in should sizzle vigorously within two seconds.Tip Give the spirals a few minutes to rest while the oil climbs; a short rest helps them hold their curl.
- Fry until puffed and goldenLower a handful of spirals into the oil with tongs, frying in small batches so the temperature stays near 365°F. Cook for 90 seconds, nudging them once or twice so they color evenly, until they puff into crunchy curly ribbons with golden edges.Look for The curls should be puffed, blistered and deep golden at the ridges, with a hollow, crackly sound when tapped.Tip Fry no more than a third of the batch at a time; crowding drops the temperature and the curls turn greasy.
- Drain on a wire rackLift each batch out with a spider strainer or tongs, letting the oil drip back into the pot for a moment, then spread the curls in a single layer on a wire rack set over a sheet pan. Repeat with the remaining spirals, returning the oil to 365°F between batches.Look for The curls should feel dry and brittle to the touch within a minute of landing on the rack.Tip Never drain on paper towels; a raised rack keeps steam from softening the undersides of the curls.
The transformation here is fast and unmistakable. In 90 seconds at 365°F, each pale coil puffs, blisters and turns deep golden at the ridges, emerging as a crunchy curly ribbon with a hollow crackle when tapped.
Drained on the wire rack, the curls should feel dry and brittle within a minute, never greasy or bending. Listen as each batch goes in: a vigorous, even sizzle means the oil is holding temperature; a lazy simmer means too many spirals went in at once.
Pile, pour and finish
- Warm the quesoPour the white queso into a small saucepan set over low heat and stir often for 3 to 4 minutes, until it loosens into a glossy, pourable sauce. Keep it on the lowest setting while the nachos are assembled so it stays liquid right up to the pour.Look for The queso should ribbon off the spoon in a slow, continuous stream with no clumps left at the bottom.Tip A splash of water whisked in brings refrigerated queso back to a smooth, pourable texture.
- Pile the curls and scatter the beefPile the fried spirals high in a cast-iron skillet, letting the curls tangle and stack so there are pockets everywhere for the toppings to sink into. Scatter the cooked taco beef evenly over the top, working it into the gaps between the curls. If the beef was made from scratch and is being reheated, ensure it reaches 160°F (71°C) internally.Look for The pile should look loose and airy, with visible openings rather than a flat, packed layer.Safe temperature 160°F (71°C) internal temperature (ground meat)Tip Build the pile toward the center so the queso pools through the middle instead of running off the edges.
- Pour, drizzle and servePour the hot queso slowly over the entire pile, letting it cascade into every fold of the curls. Dot the top with pickled jalapeño slices and finish with a drizzle of Mexican crema. Carry the skillet straight to the table and serve immediately while the curls still crackle.Look for The queso should still be streaming down the sides of the pile when the skillet reaches the table.Tip Set out extra crema and jalapeños on the side so everyone can adjust the heat at the table.
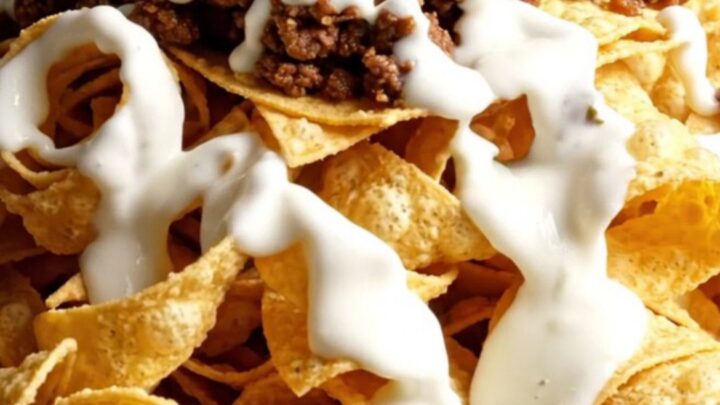
The finished skillet is a tall, tangled pile of golden curls with hot queso cascading through every fold, pooling in the gaps and glazing the ridges. The cooked taco beef is scattered evenly through the middle layers, not sitting on top, and the pickled jalapeños and crema mark the surface in bright, contrasting dots.
The queso should still be visibly streaming when the skillet reaches the table, glossy and pourable rather than set. Lift a curl from the top: it should snap, then carry sauce. One from underneath should be coated too.
Common mistakes
The most common failure is frying too cool. Below about 350°F, the spirals soak oil before they set and come out limp and heavy; hold 365°F and fry in small batches. The second mistake is crowding: a full handful of spirals at once drops the temperature instantly.
The third is slicing thick. Ribbons much over 1/4 inch stay doughy in the center of the coil while the outside burns; thin, even slices fry through in 90 seconds. Rolling too loosely is another quiet failure, because loose spirals unwind in the oil and become ordinary chips.
How to tell it’s done
The nachos are done the moment the queso finishes its pour. The curls themselves are done when they come out of the oil: puffed, deep golden at the ridges, brittle to the touch and hollow-sounding when tapped. If a batch bends instead of snapping, give it 15 more seconds in the oil; under-fried spirals turn chewy under the queso. The queso is ready when it flows off the spoon in a slow, glossy stream with no clumps.
- Ground meat: 160°F (71°C) in the thickest part
Up next · Part 3 of 3
4 variations · storage & make-ahead · 5 answers · printable card
Tips, FAQ & printable recipe (Part 3)← Back to the ingredients (Part 1)