Dinner · Part 2 of 3: Instructions
Spicy Lamb Birria Pizzadilla with Crispy Consomé Tortillas Step-by-step instructions
- Prep
- Cook
- Total
- Serves
- 2
Before you start
Have the birria ready to go: the lamb braised, shredded and at room temperature for no more than 30 minutes, with its consomé warmed in a shallow wide dish so a tortilla can lie flat in it. Shred the Oaxaca cheese, dice the red onion fine, and slice the serrano into coins. Set the comal or cast-iron skillet over medium-high heat and let it climb toward 400°F while the stack is built — an infrared thermometer takes the guesswork out, but a drop of water skittering on the surface is a reliable sign. Keep a wide spatula, a ladle and a cutting board within arm's reach, because once the pizzadilla hits the heat, the whole cook takes five minutes.
Ingredients at a glance (8)
- 2 flour tortillas, 10-inch each
- 1/2 cup birria consomé, warm, plus more for dunking
- 4 oz braised lamb birria, shredded (store-bought or made ahead)
- 1 1/2 cups shredded Oaxaca cheese
- 2 tbsp diced red onion
- 1 serrano chile, sliced into thin coins
- 2 tbsp red chili oil, divided
- 1/2 cup creamy avocado salsa, plus more for drizzling
Instructions
Build the Stack
- Prep the fillingShred the braised lamb into bite-size threads and warm it gently until it reaches 145°F (63°C) at the center, then let it rest at least 3 minutes. Warm the consomé in a shallow bowl until it pours easily. Dice the red onion fine, slice the serrano into thin coins, and shred the Oaxaca cheese if starting from a ball. Keep everything within reach of the stove.Look for The consomé should pour like thin gravy rather than sitting gelled cold from the refrigerator.Safe temperature 145°F (63°C) internal temperature (steaks, chops and roasts)Tip A few seconds in the microwave loosens gelled consomé without thinning its deep chile flavor.
- Dip the base tortillaDip the first tortilla in the consomé for a few seconds per side, coating it evenly without soaking it through. Lift it, let the excess drip off, and lay it flat on a clean board. It should look glossy and red.Look for Look for an even red sheen with no dry pale patches and no sauce still dripping.Tip A quick two-second dip per side keeps the tortilla sturdy enough to flip cleanly later.
- Layer lamb and cheeseScatter half of the Oaxaca cheese over the dipped tortilla, leaving a half-inch border. Pile the lamb in an even layer, then add the onion and serrano. Finish with the remaining cheese and press down lightly so the stack holds together.Look for The border of cheese should stay visible all the way around the lamb layer.Tip That cheese border glues the tortillas together and keeps the filling from sliding out.
- Cap the stackDip the second tortilla the same way, letting the excess drip back into the dish. Lay it over the filling, red side up, and press gently from the center outward until the stack sits flat, even, and ready for the comal.Look for No filling should peek out at the edges before the stack reaches the pan.Tip Pressing from the center pushes air out and helps the cheese grip both tortillas.
At the end of this phase, the assembly should look like a flat, tidy disc: a glossy red tortilla on the bottom, an even lamb layer ringed by visible cheese, flecks of purple onion and green serrano peeking through, and a second red-glossed tortilla capping it all. Press the center gently — the stack should feel compact, not springy or loose, and no filling should be sliding toward the edges.
The top tortilla should sit flush against the cheese with no air pocket in the middle. If consomé is pooling on the board under the stack, the tortillas were dipped too long; blot the edges with a paper towel before the pan, or the crust will steam instead of crisping.
Crisp on the Comal
- Crisp the first sideHeat a comal or large cast-iron skillet to 400°F and slide the pizzadilla on, dipped side down. Cook for 2 1/2 minutes without moving it, pressing gently once or twice, until the underside blisters and the edge cheese begins to melt.Look for Dark blisters and a toasty smell mean the crust is forming; peek with a thin spatula.Tip Resist shifting it early; the crust releases on its own once it crisps.
- Flip and baste with chili oilSlide a wide spatula underneath and flip the pizzadilla in one confident motion. Ladle about 1 tablespoon of the red chili oil over the top crust and spread it to the edges. Cook another 2 1/2 minutes, pressing lightly, until the second side blisters.Look for The cheese should ooze at the edges and the crust should smell toasty, never burnt.Tip A quick, centered motion is what keeps a loaded pizzadilla from tearing mid-turn.
This phase is done when the bottom tortilla carries a constellation of deep golden blisters and smells toasty, with the cheese visibly melted at the edges; after the flip, the top crust should take on the same blistered look with a glossy sheen from the chili oil.
Listen for a faint sizzle that stays steady rather than roaring — a violent sizzle means the heat is too high and the consomé is burning instead of crisping. Lift a corner with the spatula before committing to the flip: the underside should release cleanly and feel rigid, not bend. If it sticks or flexes, give it another 30 seconds. The whole side takes about 2 1/2 minutes at a true 400°F.
Slice and Serve
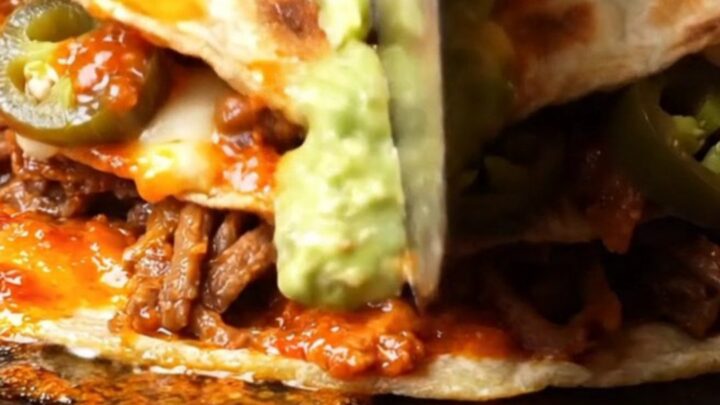
- Rest and slice into wedgesTransfer the pizzadilla to a cutting board and rest it for 2 minutes so the cheese sets enough to hold the layers. Slice into 6 wedges with a rocker knife or large chef's knife, pressing straight down in one firm pass.Look for A crunch through the blistered crust and a slow cheese pull mean the timing is right.Tip Wiping the blade between cuts keeps every wedge looking clean and sharp-edged.
- Drizzle and serve hotDrizzle the wedges with creamy avocado salsa and serve immediately, while the crust shatters and the cheese pulls. Set the warm consomé alongside in small cups for dunking, with extra chili oil at the table for anyone chasing more heat.Look for Wedges should hold their shape with cheese stretching between pieces as they are lifted.Tip Warm the consomé cups first so the dunking sauce stays hot to the last wedge.
The finished pizzadilla should feel rigid under a light press, with a crust that crackles when tapped and edges that look dry and lacy from the crisped consomé. After the two-minute rest, the rocker knife should go through in one firm pass per cut, with an audible crunch and a slow stretch of cheese behind the blade.
The six wedges should hold their shape on the board, cheese pulling between them as they separate, and the avocado salsa drizzle should sit on top without soaking in. Taste one wedge for heat: the serrano should register as a bright burn, and the consomé dunk should round it out. Serve everything while the first pull is still steaming.
Common mistakes
The most common failure is over-soaking: a tortilla left in the consomé longer than a few seconds turns soggy and tears on the flip, so dip and drain quickly. Skimping on the cheese border lets the filling slide out as the stack moves; keep a visible half-inch ring of cheese all the way around. A comal that is not fully hot produces a leathery, oil-logged crust instead of blisters, so preheat properly and cook in batches rather than crowding. Flipping with hesitation is the other culprit — use one wide spatula, one fast motion. Finally, slicing the moment it leaves the pan makes the cheese run everywhere; two minutes of rest fixes it.
How to tell it’s done
The pizzadilla is done when both tortillas show deep golden blisters with a few dark, almost charred spots, and the edges look dry and crackly rather than pale or damp. The cheese should be fully melted and just beginning to ooze at the seams when a corner is lifted.
Because the lamb birria is already braised through, the only cooking that happens is the crust and the melt — just make sure the shredded lamb was warmed to 145°F (63°C) before it went into the stack, with a 3-minute rest. What matters most is texture: a firm press with the spatula should meet resistance, the crust should sound crisp when tapped, and the whole stack should feel rigid enough to lift and flip without bending in the middle.
- Steaks, chops and roasts: 145°F (63°C) in the thickest part, then a 3-minute rest
Up next · Part 3 of 3
4 variations · storage & make-ahead · 5 answers · printable card
Tips, FAQ & printable recipe (Part 3)← Back to the ingredients (Part 1)