Dinner · Part 2 of 3: Instructions
Spicy Chili Crisp Chicken Alfredo: 30-Minute Creamy Pasta Step-by-step instructions
- Prep
- Cook
- Total
- Serves
- 4
Before you start
Before you start, bring a large pot of salted water to a boil for the pasta. Pat the chicken dry with paper towels — this helps the seasoning stick and the sear to be golden.
Measure out all your ingredients: the spices, the cream, the Parmesan, and the chili crisp. Have your skillet ready over medium-high heat. The whole dish comes together quickly once you start cooking, so having everything at hand makes it smooth and stress-free.
Ingredients at a glance (13)
- 9 oz fettuccine pasta
- 1 lb boneless, skinless chicken breast
- 1 tsp smoked paprika
- 1 tsp garlic powder
- 1 tsp kosher salt, divided
- 1/2 tsp black pepper, divided
- 2 tbsp olive oil, divided
- 2 tbsp unsalted butter
- 3 cloves garlic, minced
- 1 1/2 cups heavy cream
- 1 cup freshly grated Parmesan cheese
- 2 tbsp chili crisp oil
- 1/4 cup fresh parsley, chopped
Instructions
Sear the Chicken and Boil the Pasta
- Season and Sear the ChickenPat the chicken breast dry with paper towels. In a small bowl, combine the smoked paprika, garlic powder, 1/2 teaspoon of salt, and 1/4 teaspoon of black pepper. Rub the spice mixture all over the chicken. Heat 1 tablespoon of olive oil in a large skillet over medium-high heat. Add the chicken and cook for 5 minutes per side, until golden brown and cooked through. Transfer to a plate and let rest for 5 minutes before slicing.Look for The chicken is golden brown on both sides and juices run clear.Safe temperature 165°F (74°C) internal temperature (poultry)Tip Use an instant-read thermometer to check that the thickest part reaches 165°F (74°C).
- Slice the Chicken and Cook the PastaWhile the chicken rests, bring a large pot of salted water to a boil. Add the fettuccine and cook according to package directions until al dente. Reserve 1 cup of pasta water before draining. When the chicken is cool enough to handle, slice it into 1/2-inch thick strips.Look for The pasta is tender but still has a slight bite.Tip Set a timer for 1 minute less than the package suggests — you'll finish cooking it in the sauce.
The chicken should be golden brown on both sides, with a nice crust from the paprika and garlic powder. The kitchen smells smoky and savory. The pasta is boiling in salted water, and you've reserved a cup of the starchy cooking liquid. The chicken is resting on a cutting board, and you're ready to slice it into strips.
Build the Creamy Alfredo Sauce
- Make the Creamy Alfredo SauceIn the same skillet you used for the chicken, melt the butter over medium heat. Add the minced garlic and cook for 1 minute until fragrant. Pour in the heavy cream and bring to a gentle simmer. Cook for 3-4 minutes, stirring occasionally, until the cream thickens slightly. Reduce the heat to low and whisk in the grated Parmesan cheese until smooth. Season with the remaining 1/2 teaspoon salt and 1/4 teaspoon black pepper.Look for The sauce is smooth, glossy, and coats the back of a spoon.Tip Add the Parmesan off the heat to prevent it from clumping.
- Add the Chili Crisp and Toss the PastaDrizzle the chili crisp oil into the sauce and stir to create ribbons. Add the drained fettuccine and 1/2 cup of the reserved pasta water. Toss everything together with tongs, allowing the pasta to absorb the sauce. If the sauce is too thick, add more pasta water a splash at a time until it reaches a silky consistency.Look for The pasta is evenly coated, and the sauce clings to every strand.Tip The pasta water's starch helps the sauce emulsify and stick to the noodles.
The butter has melted and the garlic is fragrant — you can smell it immediately. The cream is simmering gently, and the sauce has thickened just enough to coat a spoon.
The Parmesan has melted into a smooth, velvety mixture. The chili crisp has created beautiful red ribbons throughout the sauce, and the whole skillet looks glossy and inviting.
Toss the Pasta and Finish
- Fold in the Chicken and ParsleyAdd the sliced chicken and chopped parsley to the skillet. Gently fold everything together with tongs, being careful not to break the chicken slices. Cook for 1-2 minutes until the chicken is warmed through and the parsley is wilted.Look for The chicken slices are coated in sauce and the parsley is bright green.Tip Fold gently — you want the chicken to stay in nice slices.
- Serve with Extra Chili CrispDivide the pasta among four bowls. Drizzle each serving with a little more chili crisp oil if desired. Serve immediately, with extra grated Parmesan on the side.Look for The sauce is creamy and the chili crisp adds a fiery sheen.Tip For a restaurant-style finish, twirl the pasta with tongs before placing it in the bowl.
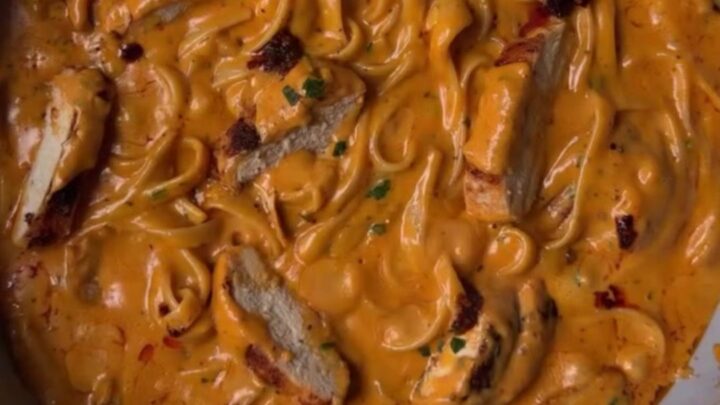
The fettuccine is coated in the creamy, spicy sauce, and the chicken slices are nestled throughout. The parsley adds fresh green flecks. The pasta is twirling easily on your fork, and the sauce is clinging to every strand. The chili crisp's red oil glistens on the surface, and the crispy bits are visible. The dish is ready to serve.
Common mistakes
One common mistake is overcooking the chicken, which makes it dry and tough. Use a thermometer and pull it at 165°F (74°C). Another is adding the Parmesan over high heat, which can cause it to clump or separate. Keep the heat low and stir constantly.
Also, don't skip the pasta water — it's essential for creating a silky sauce. If the sauce seems too thin, let it simmer a little longer before adding the pasta. And don't overcrowd the skillet when searing the chicken; give it room to brown, not steam.
How to tell it’s done
The chicken is done when an instant-read thermometer inserted into the thickest part registers 165°F (74°C). The sauce should coat the back of a spoon and be smooth and glossy.
The pasta should be al dente — tender but still slightly firm to the bite. When you toss everything together, the sauce should cling to the noodles and the chicken should be warmed through. Taste and adjust salt and chili crisp to your liking.
- Poultry: 165°F (74°C) in the thickest part
Up next · Part 3 of 3
4 variations · storage & make-ahead · 5 answers · printable card
Tips, FAQ & printable recipe (Part 3)← Back to the ingredients (Part 1)