Dinner · Part 2 of 3: Instructions
Smash Burger Tacos: Crispy 10-Minute Griddle Dinner Step-by-step instructions
- Prep
- Cook
- Total
- Serves
- 4
Before you start
Everything moves fast once the griddle is hot, so stage the whole station before the burner goes on. Whisk the burger sauce first and slide it into the refrigerator; a cold sauce clings instead of running. Shred the iceberg lettuce and dice the pickles, then pat both dry and set them in bowls near the stove.
Ingredients at a glance (13)
- 1/3 cup mayonnaise
- 2 tbsp ketchup
- 2 tbsp sweet pickle relish
- 1 tbsp dill pickle juice
- 1/2 tsp smoked paprika
- 1 lb 80/20 ground beef (four 3 oz balls)
- 1 tsp garlic salt
- 1/2 tsp black pepper
- 4 6-inch flour tortillas
- 1 tbsp neutral oil, for the griddle
- 4 American cheese slices
- 1 cup shredded iceberg lettuce
- 1/4 cup diced dill pickles
Instructions
Sauce, toppings and beef on tortillas
- Whisk the tangy burger sauceIn a small bowl, stir together the mayonnaise, ketchup, sweet pickle relish, dill pickle juice and smoked paprika until the sauce is smooth and uniformly orange. Taste it, and add another teaspoon of pickle juice if the tang needs a lift. Park the bowl in the refrigerator while the rest of the prep comes together.Look for The sauce should ribbon off the spoon slowly and hold its color, with no streaks of white mayo or red ketchup left behind.Tip A thicker sauce clings to a folded taco; a thin one runs straight out the bottom.
- Prep the crunchy toppingsShred the iceberg lettuce with a box grater or slice it into fine ribbons, then pat it thoroughly dry with paper towels so the sauce and cheese never turn it soggy. Dice the dill pickles small, about the size of peas, and blot them too. Set both in separate bowls within easy reach of the griddle.Look for The lettuce should look dry and squeaky, and the pickle dice should sit in a small bowl with barely a puddle of brine.Tip Wet toppings are the number one enemy of a crisp tortilla bottom.
- Portion and press the beefDivide the ground beef into four balls of about 3 oz each. Season every ball with garlic salt and black pepper, then set one on the center of a flour tortilla and press it with your palm into a thin, even layer that reaches about half an inch from the edge. Repeat with the remaining beef and tortillas.Look for The beef layer should look even and thin, with no thick dome in the middle and no gaps showing tortilla.Tip Press gently at the edges so the meat stays on the tortilla when it hits the griddle.
At the end of this phase, the station should feel like a diner line. The burger sauce is smooth, thick and uniformly orange, chilling in the refrigerator with no streaks of mayo or ketchup.
The lettuce sits dry and squeaky in its bowl, the pickle dice is blotted and neat, and nothing on the counter is dripping. Four tortillas each carry a thin, even layer of seasoned beef, pressed flat with a clear half-inch border of bare tortilla around the meat, no domes and no gaps.
Smash, sear and melt on the flat-top
- Heat the griddle to temperatureSet a large cast-iron griddle or flat-top over medium-high heat and give it five minutes to climb to roughly 450°F (230°C). Add the neutral oil and wipe it across the surface with a folded paper towel so the whole cooking zone glistens. A drop of water flicked on should skitter and vanish instantly.Look for The oil should shimmer and thin out quickly, never smoking hard; the surface should feel dangerously hot a few inches above it.Tip Cast iron holds heat beautifully, so once it is hot, resist the urge to keep cranking the burner.
- Smash the tacos meat-side downLay two tortillas beef-side down onto the hot, oiled surface, then press each one flat with the spatula for a few seconds so the meat makes full contact. Cook undisturbed for 2 minutes while the beef sears into a lacy, brown crust and the tortilla toasts beneath it. Work in two batches if the griddle feels crowded.Look for Listen for an aggressive sizzle, and peek at one edge after 90 seconds: the beef should look brown and frilly, not gray and steamed.Tip Do not move the tacos early; the crust releases on its own when it is ready.
- Flip and melt the cheeseSlide the spatula under each taco and flip it so the beef faces up. Lay a slice of American cheese over the hot beef, then cook the taco for another 1 to 2 minutes, until the cheese melts and glosses over the meat and the beef reaches an internal temperature of 160°F (71°C). Transfer to a cutting board.Look for The cheese should slump and turn shiny, and the thickest part of the beef should read 160°F (71°C) on an instant-read thermometer.Safe temperature 160°F (71°C) internal temperature (ground meat)Tip Check the temperature in the center of the patty, not at the lacy edge, for an honest reading.
This phase ends with sound as much as sight. The moment the tacos hit the oiled surface there should be an aggressive, steady sizzle, not a polite hiss.
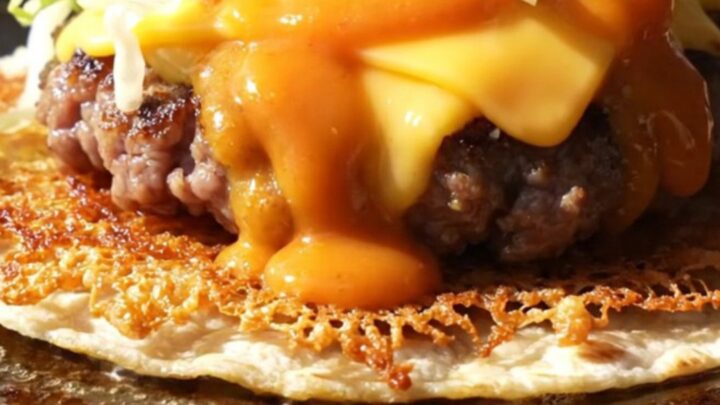
After two undisturbed minutes, the beef edges are deeply brown and frilly, with crisp lace where the meat spread thin, and the tortilla bottoms are golden with toasted spots. Flipped, the patties now face up under a slice of American cheese that has slumped into a glossy, fully melted blanket.
Crunch, drizzle and the hot fold
- Build the crunch layerWhile each taco is still hot off the griddle, scatter a generous line of shredded iceberg lettuce down the center of the cheesy beef, then follow with a spoonful of diced dill pickles. The residual heat from the patty will wake up the lettuce without wilting it, keeping every bite loud and crisp.Look for The lettuce should sit in a bright green stripe down the middle, with pickles scattered evenly along it.Tip Keep the filling inside the center third so the fold stays tidy and sealed.
- Drizzle and fold it up hotDrizzle about 2 tbsp of the chilled burger sauce over the lettuce and pickles on each taco, letting it zigzag from end to end. Fold one edge of the tortilla over the filling, then roll it into a tight half-moon, pressing lightly so it holds its shape. The tortilla should crackle slightly as it bends.Look for The folded taco should hold a neat half-moon shape with the seam resting underneath and just a little sauce peeking out.Tip Folding while hot is what fuses the layers together into one juicy, cohesive bite.
- Serve immediatelyPlate the tacos seam-side down while the bottoms are still crackly, with the extra burger sauce in a small bowl alongside for dipping or a final drizzle. Hand them over right away, because these eat best in the first five minutes, while the contrast between the shatter-crisp edges and the juicy center is at its peak.Look for The bottom of each tortilla should still feel firm and dry to the touch, with audible crunch on the first bite.Tip Cut one taco in half for the full cross-section reveal before anyone digs in.
The final phase closes with texture. Each taco, straight off the griddle, carries a bright green stripe of crisp iceberg down the center of the glossy beef, dotted with briny pickle dice and streaked with chilled orange sauce.
The fold happens while everything is still hot, and the tortilla should bend into a tight half-moon with a faint crackle, holding its shape seam-side down on the plate.
Common mistakes
The most common failure is crowding and moving the tacos too early. The lacy crust needs two undisturbed minutes to form; nudging the tortilla before the crust releases tears the beef off in patches.
The second mistake is a wet station: damp lettuce, unblotted pickles or a watery sauce will soften the crisp tortilla within minutes, so dry every topping thoroughly and keep the sauce thick and chilled. Third, over-pressing the beef to the tortilla edge causes it to slump off during the smash; leave that half-inch border.
How to tell it’s done
A finished smash burger taco shows three clear signs. First, the beef edge is brown and frilly, with crisp lacy points of crust where the meat met the hot oil, never gray or steamed-looking. Second, the cheese has fully melted into a glossy, uniform blanket over the patty, with no firm square corners left.
- Ground meat: 160°F (71°C) in the thickest part
Up next · Part 3 of 3
4 variations · storage & make-ahead · 5 answers · printable card
Tips, FAQ & printable recipe (Part 3)← Back to the ingredients (Part 1)