Breakfast · Part 2 of 3: Instructions
Slow Cooker Pumpkin Orange Jam for Easy Breakfasts Step-by-step instructions
- Prep
- Cook
- Total
- Serves
- 6
Before you start
Before beginning, ensure that your slow cooker is clean and ready for use. Prepare the pumpkin by peeling it, removing the seeds and stringy center, and cutting the flesh into small, uniform cubes. This uniformity is the key to even cooking.
Zest the orange before juicing it to ensure you get the oils from the skin, which provide the most flavor. Gather all your spices and have your measuring tools at the ready to make the assembly process quick and efficient once you begin.
Ingredients at a glance (5)
- 2 cups diced pumpkin or winter squash
- 1 cup blond sugar
- 1 tsp ground cinnamon
- 1/2 tsp ground ginger
- 1/2 cup fresh orange juice with zest
Instructions
Preparation and assembly
- Combine ingredients in the slow cookerAdd the diced pumpkin or winter squash into the base of the slow cooker. Evenly scatter the blond sugar over the squash pieces, then sprinkle with the ground cinnamon and ground ginger. Finally, pour the fresh orange juice and zest over the entire mixture to ensure everything is moistened.Look for The squash should be evenly coated with the sugar, spices, and orange juice mixture before the lid is placed on the slow cooker.Tip Ensure the squash is cut into small, uniform cubes so it softens consistently during the slow cooking process.
At the end of this phase, the slow cooker should be filled with uniform cubes of pumpkin, a layer of sugar and spices, and a splash of fresh orange juice. Everything should be neatly layered, ready to be covered. Check that the lid fits snugly to ensure that heat and moisture are trapped effectively for the long cooking duration ahead. The kitchen should already smell faintly of the fresh orange zest you have just prepared for the recipe.
Slow cooking process
- Slow cook the jamCover the slow cooker with its lid. Set the heat to low and allow the mixture to cook undisturbed for approximately four hours. This gentle, low-temperature cooking allows the squash to break down completely and absorb the flavors of the orange juice and aromatic spices, creating a thick, jam-like consistency.Look for The pumpkin pieces should be completely tender and translucent, and the liquid should be reduced to a glossy syrup that coats the back of a spoon.Tip Resist the urge to lift the lid frequently, as this releases the trapped steam and heat necessary to properly soften the squash fibers.
After four hours, the pumpkin should be completely soft and the liquid should have reduced significantly. The mixture will look dark, glossy, and cohesive, with the spices fully incorporated into the syrup. You should see a notable reduction in volume compared to the start.
The scent in the kitchen will be warm and inviting, indicating that the flavors have melded together perfectly. This is the stage where the magic happens, transforming raw ingredients into a finished, spreadable jam.
Final finish
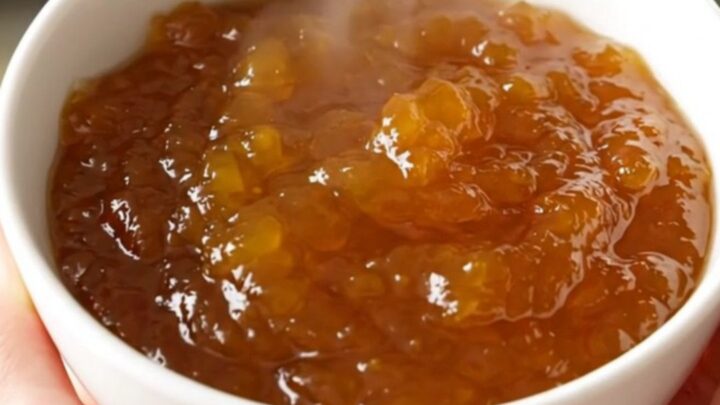
- Finish and serveOnce the squash is fully tender and the liquid has thickened, turn off the slow cooker. Carefully stir the jam to break up any remaining larger pieces of squash, creating a smooth and uniform texture. Transfer the finished jam into a clean serving bowl and allow it to cool slightly before serving warm.Look for The final product should be a thick, spreadable, and glossy jam that holds its shape when spooned, with a vibrant color and aromatic citrus scent.Tip If a very smooth, refined texture is preferred, the jam can be briefly pulsed with an immersion blender before transferring to a bowl.
The jam is now ready to be finished. After turning off the heat, give the mixture a good stir to break down any remaining whole pieces of squash, creating a smooth and uniform texture. The final product should be rich and spreadable. Before transferring to a bowl, ensure the jam has reached your desired consistency. It should look vibrant and appetizing, ready to be served on toast, biscuits, or incorporated into your favorite morning breakfast dishes.
Common mistakes
One common mistake is cutting the squash into pieces that are too large, which prevents them from softening enough to form a proper jam consistency. Another error is failing to ensure the sugar is evenly distributed, which can lead to uneven cooking and potential scorching on the bottom of the slow cooker.
Avoid using pre-cut, frozen squash unless you have thawed and drained it thoroughly, as the excess water can interfere with the final thickness and texture of your finished jam preserve.
How to tell it’s done
The jam is done when the pumpkin pieces have completely lost their structure and the mixture has transformed into a thick, glossy, and uniform preserve. It should look like a rich, golden-orange spread that clings to a spoon when lifted.
The liquid should be syrupy and reduced, with no watery separation. When tasted, the flavors should be well-integrated, with the sweetness of the sugar perfectly balanced by the bright, acidic notes of the orange and the warmth of the spices.
Up next · Part 3 of 3
2 variations · storage & make-ahead · 3 answers · printable card
Tips, FAQ & printable recipe (Part 3)← Back to the ingredients (Part 1)