Dinner · Part 2 of 3: Instructions
Slow Cooker Pork Chops and Stuffing — Five Ingredients, One Pot Step-by-step instructions
- Prep
- Cook
- Total
- Serves
- 5
Before you start
Read the ingredient list once and the assembly takes ten minutes. Take the pork chops out of the refrigerator last, right before building the crock, so they spend as little time as possible at room temperature — thirty minutes at most. Have paper towels ready for patting the meat dry before anything else touches the insert.
Open the can of soup and give the broth a stir if it has been sitting. Measure the stuffing cubes so the layer covers the chops edge to edge. Set the slow cooker on the counter where it will stay for the whole cook, away from curtains or anything that should not sit near a warm appliance. No browning, no marinade, no other pans — everything happens in one insert.
Ingredients at a glance (4)
- 5 boneless pork chops (about 2 lb), about 1 inch thick
- 6 oz dry herb stuffing cubes (about 4 cups)
- 1 can (10.5 oz) condensed cream soup (chicken flavor)
- 1 cup chicken broth
Instructions
Build the base
- Pat the pork chops dryPat the pork chops dry with paper towels on both sides. Dry surfaces keep the finished sauce from thinning as the chops release their juices during the long, gentle cook. Keep the chops in the refrigerator until the cooker is ready, and never leave raw pork out for more than 30 minutes before it goes into the crock.Look for The surface of each chop should look dry and even, with no damp spots.Tip Patting dry matters here, since the slow cooker never reduces the sauce and extra surface moisture thins it.
- Arrange the chops in the crockLay the chops in a single, slightly overlapping layer in the slow cooker insert, fanning them out like a hand of cards. Even coverage matters: chops stacked in a tall pile cook unevenly, and the pieces buried at the bottom sit in cooler zones longer than the ones near the top of the layer.Look for Every chop should touch the crock or the chop below it, with no tall stack in the middle.Tip If the chops are very thick, choose the Low setting later; thin chops handle High without drying out.
By the end of this phase the crock holds a single, slightly overlapping layer of dry, patted chops with no tall stack in the middle. Each chop should look dry on the surface, and the layer should fill the insert without crowding past the sides. This is the moment to confirm the cooker sits where it will stay for hours. If the chops overlap heavily or stand on edge, rearrange them now — once the stuffing goes on, the layers should not be disturbed again for the rest of the cook.
Layer and load
- Scatter the stuffing cubesScatter the dry herb stuffing cubes evenly over the chops, covering them from edge to edge. Do not stir. The cubes stay distinct at this stage; they drink the broth and soup below them as the cooker heats and turn into a moist, savory blanket by the end of cooking.Look for The pork should be completely hidden under an even layer of cubes.Tip An even layer is the whole trick — bare spots dry out, while thick mounds stay dense in the center.
- Dollop on the soupSpoon the condensed cream soup over the stuffing in several dollops, spacing them across the whole surface. Resist the urge to spread or mix. The soup melts down through the layers on its own, seasoning everything it touches and keeping the stuffing on top from drying out during the long, gentle cook.Look for Dollops of soup should sit across the entire surface, including the edges.Tip Scrape the can well; the last of the soup is the most concentrated and carries plenty of flavor.
- Pour in the brothPour the chicken broth slowly and evenly over everything, aiming for the corners of the crock as well as the center. The broth settles to the bottom, turns to steam around the chops, and finishes as a thick, creamy sauce. Do not stir; the layering is what keeps the texture right.Look for Liquid should just peek through the stuffing at the edges, not pool above it.Tip Pour against the side of the crock where possible so the top layer of stuffing stays dry until steam softens it.
- Cover and set the cookerPlace the lid on the slow cooker and set it to Low for 4 to 5 hours, or High for 2 to 3 hours. Keep the lid closed the whole time. Every lift of the lid releases steam and heat, and each peek can add twenty minutes or more to the total cooking time.Look for Condensation on the lid and a faint savory smell within the first hour mean the cooker is working.Tip Set a timer for the earliest end of the range so the cooker never runs long on a busy day.
The insert is now fully loaded and sealed: a complete blanket of stuffing cubes hides the pork, dollops of soup sit spaced across the surface, and broth has been poured evenly with a little liquid just visible at the edges.
Nothing has been stirred, the lid is on, and the cooker is set to Low or High with a timer noted. Before walking away, check that the lid seats flat and the controls read the intended setting. A faint savory smell and light condensation on the glass within the first hour confirm the cooker is heating as it should.
Finish and serve
- Check the temperatureNear the end of cooking, insert an instant-read thermometer sideways into the thickest chop. Pull the cooker off heat when the pork reads 145°F (63°C), then let the chops rest in the hot cooker for at least 3 minutes so the juices settle. The meat should look pale and braised, with no browning anywhere.Look for An instant-read thermometer in the thickest chop reads at least 145°F (63°C).Safe temperature 145°F (63°C) internal temperature (steaks, chops and roasts)Tip Check two or three chops if they differ in size; the smallest finishes first and the largest sets the final time.
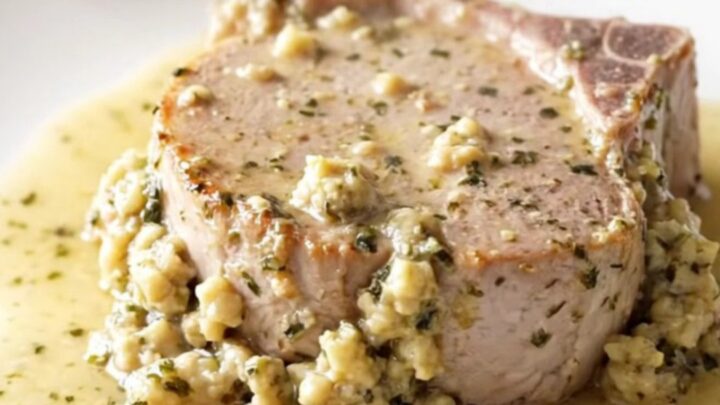
- Plate and serve hotSpoon a mound of stuffing onto each plate, set a chop on top, and finish with a generous spoonful of the creamy sauce from the bottom of the crock. Serve straight away while the sauce is still glossy and steam still rises off the plates. The stuffing should be moist and cohesive, never wet or separate.Look for The sauce should coat the back of the spoon and drip slowly, not run like broth.Tip A flat spatula lifts each chop whole; tongs tear the tender meat.
The lid comes off to steam and a creamy, glossy sauce pooling around tender, pale chops under moist stuffing. The thermometer reads at least 145°F (63°C) in the thickest chop, the meat has rested three minutes, and the sauce coats a spoon and drips slowly. The stuffing holds together in soft, cohesive mounds. If any of those checks fail, keep cooking and test again in fifteen minutes. Serve hot from the insert while the sauce is still glossy, plating stuffing first, then a chop, then a spoonful of sauce over everything.
Common mistakes
The most common slip is stirring. Mixing the layers turns the stuffing into paste and leaves the chops unevenly coated, so build the crock in order and leave it alone. Lifting the lid to check is the second: every peek releases steam and stretches the cook time by twenty minutes or more.
Overfilling the crock with extra chops or extra stuffing slows the heat and risks underdone meat. Skipping the pat-dry step thins the sauce, since slow cookers never reduce and concentrate liquid — dry the chops well at the start. Finally, skipping the thermometer is the mistake that matters most; pale braised pork looks done before it is.
How to tell it’s done
The reliable test is temperature, not appearance: the thickest chop must read at least 145°F (63°C) at its center on an instant-read thermometer, followed by a rest of at least 3 minutes. The meat looks pale and gently braised, never browned, and a fork slid into it meets almost no resistance.
The stuffing should be moist and cohesive, holding together on a spoon without being wet, and the sauce should be thick enough to coat the spoon and drip slowly. If the pork reads below temperature but the stuffing is already soft, simply keep the lid on and check again every fifteen minutes.
- Steaks, chops and roasts: 145°F (63°C) in the thickest part, then a 3-minute rest
Up next · Part 3 of 3
4 variations · storage & make-ahead · 5 answers · printable card
Tips, FAQ & printable recipe (Part 3)← Back to the ingredients (Part 1)