Dinner · Part 1 of 3: Ingredients
Slow Cooker Pineapple Bourbon BBQ Chicken Wings
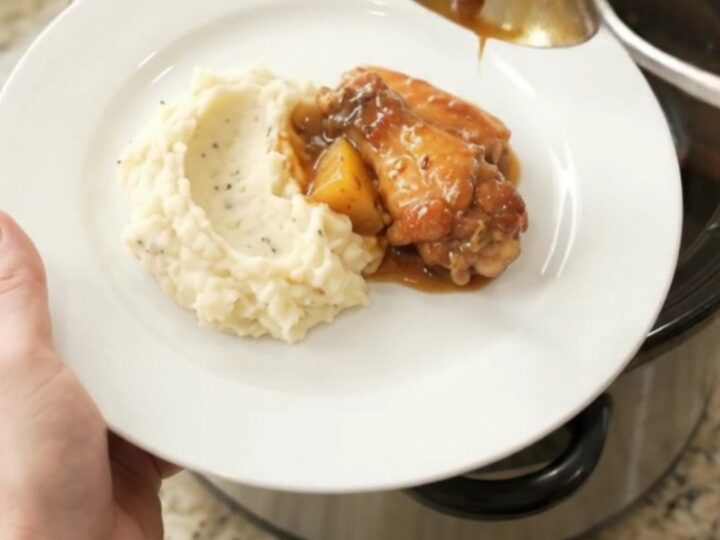
- Prep
- Cook
- Total
- Serves
- 4
These slow cooker pineapple bourbon BBQ chicken wings are the definition of set-it-and-forget-it cooking. With just four ingredients and a few minutes of prep, you get sticky, caramelized wings that fall off the bone.
The pineapple chunks melt into the sauce, adding natural sweetness and a tangy brightness that balances the rich bourbon glaze. Perfect for game day, a family dinner, or any night you want something indulgent without the fuss. The slow cooker does all the work, turning simple ingredients into a glossy, crowd-pleasing meal.
This recipe takes the classic BBQ wing and gives it a sweet, tropical twist. Chicken wingettes and drumettes cook low and slow in a mixture of pineapple chunks, bourbon BBQ glaze, and dark brown sugar. The result is deeply caramelized, sticky wings with a sauce that clings to every bite.
The pineapple breaks down slightly, creating a chunky, jammy sauce that's perfect over mashed potatoes or rice. Best of all, there's no marinating, no browning, and no complicated steps—just dump everything into the slow cooker and walk away. The hands-off method makes it ideal for busy weeknights or casual entertaining.
Ingredients
- 2 lb split chicken wingettes and drumettes
- 20 oz pineapple chunks in juice (undrained)
- 1 cup bourbon BBQ glaze
- 1/4 cup dark brown sugar, packed
Why this recipe works
The slow cooker's low, steady heat breaks down the connective tissue in the chicken wings, making them incredibly tender without any effort. As the wings cook, they release their juices, which combine with the pineapple juice and BBQ glaze to create a rich, flavorful sauce.
The long cooking time also allows the brown sugar to caramelize slowly, deepening the flavor and giving the sauce a glossy, sticky texture that clings beautifully to the meat. This method ensures every wing is evenly coated and infused with the sweet, smoky, bourbon notes.
The key to this recipe is the layering of ingredients. By placing the chicken first, then the pineapple, and finally the glaze and sugar, you allow the flavors to meld and develop as they cook. The pineapple chunks act as a natural tenderizer and add moisture, while the bourbon BBQ glaze provides a complex sweetness with a hint of smokiness.
The brown sugar enhances the caramelization, creating a lacquer-like finish that's both visually appealing and delicious. This simple technique transforms basic ingredients into a memorable dish with minimal effort.
Notes and substitutions
For the best results, use split chicken wingettes and drumettes—they cook evenly and are easy to eat. You can buy them pre-split or cut whole wings yourself. The pineapple chunks should be in juice, not syrup, to keep the sauce from becoming too sweet. The bourbon BBQ glaze adds a rich, smoky flavor; if you prefer a milder taste, use a regular BBQ sauce and add a splash of bourbon or vanilla extract. Dark brown sugar gives a deeper molasses flavor, but light brown sugar works too.
This recipe is incredibly forgiving. You can adjust the amount of brown sugar to suit your taste, or add a pinch of cayenne for heat. The slow cooker does the work, but you can also make this in a Dutch oven in the oven at 300°F (150°C) for about 3 hours. Leftovers keep well and the sauce thickens even more as it cools. Serve over mashed potatoes, rice, or with crusty bread to soak up every bit of the sauce.
- bourbon BBQ glaze: Use regular BBQ sauce plus 2 tablespoons bourbon or 1 teaspoon vanilla extract for a non-alcoholic version.
- pineapple chunks in juice: Fresh pineapple chunks plus 1/2 cup pineapple juice or water can replace canned chunks.
- dark brown sugar: Light brown sugar or coconut sugar can be used with slightly less molasses flavor.
- chicken wingettes and drumettes: Chicken thighs or drumsticks work well; adjust cooking time as needed.
Equipment
- 6-quart slow cooker
- Measuring cups
- Large spoon
- Tongs
Up next · Part 2 of 3
6 steps · 4 h of cooking · what to look for at each stage
Step-by-step instructions (Part 2)