Dinner · Part 2 of 3: Instructions
Slow-Cooker Monterey Jack Hatch Chile Skirt Steak Step-by-step instructions
- Prep
- Cook
- Total
- Serves
- 6
Before you start
Before starting, slice the skirt steak into 2-inch strips, cutting against the grain for tenderness. If using frozen corn, measure it straight from the freezer; no need to thaw. Drain canned corn thoroughly. Chop the roasted green chiles if they are whole.
Have the taco seasoning measured and ready. This recipe requires no pre-cooking or browning, so the prep is minimal. Keep the slow cooker insert handy, and ensure it is large enough to hold all ingredients comfortably.
Ingredients at a glance (6)
- 2 lb beef skirt steak, sliced into strips
- 4 oz roasted green chiles (such as Hatch), chopped
- 1 cup frozen or canned sweet corn, drained
- 2 tbsp taco seasoning
- 1 cup sour cream
- 2 cups shredded Monterey Jack cheese
Instructions
Layer and Set
- Layer the MeatPlace the sliced skirt steak strips in the bottom of a 6-quart slow cooker, spreading them into an even layer. This ensures the meat cooks evenly and absorbs the flavors from the ingredients on top.Look for The bottom of the slow cooker is covered with raw beef strips.Tip For best texture, slice the steak against the grain into 2-inch strips.
- Add Chiles, Corn, and SpiceScatter the chopped roasted green chiles and sweet corn evenly over the meat. Sprinkle the taco seasoning over the top, covering as much surface as possible.Look for The meat is dotted with green chiles, yellow corn, and a light dusting of spice.Tip If using frozen corn, no need to thaw; it will cook perfectly in the slow cooker.
- Top with Cream and CheeseDollop the sour cream over the mixture, then sprinkle the shredded Monterey Jack cheese evenly on top. Do not stir; the layers will meld during cooking.Look for The top is covered with white sour cream and a blanket of shredded cheese.Tip Use full-fat sour cream for a richer sauce that won't curdle.
After layering the ingredients, the slow cooker should look like a colorful mosaic: raw beef strips at the bottom, topped with green chiles, yellow corn, and a dusting of taco seasoning. Sour cream dollops and shredded cheese cover the top completely. The scene is tidy and dry, with no liquid yet. This is exactly how it should look before cooking begins.
Slow Cook to Tender
- Cook Low and SlowCover the slow cooker and cook on low for 6 to 8 hours, or on high for 3 to 4 hours, until the beef is tender and easily shreds with a fork. The cheese will melt into the sauce, and the flavors will meld. Let it rest for 3 minutes before slicing.Look for The sauce is bubbling gently at the edges, and the beef is fork-tender.Safe temperature 145°F (63°C) internal temperature (steaks, chops and roasts)Tip Avoid lifting the lid during cooking to maintain steady heat.
- Check and RestAfter cooking, check that the beef has reached an internal temperature of at least 145°F (63°C). Let the beef rest for at least 3 minutes before serving to allow the juices to redistribute.Look for A meat thermometer reads 145°F or higher.Safe temperature 145°F (63°C) internal temperature (steaks, chops and roasts)Tip The resting time is short but essential for juicy meat.
After 6-8 hours on low, the kitchen smells of toasted cumin and chiles. The sauce is bubbling gently around the edges, and the cheese has melted into a creamy, golden layer.
The beef is deeply browned and tender—test it with a fork; it should shred easily. The sauce should be thick enough to cling to the meat, not watery. If it looks thin, let it cook uncovered for a few minutes.
Serve and Enjoy
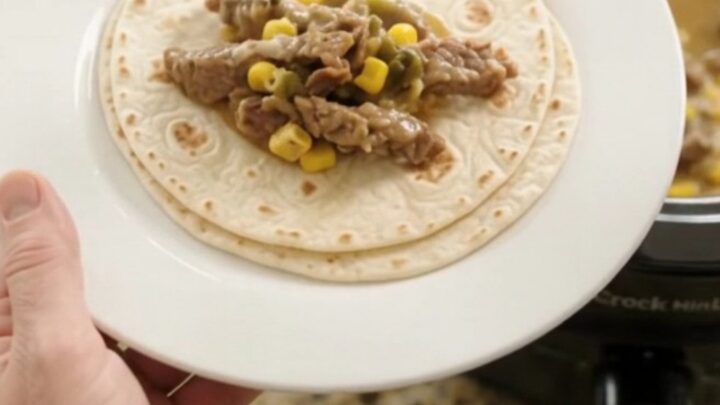
- Serve with TortillasWarm flour tortillas and place them on plates. Spoon the steak and sauce over the tortillas, using a slotted spoon to control the amount of sauce. Serve immediately.Look for The steak is piled onto tortillas, with creamy sauce spooned over.Tip For extra flavor, lightly char the tortillas over a gas flame before serving.
When spooned over warm tortillas, the steak strips are glistening with creamy sauce, and the corn and chiles are visible throughout. The texture is rich and velvety, with a slight kick from the green chiles. The dish is best served hot, with extra tortillas on the side for soaking up every drop of sauce.
Common mistakes
One common mistake is lifting the lid too often, which releases heat and extends cooking time. Another is using low-fat sour cream, which can curdle and separate. Avoid overcooking on high, as this can make the beef stringy.
Also, don't skip resting the meat—it allows the juices to redistribute. If the sauce tastes flat, add a pinch of salt or a squeeze of lime juice at the end, but be aware that the video does not include these additions.
How to tell it’s done
The beef is done when it is fork-tender and reaches an internal temperature of at least 145°F (63°C). The sauce should be bubbling gently and thick enough to coat a spoon. The cheese will be fully melted and blended into the sour cream, creating a creamy, pale golden sauce.
If the sauce seems thin, remove the lid and cook on high for an additional 15-20 minutes to reduce. Let the meat rest for at least 3 minutes before serving to keep it juicy.
- Steaks, chops and roasts: 145°F (63°C) in the thickest part, then a 3-minute rest
Up next · Part 3 of 3
4 variations · storage & make-ahead · 5 answers · printable card
Tips, FAQ & printable recipe (Part 3)← Back to the ingredients (Part 1)