Dinner · Part 2 of 3: Instructions
Slow Cooker Maple Bacon Chuck Roast Step-by-step instructions
- Prep
- Cook
- Total
- Serves
- 6
Before you start
Before beginning, ensure your slow cooker is clean and placed on a flat, heat-resistant surface. Have all your ingredients measured and ready to go.
Because this recipe relies on long, slow cooking, there is no need to sear the meat beforehand; the slow cooker does all the work.
Ensure you have a pair of sturdy forks ready for shredding the beef once the cooking time concludes, as the meat will be extremely tender and delicate.
Ingredients at a glance (4)
- 3 lb chuck roast
- 6 oz bacon, diced
- 2 tbsp garlic herb seasoning
- 1 1/2 cups maple broth
Instructions
Assembly and initial setup
- Prepare the slow cookerPlace the raw chuck roast directly into the bottom of the slow cooker bowl. Ensure the meat is positioned centrally to allow even heat distribution during the cooking process.Look for The roast should sit flat in the cooker.Tip Do not add any oil or liquid at this stage.
At this stage, the beef is placed in the cooker, topped with bacon, seasoning, and broth. Everything is raw, but neatly arranged. The key is to ensure the meat is sitting flat to promote even heating from the base of the slow cooker.
Slow cooking process
- Add flavorings and braising liquidScatter the diced bacon evenly over the surface of the roast. Sprinkle the garlic herb seasoning over the bacon and beef, then pour the maple broth into the slow cooker, carefully avoiding the edges to keep the sides clean.Look for The bacon should be distributed across the meat.Tip Use a glass measuring cup to pour the liquid steadily.
Throughout the cooking phase, the aroma of garlic, herbs, and bacon will fill the kitchen. The broth will begin to bubble gently, and the beef will slowly release its juices, mixing with the maple and bacon fat to create a fragrant, flavorful braising liquid.
Shredding and final preparation
- Slow cook and shredCover the slow cooker and set to low heat for 8 hours. Once finished, ensure the internal temperature of the roast reaches 145°F (63°C). Remove the beef to a cutting board, let it rest for 10 minutes, then shred the meat using two forks.Look for The meat should pull apart easily with a fork.Safe temperature 145°F (63°C) internal temperature (steaks, chops and roasts)Tip Discard any large pieces of excess fat while shredding.
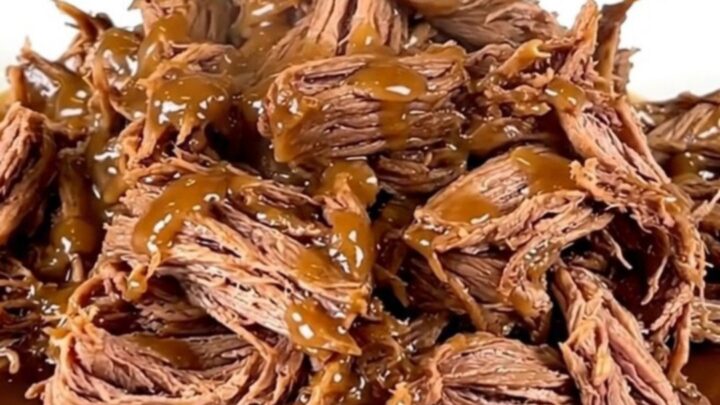
Once the cooking cycle is complete, the meat should be exceptionally tender. The final check involves testing the texture with a fork. It should yield instantly, falling apart with minimal pressure, indicating the roast is ready to be shredded and served.
Common mistakes
A common mistake is adding too much liquid; the roast releases its own juices as it cooks, so stick to the measured amount of broth.
Another error is checking the roast too frequently by lifting the lid, which releases precious heat and moisture, significantly slowing down the cooking process. Trust the slow cooker and keep the lid closed until the final hour of cooking to ensure the best possible results.
How to tell it’s done
The roast is finished when it reaches an internal temperature of 145°F (63°C) and shreds easily with two forks. The meat should be dark, glistening with the maple bacon juices, and have a soft, pull-apart consistency.
If the meat offers resistance when prodded with a fork, continue cooking for another 30 to 60 minutes, as tenderness is the ultimate indicator of success for this slow-cooked dish.
- Steaks, chops and roasts: 145°F (63°C) in the thickest part, then a 3-minute rest
Up next · Part 3 of 3
2 variations · storage & make-ahead · 3 answers · printable card
Tips, FAQ & printable recipe (Part 3)← Back to the ingredients (Part 1)