Dinner · Part 2 of 3: Instructions
Slow Cooker Lamb Shoulder with Chestnuts and Onions Step-by-step instructions
- Prep
- Cook
- Total
- Serves
- 4
Before you start
Before beginning, ensure all ingredients are ready to go. Peel and cut the onions into thick wedges, as smaller pieces may disintegrate during the long cooking time.
If using vacuum-packed chestnuts, drain and rinse them lightly under cold water. Have the beef broth measured and ready, and ensure the slow cooker is plugged in and placed on a stable, heat-resistant surface away from any splashes.
Ingredients at a glance (5)
- 2 lb lamb shoulder, cut into large chunks
- 1 cup peeled chestnuts
- 2 large onions, cut into wedges
- 1 packet veal stock powder
- 2 cups beef broth
Instructions
Preparation and assembly
- Assemble the slow cookerPlace the chunks of lamb shoulder into the base of the slow cooker. Arrange the onion wedges and peeled chestnuts evenly around the meat to ensure balanced cooking throughout the process.Look for The lamb pieces should be spread out in a single layer if possible for even heat distribution.Tip Avoid overcrowding the slow cooker to ensure the meat cooks evenly without steaming too much.
At this stage, the slow cooker contains the raw lamb, onion wedges, and chestnuts. Everything should be arranged in a single layer to ensure even heat distribution once the device is turned on.
Ensure the veal stock powder is distributed evenly across the surface of the meat and vegetables before adding the beef broth to prevent clumping.
Slow braising process
- Season and add liquidSprinkle the veal stock powder over the lamb and vegetables. Carefully pour the beef broth over the entire mixture, ensuring the stock powder dissolves into the liquid as it settles into the bottom.Look for The liquid should partially submerge the ingredients without filling the slow cooker to the brim.Tip Pour the liquid slowly to avoid splashing the stock powder out of the cooker.
The lamb is simmering gently in the seasoned broth. The scent of savory meat and onions will fill the kitchen. Check that the liquid is bubbling very lightly; if it is boiling vigorously, the heat setting may be too high. Ensure the lid is securely closed to maintain the necessary humidity for tenderizing the lamb shoulder.
Final reduction and serving
- Cook and serveCover and cook on low for 6 hours until the lamb is tender. Ensure the internal temperature of the lamb reaches at least 145°F (63°C). Let the meat rest for at least 10 minutes before serving.Look for The lamb will be glossy and tender, and the onions should be soft and translucent.Safe temperature 145°F (63°C) internal temperature (steaks, chops and roasts)Tip Using a meat thermometer ensures the lamb is safely cooked while maintaining its succulence.
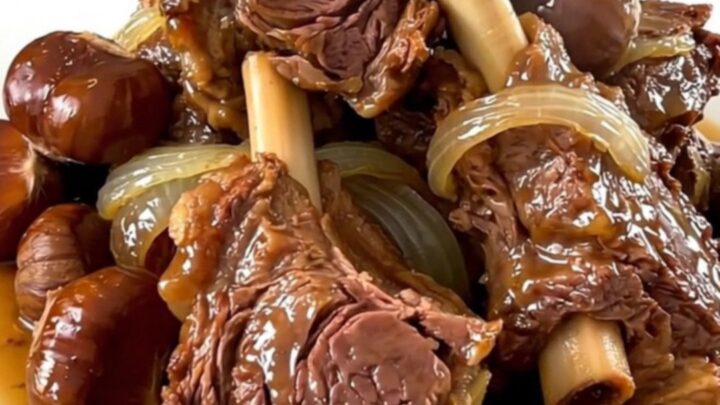
The meat is now tender and glossy, and the chestnuts have softened perfectly. The sauce should be rich and aromatic. Check that the lamb is at least 145°F (63°C) internally. Before serving, verify that the onions have maintained their shape but are tender enough to cut with a fork, providing a soft contrast to the savory lamb.
Common mistakes
Avoid lifting the lid frequently during the cooking process, as each time the lid is opened, heat escapes and the cooking time must be extended.
Do not add too much liquid, as the onions and lamb will release their own juices during the process; the broth should only partially cover the meat. Ensure the lamb is not cut into pieces that are too small, which can lead to the meat becoming stringy or dry.
How to tell it’s done
The lamb is done when it is fork-tender and pulls apart easily with minimal pressure. Use a digital meat thermometer to confirm the internal temperature has reached at least 145°F (63°C) in the thickest part of the meat.
The liquid should have reduced slightly into a glossy, flavorful sauce that coats the back of a spoon. Let the meat rest for 10 minutes to allow the juices to redistribute.
- Steaks, chops and roasts: 145°F (63°C) in the thickest part, then a 3-minute rest
Up next · Part 3 of 3
2 variations · storage & make-ahead · 3 answers · printable card
Tips, FAQ & printable recipe (Part 3)← Back to the ingredients (Part 1)