Dinner · Part 2 of 3: Instructions
Slow Cooker Garlic Chicken Thighs with Four Ingredients Step-by-step instructions
- Prep
- Cook
- Total
- Serves
- 4
Before you start
Plan the timing around the cooker, not the clock: four hours on LOW means the insert should be loaded by early afternoon for a dinner-hour plate. Pat the thighs dry with paper towels and keep them in the refrigerator until the cooker is ready — raw poultry should not sit on the counter for more than about 30 minutes before cooking.
Peel the garlic, or open the container of pre-peeled cloves, and measure the herb blend and broth into small cups so assembly takes two minutes. Check that the insert sits level in the heating base before anything goes in.
Ingredients at a glance (4)
- 6 boneless skinless chicken thighs
- 12 whole peeled garlic cloves
- 2 tsp dried Italian herb blend
- 1 cup chicken broth
Instructions
Layer the cooker
- Dry and layer the thighsPat the chicken thighs dry with paper towels. Arrange them in the slow cooker in a single, snug layer, folding any ragged edges under so each piece sits flat against the ceramic insert. Even contact with the insert helps every thigh cook at the same pace from the first hour onward.Look for The thighs should fit without stacking; light crowding is fine, but no piece should sit fully on top of another.Tip Drying the surface first helps the finished sauce cling to the meat instead of sliding off a damp layer.
- Scatter the garlic clovesScatter the peeled garlic cloves evenly over and around the thighs, tucking a few underneath so they braise in the liquid rather than dry out on top. Aim for cloves in every corner of the insert so each serving gets its fair share of the sweet, softened garlic.Look for Every thigh should have at least two cloves nearby; the garlic will look like a lot now, and that is the point.Tip Tucked cloves turn creamy and mild; cloves left fully exposed can dry at the rim, so keep them covered by meat or liquid.
- Season and add the brothSprinkle the dried herb blend over the chicken, then pour the broth slowly down the side of the insert so it pools underneath without washing the herbs off the meat. Put the lid on. The broth should reach roughly a third of the way up the thighs, never covering them.Look for The broth should pool at the bottom and climb partway up the stack of thighs, leaving the tops clearly above the liquid.Tip Pouring against the wall of the insert keeps the herbs where they landed, so the top of each thigh stays seasoned.
By the end of this phase the insert should hold six thighs in a single, mostly flat layer, with garlic cloves visible in the gaps and a thin pool of broth at the bottom that reaches roughly a third of the way up the meat. Nothing should be submerged — the tops of the thighs stay above the liquid so the herbs keep their place. The lid goes on with a gentle press; steam should begin to gather within a few minutes if the base is already warm. If the pile looks stacked rather than tiled, rearrange before turning the cooker on.
Slow-cook to tender
- Cook low and slowCook on LOW for 4 hours, or on HIGH for about 2 hours, until the thighs are tender. Resist lifting the lid during cooking; every peek releases heat and adds 15 to 20 minutes to the clock. Trust the timer and let the insert do its quiet, steady work.Look for Steam should gather under the lid and the edges should bubble gently; a rolling boil means the setting is too hot.Tip LOW gives the garlic more time to turn sweet and the sauce more time to settle, so choose it whenever the schedule allows.
- Check the temperatureCheck for doneness by inserting an instant-read thermometer into the thickest thigh, away from any garlic clove. The chicken is safe to eat at an internal temperature of 165°F (74°C). If one reads low, cover and continue cooking, checking again every 20 minutes until it reaches temperature.Look for Fully cooked thighs feel tender under the probe and the juices around them look clear, never pink.Safe temperature 165°F (74°C) internal temperature (poultry)Tip Thighs hold well on LOW, but the thermometer is the only reliable sign they have reached a safe temperature.
After four hours on LOW, lift the lid away from you and look for thighs that sit plump and intact in a shallower pool of liquid than when they went in — the meat releases juices while some steam escapes, so the level changes only slightly.
The garlic cloves should look pale gold at the edges and offer no resistance to a fork. The kitchen should smell of herbs and roasted garlic, not of raw poultry. Take the temperature in the thickest thigh before anything else; 165°F (74°C) is the number that matters, and everything else on the plate waits for it.
Sauce and serve
- Rest the chickenTransfer the thighs to a warm plate with tongs and tent them loosely with foil. Let them rest for 5 minutes so the juices settle back through the meat while the sauce finishes in the insert. The thighs should stay plump and hold their shape when lifted.Look for The thighs should look plump and glossy, holding their shape without falling apart when lifted with tongs.Tip Braised meat reabsorbs moisture quickly, but those few minutes keep every bite juicy rather than draining onto the plate.
- Build the herb sauceTurn the cooker to HIGH, press about a third of the softened garlic cloves against the side of the insert with a fork, and stir them into the cooking liquid. Let the sauce reduce uncovered for 5 to 10 minutes until it thickens enough to lightly coat the back of a spoon.Look for The sauce is ready when it leaves a brief trail across the bottom of the insert when stirred with the fork.Tip Crushing a few cloves into the liquid is all the thickening this sauce needs; starch would dull the garlic flavor.
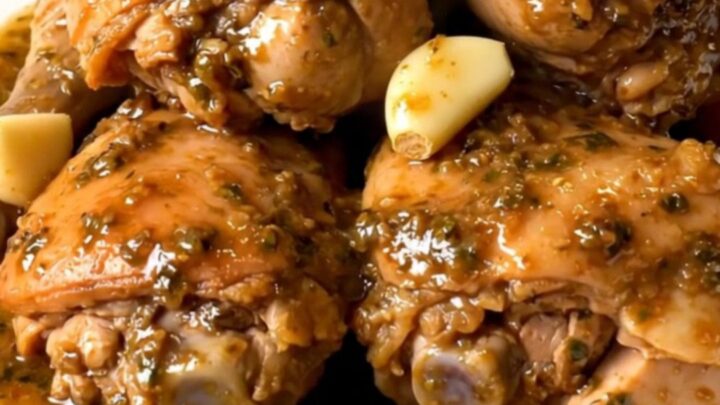
- Plate and serve hotSpoon the sauce onto a warm plate, set the thighs on top, and scatter the remaining whole garlic cloves around them. Serve right away while the plate is steaming and the sauce is still glossy, with the soft cloves ready to spread alongside each portion.Look for The finished plate should show tender thighs napped in sauce with soft cloves alongside, steam rising as it reaches the table.Tip Warm the plates briefly under hot tap water so the sauce stays loose and glossy until everyone sits down.
The finished plate should show thighs napped in a sauce that clings and slowly slumps rather than running to the rim, with a few crushed cloves stirred through and whole ones scattered alongside. The sauce should taste of herbs first, then garlic, then the richness of the broth — mellow, never sharp.
Steam should still rise when it reaches the table, which is why warmed plates earn their keep here. Before serving, check the sauce against a spoon: it should leave a brief trail across the insert. If it still looks watery, give it a few more minutes uncovered on HIGH.
Common mistakes
The most common slip is overfilling with broth. More than a cup turns the sauce thin and dilutes the garlic; much less risks scorching at the edges of the insert. Lifting the lid to check progress costs 15 to 20 minutes each time, so trust the timer instead. Cooking on HIGH to save an hour works, but the garlic has less time to sweeten and the sauce stays thinner. Finally, avoid stacking thighs — a piece sitting fully on top of another cooks unevenly and may miss the safe temperature at the center even when the rest reads done.
How to tell it’s done
Done means two things here. First, safety: an instant-read thermometer inserted into the thickest part of a thigh, away from any garlic clove, must read 165°F (74°C). Second, texture: braised thighs at that temperature should feel tender under the fork and pull apart with light pressure, their juices clear.
The garlic cloves are done when they crush against the side of the insert with almost no pressure — pale, soft, sweet. The sauce is ready when it lightly coats the spoon after its few minutes uncovered. If the temperature reads low, simply cover and keep cooking; thighs hold their texture well.
- Poultry: 165°F (74°C) in the thickest part
Up next · Part 3 of 3
4 variations · storage & make-ahead · 5 answers · printable card
Tips, FAQ & printable recipe (Part 3)← Back to the ingredients (Part 1)