Dinner · Part 2 of 3: Instructions
Slow Cooker Creamy Onion Pork Chops (Dump-and-Go Dinner) Step-by-step instructions
- Prep
- Cook
- Total
- Serves
- 4
Before you start
Set out the slow cooker where its vent has a few inches of clearance, since it runs for hours. Pat the pork chops dry, season them lightly, and slice the onions into thick rings, keeping the pieces sturdy so they hold shape through the cook. Open the can of condensed soup and blend it with the onion soup mix in a small bowl until no dry streaks remain. Have the lid, a spoon for dolloping, and an instant-read thermometer within reach.
Ingredients at a glance (4)
- 4 bone-in pork chops (about 2 lb), 1 inch thick
- 2 large yellow onions, sliced into thick rings
- 1 oz dry onion soup mix (about 2 tbsp)
- 10.5 oz condensed cream soup (cream of chicken flavor), canned
Instructions
Prep the Chops and Sauce
- Dry and season the chopsPat the pork chops dry with paper towels and set them on a clean plate. Sprinkle both sides lightly with salt and a few grinds of black pepper, keeping the salt modest because the onion soup mix is already well seasoned. Dry surfaces and a light hand with the salt help the chops braise evenly and keep the finished gravy balanced.Look for The surface of each chop should look dry and matte, with no damp spots, before it goes near the cooker.Tip Chops close to 1 inch thick hold their juiciness best over a long cook; very thin ones turn dry.
- Slice the onions into ringsTrim the ends from the onions, halve them top to bottom, and slice into rings about 1/4 inch thick. Separate the rings with your fingers so they scatter evenly instead of clumping into a solid mass. Thick slices keep some bite during the long cook instead of dissolving completely into the gravy.Look for Aim for even, sturdy rings; a few broken pieces are fine, but avoid paper-thin slices that vanish.Tip A sharp chef's knife gives cleaner, more even rings than rushing the cuts.
- Blend the soup and seasoningSpoon the condensed cream of chicken soup into a small bowl, add the dry onion soup mix, and stir until the mixture is uniform in color with no dry streaks of powder left. This quick blend distributes the onion seasoning through the soup so that every spoonful of gravy tastes the same from the first serving to the last.Look for The sauce should look pale golden and smooth, with the onion flecks spread evenly throughout.Tip Scrape the bowl with a rubber spatula so none of the seasoned soup is left behind.
By the end of this phase, the raw pork chops sit dry and lightly seasoned on a plate, the onions are cut into even, sturdy rings, and the cream of chicken soup and onion soup mix are stirred into a smooth, pale golden sauce with no visible powder.
Nothing has touched heat yet. Before moving on, confirm three things: the chop surfaces feel dry rather than damp, the onion rings separate cleanly instead of clumping, and the seasoned soup shows no dry streaks.
Layer and Cook
- Fan the chops in the insertArrange the pork chops in the bottom of a 6-quart slow cooker insert, letting them overlap slightly the way shingles do. Slight overlapping is fine and even helps the chops stay moist, but leave gaps here and there so the onions can settle between them and the gravy can circulate around every piece as it cooks.Look for The bottom of the insert should be covered in one layer, with small gaps showing between the chops.Tip Position the thickest chops toward the center of the insert, where the heat is steadiest.
- Add onions and soup mixScatter the onion rings over and around the chops, letting them fall into the gaps and pile gently on top. Sprinkle the dry onion soup mix evenly over everything, tilting toward the onions, which will drink up the seasoning as they soften. Do not stir; the layers stay exactly as they are.Look for Every chop should have onions touching it and a light, even dusting of the soup mix on top.Tip Resist stirring now; the layered arrangement cooks more evenly than a stirred jumble.
- Dollop the cream soup overDollop the seasoned cream of chicken soup over the chops and onions in large spoonfuls, then spread it gently with the back of the spoon so it covers most of the surface. Cover the slow cooker with the lid. No water or broth is needed; the onions and the chops release plenty of liquid on their own.Look for The top should look mostly blanketed in pale soup, with onion rings peeking through here and there.Tip A light spread is enough; the gravy thins and doubles in volume as it cooks.
- Cook low and slowPut the lid on and cook on low for 6 hours, or on high for about 3 to 3 1/2 hours, until the chops are fork-tender. Low heat gives the tenderest, most evenly braised result, so choose it whenever the day allows. Keep the lid closed the whole time while the chops braise in the onion gravy.Look for Near the end, the gravy bubbles gently at the edges and the kitchen smells deeply of sweet, cooked onion.Tip Every peek drops the temperature and adds cooking time, so trust the lid.
This phase ends when the lid has been on and the cooker has run its full time. The insert should hold chops resting in a deep, creamy onion gravy, the onions collapsed and translucent, and the whole thing bubbling gently at the edges. The smell is the best signal: deeply sweet, savory onion filling the kitchen, with no raw or sour notes. The gravy should coat a spoon thickly rather than pooling watery around the chops.
Check, Rest, and Serve
- Check the temperature and restCheck the chops with an instant-read thermometer inserted into the thickest part, avoiding the bone. They are safely done at 145°F (63°C). Transfer the chops to a plate or warm platter, tent them loosely with foil, and let them rest at least 3 minutes so the juices settle back into the meat before serving.Look for The meat should feel slack and tender under the probe, and the gravy should be thick enough to coat a spoon.Safe temperature 145°F (63°C) internal temperature (steaks, chops and roasts)Tip If the chops need more time, recover the cooker and check again in 20 minutes on low.
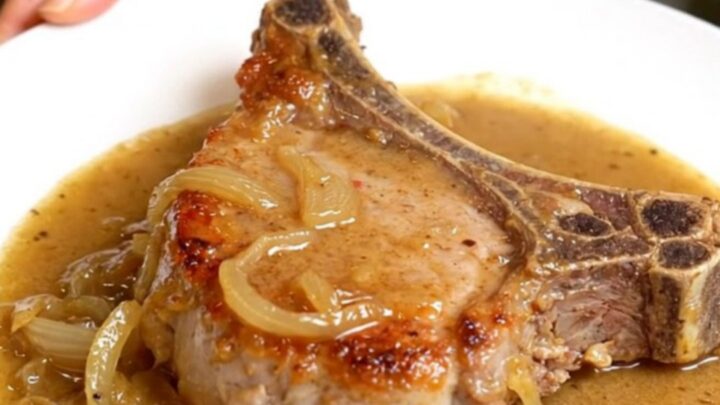
- Plate with the onion gravySpoon the softened onions and the creamy onion gravy over the rested chops and serve hot. The gravy will be thick and glossy, the onions soft and sweet, and the meat ready to pull from the bone. Plate each chop with a generous ladle of gravy so nothing is left behind in the insert.Look for Look for chops that give easily to a fork and gravy that clings rather than runs.Tip Warm the plates briefly so the gravy stays fluid until everyone is seated.
The final phase is short and decisive. The thermometer reads 145°F (63°C) in the thickest chop, the chops have rested under foil for at least 3 minutes, and the meat now feels tender and juicy rather than tense.
The gravy is glossy and thick, clinging to the softened onions, and it ladles smoothly over each chop without running off the plate. On the plate, the meat should pull from the bone with light pressure and look moist all the way through.
Common mistakes
The most common mistake is overcooking, especially on high, where chops can pass from tender to dry inside half an hour once they are done. Starting the check early, around the 5-hour mark on low, removes the guesswork.
Lifting the lid repeatedly is the second trap: each peek releases heat and steam and can stretch the cook by 20 minutes or more. Under-seasoning at the start is another, because the chops themselves never touch the gravy directly enough to catch up later; a light sprinkle on both sides before they go in matters.
How to tell it’s done
The chops are done when an instant-read thermometer reads 145°F (63°C) in the thickest part, away from the bone, which is the safe internal temperature for pork cuts.
Done chops also show the telltale braised signs: the meat gives easily to a fork, the edges loosen slightly from the bone, and the surface looks slack rather than springy. The gravy should be thick enough to coat a spoon and glossy where it pools, with the onions fully collapsed and sweet.
- Steaks, chops and roasts: 145°F (63°C) in the thickest part, then a 3-minute rest
Up next · Part 3 of 3
4 variations · storage & make-ahead · 5 answers · printable card
Tips, FAQ & printable recipe (Part 3)← Back to the ingredients (Part 1)