Dinner · Part 2 of 3: Instructions
Slow-Cooker Cheesy Tortilla Chip Taco Beef Casserole Step-by-step instructions
- Prep
- Cook
- Total
- Serves
- 8
Before you start
Pull out the slow cooker, the skillet, and a mixing bowl, and check that the crock fits where it will cook for three hours with a little air around the lid. Grate the cheddar now so it is ready to scatter the moment the layers go in. Keep the sour cream in the refrigerator until the moment it is stirred into the sauce. Crush the tortilla chips in the bag with a rolling pin, aiming for coarse pieces — roughly half-inch — rather than fine crumbs, since larger pieces keep some bite after cooking.
Ingredients at a glance (10)
- 2 lb ground beef
- 1 packet taco seasoning (about 2 tbsp), or 2 tbsp homemade blend
- 1 can (10 oz) diced tomatoes and green chiles, undrained
- 1 can (10.5 oz) cream of chicken soup (condensed cream soup)
- 1 cup sour cream, plus more for drizzling
- 9 oz nacho cheese tortilla chips, coarsely crushed (about 6 cups)
- 3 cups shredded sharp cheddar cheese
- 1 ripe avocado, diced
- 2 tbsp chopped fresh cilantro
- 1 lime, cut into wedges, for squeezing
Instructions
Brown, sauce, and layer
- Brown the taco beefSet a large skillet over medium-high heat and add the ground beef, breaking it up with a wooden spoon as it cooks. Sprinkle the taco seasoning over the meat and keep crumbling and stirring until no pink remains and the beef reaches 160°F (74°C), about 8 minutes. Drain the fat thoroughly so the casserole never turns greasy.Look for The beef is evenly crumbled, deep brown in spots, and no trace of pink shows anywhere in the pan.Safe temperature 160°F (71°C) internal temperature (ground meat)Tip Pour off the fat while the pan is hot, then blot the beef quickly with paper towels for cleaner layers.
- Stir the creamy sauce baseIn a mixing bowl, stir together the condensed cream soup, the sour cream, and the undrained can of diced tomatoes and green chiles until the color is even and no streaks of soup remain. This mixture is what keeps every layer moist as the casserole slow-cooks, so take a moment to blend it fully before it meets the beef.Look for The sauce is pale, smooth, and flecked evenly with red tomato and green chile pieces.Tip Stir patiently until completely smooth; any lumps of soup show up later as pale streaks in the finished layers.
- Layer the casseroleLightly coat the slow cooker with nonstick spray. Spread the hot taco beef across the bottom, then scatter half of the crushed tortilla chips over it. Pour the creamy sauce over everything, smooth it to the edges, and finish with all three cups of shredded cheddar spread in an even blanket. Resist stirring; the layers stay distinct.Look for You can still see the separate bands of beef, chips, sauce, and cheese through the crock wall.Tip Crush the chips in the bag with a rolling pin; big pieces hold more crunch than fine crumbs.
At the end of this phase the crock is fully assembled and switched on. The beef should look deeply browned and evenly crumbled with no pink anywhere, and the skillet should be empty of visible fat. The sauce should be smooth and streak-free when poured, and the cheddar should cover the top edge to edge in an even blanket. Before walking away, confirm the cooker is on LOW and the lid sits flush; a crooked lid vents heat and stretches the cook time well past three hours.
Slow-cook to molten
- Cook low and slowCover the slow cooker and set it to LOW for 3 hours. No peeking for the first two and a half hours — every lift of the lid releases heat and slows the melt. The casserole needs no stirring at all; the gentle heat does the work of an oven while you go about your day.Look for Steam fogs the lid and faint bubbling sounds come from the crock well before time is up.Tip If the schedule is tight, HIGH for 90 minutes works, but LOW gives the creamiest sauce.
- Check the meltAt the 3-hour mark, lift the lid and look closely. The edges should bubble actively, the cheese should be fully molten and glossy, and the exposed chips on top should look toasted and saturated. If the center still looks pale or the cheese has not fully melted, cover and give it another 20 to 30 minutes on LOW.Look for The cheese surface ripples gently from the bubbles escaping around the edges of the crock.Tip Slow cookers vary; know your model's hot spots and rotate the liner if one side cooks faster.
- Rest before scoopingTurn the slow cooker off, keep the lid on, and let the casserole rest for 10 minutes. The molten cheese tightens just enough to hold layers together on the spoon, and the sauce stops bubbling so portions lift out clean instead of sliding apart. Skipping this step costs you neat servings.Look for The bubbling settles, and the cheese surface looks set but still shiny and soft.Tip Rest with the lid on but the cooker switched off so residual heat does not keep cooking.
After three hours on LOW, the transformation is unmistakable. The edges of the casserole bubble steadily, the cheese has melted into a glossy, golden layer, and the exposed chips on top look toasted and saturated with sauce.
Steam escapes in a rich wave of taco seasoning and melted cheese the moment the lid lifts. Check the center: it should look as hot and molten as the edges. If any part stays pale or the sauce seems loose, give it 20 to 30 more minutes covered, then reassess before moving on.
Rest, scoop, and garnish
- Scoop generous portionsPush a large serving spoon straight down through the layers to the bottom of the crock, then lift a full portion onto a warm plate so every serving carries beef, chips, sauce, and cheese together. Work from one side and refill the gap as you go; the casserole holds its heat well in the ceramic liner.Look for Each scoop shows distinct layers with cheese stretching from the spoon to the crock.Tip Warm the plates briefly in the oven so the cheese stays stretchy at the table.
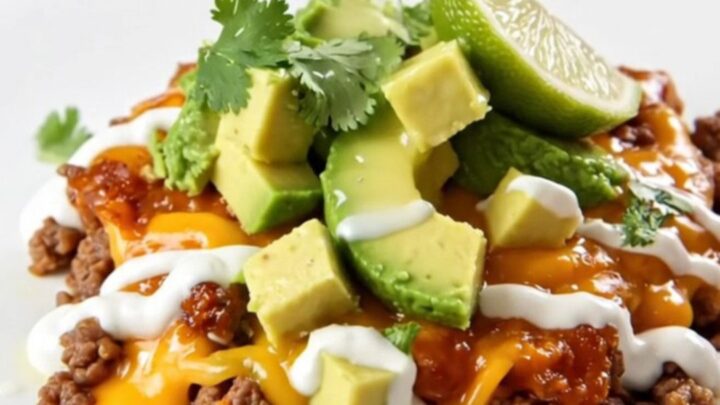
- Top and finishFinish each plate with diced avocado, a drizzle of sour cream, and a scatter of chopped cilantro, then squeeze a lime wedge over the top just before it reaches the table. The cool toppings against the hot, cheesy casserole are the whole point, so serve within a minute of garnishing.Look for The lime hits the hot cheese with a bright hiss of steam and lift of citrus aroma.Tip Put the toppings in small bowls and let everyone garnish their own plate.
The finished casserole rests for ten minutes with the cooker off, during which the bubbling subsides and the cheese surface settles into a set but shiny state. Portions lift in clean, full-depth scoops with all four layers present in each one.
Every plate gets the cool finishing touch — avocado, sour cream, cilantro, and a squeeze of lime — and goes to the table while the cheese still stretches. If the last servings wait, re-cover the crock to hold the heat; the residual warmth keeps them hot for a good half hour.
Common mistakes
The most common slip is skipping the drain after browning; even a little pooled fat turns the sauce greasy and the chips sodden, so blot the beef before it layers in. Lifting the lid early is the second offender — every peek costs twenty minutes of cooking, so trust the timer until the three-hour mark.
Using finely crushed chip crumbs instead of coarse pieces leaves no crunch at all on top. Overfilling a small crock slows the melt and can leave cold pockets in the center. Finally, scooping the instant the lid comes off makes portions slide apart; the short rest is what keeps the layers intact on the plate.
How to tell it’s done
The casserole is done when the edges bubble actively, the cheese across the whole surface is fully melted and glossy with no pale shreds left, and the sauce looks thick rather than soupy when the spoon parts it at the edge.
The beef finished cooking in the skillet at 160°F (74°C), the safe internal temperature for ground meat, so the slow cooker's job is melt and meld, not further cooking. If the top has melted but the center still looks cool or the sauce seems thin, cover and continue on LOW for another 20 to 30 minutes, then check again.
- Ground meat: 160°F (71°C) in the thickest part
Up next · Part 3 of 3
4 variations · storage & make-ahead · 5 answers · printable card
Tips, FAQ & printable recipe (Part 3)← Back to the ingredients (Part 1)