Dinner · Part 2 of 3: Instructions
Slow-Cooker Bourbon Glazed Chicken Drumsticks Step-by-step instructions
- Prep
- Cook
- Total
- Serves
- 4
Before you start
Before you start, make sure your slow cooker is clean and dry. If you have time, trim any excess skin from the drumsticks, though it's not necessary. Prepare the fresh ginger by peeling and cutting it into thin matchsticks, and slice the scallions into 2-inch batons. Measure out the bourbon BBQ glaze and brown sugar.
Have your instant-read thermometer ready for checking doneness. If you plan to serve the chicken with mashed potatoes, prepare those just before serving, or keep them warm in a covered dish. This recipe requires minimal prep, so you can have everything in the slow cooker in under 10 minutes.
Ingredients at a glance (5)
- 8 chicken drumsticks
- 2 tbsp fresh ginger, julienned
- 4 green onions, cut into thick batons
- 1 cup bourbon BBQ glaze
- 1/4 cup dark brown sugar, packed
Instructions
Prep and Load
- Arrange the ChickenPlace the chicken drumsticks in the slow cooker insert, arranging them in a single layer in a circle. It's okay if they overlap slightly; they will shrink as they cook.Look for The drumsticks should fit snugly in the bottom of the slow cooker.Tip If using a smaller slow cooker, stack the drumsticks slightly; they will cook evenly anyway.
- Add Ginger and ScallionsScatter the julienned fresh ginger and the thick-cut green onion batons over the chicken, distributing them evenly so every drumstick gets some aroma.Look for The ginger and scallions should cover the chicken in a light layer.Tip Cut the scallions into 2-inch pieces for a heartier texture after slow cooking.
- Top with Glaze and SugarPour the bourbon BBQ glaze over the chicken, then sprinkle the dark brown sugar evenly on top. Do not stir; the sugar will melt and form a lacquer during cooking.Look for The glaze and sugar should coat the top of the chicken and aromatics.Tip Use a spatula to scrape every last bit of glaze from the measuring cup.
At the end of this phase, all ingredients are in the slow cooker: the drumsticks are arranged in a single layer, topped with ginger and scallions, and coated with the bourbon glaze and brown sugar. The slow cooker is ready to turn on.
You should see a glossy, sugary layer over the chicken, and the aromatics are scattered evenly. The raw chicken should be cold from the refrigerator, and you should wash your hands and any surfaces that touched raw poultry before proceeding.
Slow Cook
- Cook on LowCover the slow cooker and cook on low for 4 to 5 hours, or until the chicken is tender and registers at least 165°F (74°C) in the thickest part of a drumstick. Avoid opening the lid during the first 3 hours to keep the heat steady.Look for The sauce should be bubbling gently around the edges and the chicken should look glossy.Safe temperature 165°F (74°C) internal temperature (poultry)Tip If you prefer a thicker glaze, remove the chicken and simmer the sauce on the stovetop for 10 minutes.
- Check for DonenessAfter 4 hours, check the chicken with an instant-read thermometer. Insert it into the thickest part of a drumstick without touching bone. The temperature should be at least 165°F (74°C). If not, continue cooking in 15-minute increments.Look for The meat should be pulling away from the bone and the sauce should be thick and sticky.Safe temperature 165°F (74°C) internal temperature (poultry)Tip If the chicken is not yet tender, give it another 30 minutes; slow cookers vary.
After 4 to 5 hours on low, the kitchen will smell sweet and savory. The sauce should be bubbling gently around the edges, and the chicken will look glossy and lacquered. The meat should be pulling away from the bone when tested with a fork. The internal temperature should be at least 165°F (74°C). The ginger and scallions will have softened and melded into the sauce. If the chicken is not yet tender, continue cooking in 15-minute increments until it is.
Serve and Finish
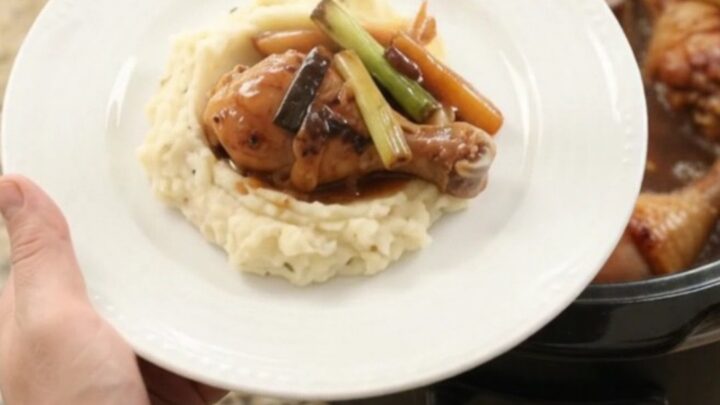
- Serve Over Mashed PotatoesUsing a slotted spoon, transfer the drumsticks to a serving platter or individual plates. Spoon some of the glaze over the top and serve immediately with creamy mashed potatoes on the side.Look for The chicken should be glistening with a sticky bourbon-molasses sauce.Tip For a family-style dinner, place the drumsticks directly on a platter and pour the sauce over.
When you lift the drumsticks out with a slotted spoon, they should be glistening with a thick, sticky glaze. The sauce should coat the back of a spoon. The ginger and scallions will be caramelized and fragrant. The chicken will be fall-off-the-bone tender, and the sauce will have a deep bourbon-molasses color. Serve immediately over mashed potatoes, spooning extra glaze over the top. The dish should look glossy, rich, and utterly inviting.
Common mistakes
One common mistake is lifting the lid too often during cooking, which lets heat escape and extends the cooking time. Trust the process and keep the lid on. Another is using too much sauce or sugar, which can make the dish overly sweet and thin; stick to the measurements.
If you use a glaze that is very thin, the sauce may not thicken enough; you can thicken it with a cornstarch slurry at the end. Finally, don't overcrowd the slow cooker—if you have more than 8 drumsticks, cook them in batches or use a larger slow cooker to ensure even cooking.
How to tell it’s done
The chicken is done when it is fork-tender and the internal temperature in the thickest part of a drumstick, without touching bone, reaches at least 165°F (74°C). The meat should easily pull away from the bone, and the sauce should have thickened and reduced slightly, clinging to the chicken like a glaze.
If the sauce seems too thin, you can remove the chicken and simmer the sauce on the stovetop for a few minutes to reduce it. The ginger and scallions should be soft and infused with the sauce, and the overall aroma will be rich, sweet, and savory.
- Poultry: 165°F (74°C) in the thickest part
Up next · Part 3 of 3
4 variations · storage & make-ahead · 5 answers · printable card
Tips, FAQ & printable recipe (Part 3)← Back to the ingredients (Part 1)