Desserts · Part 2 of 3: Instructions
Slow Cooker Apple Butter for Autumn Mornings Step-by-step instructions
- Prep
- Cook
- Total
- Serves
- 8
Before you start
Before beginning, ensure that you have thoroughly washed, peeled, and cored the apples. Slice them into uniform, thin pieces to ensure they cook evenly. Check that your slow cooker is clean, dry, and positioned on a stable, heat-resistant surface away from any water sources.
Have your measuring tools ready to ensure accuracy with the sugar and cinnamon, as these ratios are essential for achieving the correct balance of sweetness and spice in the final product.
Ingredients at a glance (4)
- 4 lbs apples, peeled and sliced
- 1 cup brown sugar
- 2 tsp ground cinnamon
- 1 cup sweet cider
Instructions
Preparation and layering
- Combine ingredients in the slow cookerPlace the peeled and sliced apples into the bottom of the slow cooker basin. Evenly scatter the brown sugar over the top of the fruit. Sprinkle the ground cinnamon over the sugar, then pour the sweet cider over all ingredients to provide the necessary moisture for the initial cooking phase.Look for ensure the apples are evenly layered at the bottomTip use a mix of apple varieties like Fuji and Gala for a balanced flavor profile
The apples should be neatly layered in the base of the slow cooker. The sugar and spices should be distributed evenly to ensure every slice is coated.
The cider should be poured carefully to moisten the base without drowning the fruit, creating the necessary steam environment for the initial breakdown phase.
Slow simmering
- Slow cook until tenderCover the slow cooker with its lid and set to low heat. Allow the mixture to cook undisturbed for approximately 8 hours. The apples should become completely soft and break down into a sauce-like consistency as they absorb the spices and sugar during the long, slow heat application.Look for apples are very tender and falling apart when pressed with a spoonTip avoid opening the lid frequently to maintain a consistent internal temperature throughout the process
During the long cook, the kitchen will fill with the warm aroma of cinnamon and cooked fruit. The apples will gradually collapse and lose their structure. Check that the slow cooker is on the low setting to maintain the gentle heat necessary for the apples to soften without burning or sticking to the bottom.
Reduction and thickening
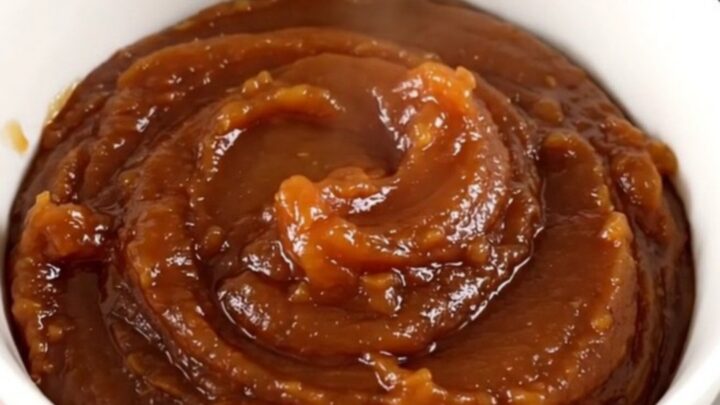
- Finish and caramelizeOnce the apples are tender, stir the mixture thoroughly. If a thicker consistency is desired, leave the lid slightly ajar for the final hour of cooking to allow excess moisture to evaporate. Once the apple butter reaches a deep, glossy, and thick consistency, turn off the slow cooker and transfer to storage containers.Look for the mixture is thick enough to hold its shape on a spoonTip use an immersion blender if a perfectly smooth texture is preferred over a rustic finish
The final phase involves checking for the desired thickness. The mixture should look glossy and dark. If it appears watery, adjust the lid to allow steam to escape. Once the apple butter is thick enough to hold its shape on a spoon, it is ready to be transferred to storage containers.
Common mistakes
A common mistake is failing to peel the apples, which results in an unpleasant texture. Another error involves using too much liquid, which forces the cooking time to be significantly longer to achieve the desired thickness.
Ensure you do not overfill the slow cooker, as this can lead to uneven cooking and potential overflow issues. Finally, avoid using high heat, as this can cause the sugars to burn at the edges before the fruit is properly softened.
How to tell it’s done
The apple butter is finished when it has achieved a dark, mahogany color and a thick, spreadable consistency. When you drag a spoon through the mixture, it should leave a clear trail and not run back together immediately.
The texture should be uniform, glossy, and smooth, with no large chunks of apple remaining. If the mixture appears too thin, simply continue to cook it for a longer period with the lid off to evaporate excess liquid.
Up next · Part 3 of 3
2 variations · storage & make-ahead · 3 answers · printable card
Tips, FAQ & printable recipe (Part 3)← Back to the ingredients (Part 1)