Dinner · Part 2 of 3: Instructions
Slow Cooker Angel Chicken: Creamy Italian Herb Sauce, Almost No Work Step-by-step instructions
- Prep
- Cook
- Total
- Serves
- 6
Before you start
Set up takes five minutes and makes the rest effortless. Take the cream cheese out first so it softens while everything else happens — softened cream cheese whisks smooth, cold cream cheese stays lumpy. Line up the can of condensed cream of chicken soup, the Italian seasoning and a glass measuring cup big enough to hold and whisk the full sauce batch.
Give the chicken breasts a quick look, trim any fat or ragged thin edges, and pat them dry with paper towels; dry surfaces help the sauce cling, and even thickness means even cooking. Set the cooker on the counter with airflow around it. Nothing else is needed — no browning pan, no additional pot, no board of chopped aromatics.
Ingredients at a glance (4)
- 2 1/2 lb boneless skinless chicken breasts
- 10.5 oz condensed cream of chicken soup (1 can)
- 8 oz cream cheese, softened
- 2 tbsp Italian seasoning
Instructions
Assemble the cooker
- Prep the chickenPat the chicken breasts dry with paper towels and trim away any visible fat or thin, ragged edges. Keeping the breasts whole is deliberate: whole pieces braise gently in the sauce and stay noticeably juicier than cut-up pieces over a long cook.Look for The surfaces should feel dry to the touch, which helps the sauce cling later.Tip Dry chicken means no excess water diluting the sauce, and trimmed edges keep every piece an even thickness.
- Arrange in the slow cookerLay the whole breasts side by side in a single snug layer in the ceramic insert of a 6-quart slow cooker. It is fine if they touch — the video shows them packed close — but avoid stacking, because stacked pieces cook unevenly and the top layer may not reach temperature at the same time.Look for Every breast should sit flat with the sauce able to flow around it.Tip A single layer is the whole trick here; if the breasts are very large, tuck the thickest ones toward the hotter sides of the insert.
- Whisk the sauceCombine the condensed cream of chicken soup, the softened cream cheese and the Italian seasoning in a glass measuring cup and whisk until the mixture is completely smooth and uniform in color, with no streaks of plain cream cheese left. Softening the cream cheese first is what makes this come together in under a minute.Look for The sauce should look pale, thick and glossy, with the herbs evenly dispersed throughout.Tip Cold cream cheese leaves stubborn lumps; thirty seconds in the microwave or twenty minutes on the counter fixes that.
- Pour the sauce overPour the sauce evenly over the arranged chicken, tilting the cup so it coats every breast and settles into the gaps between them. Do not stir — the sauce stays layered on top through the cook and melds into one creamy pool as the chicken releases its juices.Look for Each breast should have sauce visible on its top surface before the lid goes on.Tip Scrape the measuring cup well; the last of the sauce carries most of the seasoning.
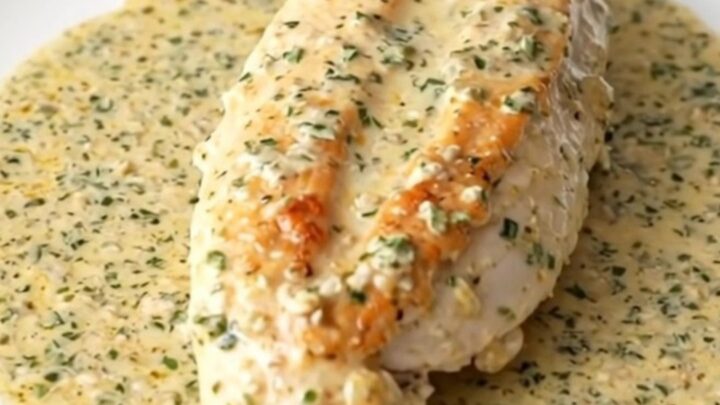
By the end of this phase the insert holds whole breasts in a single layer with the pale herb-flecked sauce poured evenly on top, no stirring done. Check three things before plugging in: every breast has sauce visible on its upper surface, nothing is stacked, and the sauce looks completely smooth with no cream cheese streaks.
The mixture is thick — thicker than a typical braising liquid — and that is correct; it thins as the chicken releases juices during the cook. The herbs should be distributed throughout the sauce rather than sitting in one patch, which is what the pre-whisk guarantees. If the sauce pooled only on one side, tilt the insert gently to spread it before covering.
Cook and verify
- Cook low and slowCover and cook on low for 4 to 5 hours, or on high for about 2 1/2 to 3 hours. Low gives the most tender, spoon-apart texture; high is the weeknight shortcut. Keep the lid closed the entire time — every lift adds roughly 20 minutes to the cook and lets heat escape.Look for The sauce will look bubbly at the edges and the breasts will look plump and pale all the way through.Tip Plan for low whenever the day allows; the extra two hours are the difference between tender and melt-apart.
- Check the temperatureNear the end of the cook, insert an instant-read thermometer into the thickest breast, aiming for the center. The chicken is safely done at 165°F (74°C). If the reading falls short, close the lid and give it another 30 minutes on the same setting, then test the thickest piece again.Look for 165°F (74°C) at the center of the thickest breast, with juices running clear.Safe temperature 165°F (74°C) internal temperature (poultry)Tip Check the largest breast, not the smallest; small pieces finish early and can be pulled aside while the rest cooks on.
After the long cook, the kitchen smells of cream and Italian herbs, the sauce bubbles lazily at the edges, and the breasts look plump and pale with no pink showing. The decisive check is the thermometer: 165°F (74°C) at the center of the thickest breast.
The sauce should have thinned slightly and turned cohesive, with a light golden film possible at the very edges — stir that back in. If the meat reads low, simply keep cooking; there is no way to overcook it in the next half hour at low. Resist tasting yet: the rest in the next phase is what sets the final texture.
Rest, gloss and serve
- Rest and gloss the sauceTurn the slow cooker off, keep the lid on, and let the chicken rest in the sauce for 10 minutes. Then stir the sauce once with a spoon so the released juices blend into a single creamy pool, and spoon some of it back over each breast so every piece is well coated before serving.Look for The sauce should look smooth and cohesive, thick enough to pool rather than run on the plate.Tip The short rest lets the fibers relax and reabsorb juices, so the meat stays moist on the plate instead of on the cutting board.
- Serve it upLift each breast out with a serving spoon cradling it, letting extra sauce cling, and plate it with more of the creamy Italian herb sauce pooled alongside. The meat should be tender enough to pull apart with a spoon — the whole point of angel chicken. Serve hot, straight from the cooker.Look for A breast should split under gentle spoon pressure, with the sauce clinging in a thick, glossy layer.Tip Leftovers cool for no more than 2 hours on the counter before going into the refrigerator, per standard food safety practice.
In this final phase the sauce turns from separated-looking to one smooth, creamy pool, and the breasts become spoon-tender. After the 10-minute rest and a single stir, the sauce should coat the back of the spoon thickly and pool, not run, on a plate. Lift a breast with the spoon cradling it: it should hold together just enough to transfer, then split under light pressure. Taste the sauce for salt — the soup and cream cheese carry most of it, so it usually needs nothing. Everything is now ready to plate hot, with extra sauce spooned over each portion.
Common mistakes
The most common slip is stacking the breasts. Piled pieces cook at different rates, and the top layer may lag well behind the bottom, so keep everything in one snug layer even if the insert looks crowded. The second mistake is adding cold cream cheese straight from the fridge; it leaves small lumps that never fully melt into the sauce. Soften it first and the sauce comes together in seconds. Third: lifting the lid. Every peek releases heat and stretches the cook, so trust the process and keep it closed.
How to tell it’s done
The reliable test is temperature, not the clock. Insert an instant-read thermometer into the center of the thickest breast: the chicken is safely cooked at 165°F (74°C). Visually, the breasts look plump and uniformly pale, never pink at the center, and the sauce bubbles gently at the edges of the insert.
A done breast yields under gentle pressure from a spoon and splits into large, moist flakes rather than resisting. Juices run clear when the meat is pressed near the thickest point. If the reading comes in below temperature, close the lid and continue cooking another 30 minutes before testing again, always probing the largest piece.
- Poultry: 165°F (74°C) in the thickest part
Up next · Part 3 of 3
4 variations · storage & make-ahead · 5 answers · printable card
Tips, FAQ & printable recipe (Part 3)← Back to the ingredients (Part 1)