Desserts · Part 2 of 3: Instructions
Simple Strawberry Fluff Cake Step-by-step instructions
- Prep
- Cook
- Total
- Serves
- 4
Before you start
Before beginning, ensure the blender is clean and dry. Verify that the refrigerator has sufficient clear space to accommodate the loaf pan on a level shelf.
Gather all ingredients and have a rubber spatula ready for transferring the mixture, as this will help minimize waste and ensure a smooth, professional finish to the top of the cake.
Ingredients at a glance (2)
- 2 cups cottage cheese
- 1 package strawberry gelatin mix
Instructions
Blending the base
- Prepare the BasePlace the cottage cheese into a clean, dry high-speed blender container. Ensure the blender is properly seated on the base before starting to avoid any spills or mechanical issues during operation.Look for The cottage cheese should be at refrigerator temperature for the best consistency.Tip Using a high-speed blender is essential to break down the cottage cheese curds completely.
The cottage cheese should be completely smooth, with no remaining curds. The texture should resemble a thick, heavy cream that is ready to receive the gelatin powder without any resistance.
Emulsifying the mixture
- Blend and IncorporateAdd the strawberry gelatin powder to the blender. Secure the lid tightly and process the mixture on high speed until it transforms into a perfectly smooth, vibrant pink cream with no visible curds.Look for The mixture will become glossy and uniform in color once fully emulsified.Tip Stop the blender once to scrape down the sides with a spatula to ensure all powder is incorporated.
The mixture must be a uniform, vibrant pink color.
The consistency should be aerated and glossy, indicating that the gelatin has been thoroughly incorporated into the dairy base, creating a stable, airy, and uniform foam structure that is ready to be poured into the pan for the final setting stage.
Chilling and setting
- Set and ChillTransfer the pink cream into a loaf pan, smoothing the top with a spatula. Place the pan in the refrigerator for at least two hours to allow the gelatin to set and the texture to become airy and firm.Look for The surface should feel set to the touch and hold its shape when sliced.Tip Cover the loaf pan with plastic wrap to prevent the surface from drying out while chilling.
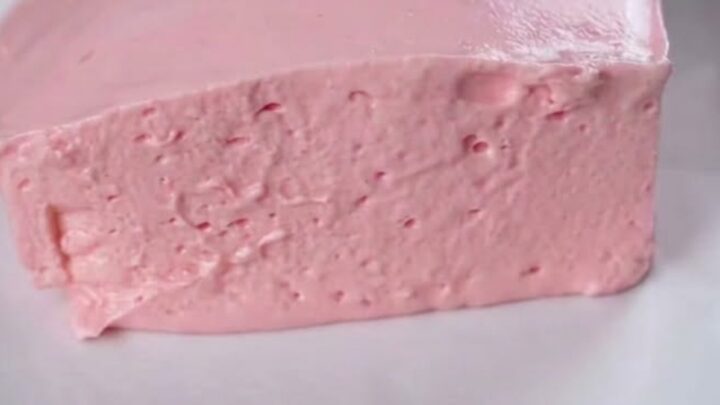
The final product should be firm to the touch and hold its shape perfectly when sliced. The surface should be smooth and the interior should display a delicate, bubbly sponge-like texture.
Common mistakes
Avoid over-blending once the mixture has reached a smooth, glossy consistency, as excessive heat from the blender motor can sometimes compromise the setting capability of the gelatin.
Additionally, ensure the loaf pan is not tilted while chilling to prevent an uneven top surface. Finally, do not rush the cooling process, as the structure needs adequate time to fully hydrate and stabilize.
How to tell it’s done
The dessert is done when it has achieved a firm, set consistency throughout. When gently pressed with a finger, the surface should spring back slightly rather than feeling liquid or runny.
The color should be consistent throughout the loaf, with no pockets of undissolved gelatin powder visible at the bottom or sides.
Up next · Part 3 of 3
2 variations · storage & make-ahead · 3 answers · printable card
Tips, FAQ & printable recipe (Part 3)← Back to the ingredients (Part 1)