Dinner · Part 2 of 3: Instructions
Short Rib Birria Enchiladas Suizas in One Bubbling Pan Step-by-step instructions
- Prep
- Cook
- Total
- Serves
- 6
Before you start
Before anything touches the oven, set up a rolling station. Shred the boneless braised short rib birria into coarse strands and moisten any dry pieces with a spoonful of warmed braising liquid or chili oil. Dice the white onion small so it distributes through the filling.
Warm the corn tortillas on a dry skillet and keep them stacked under a towel. Butter the 9x13 ceramic baking dish, measure out the poblano cream sauce and shredded Oaxaca cheese, and preheat the oven to 375°F (190°C) so the dish goes in the moment the pan is assembled.
Ingredients at a glance (8)
- 1 1/2 lb boneless braised short rib birria, shredded (store-bought or made ahead)
- 1 cup diced white onion
- 8 corn tortillas, warmed
- 1 tbsp unsalted butter, for the baking dish
- 2 cups roasted poblano cream sauce (store-bought or made ahead)
- 2 cups shredded Oaxaca cheese
- 2 tbsp red birria chili oil, for drizzling
- Cilantro microgreens, to taste, for garnish
Instructions
Prep the filling and pan
- Shred the birria and dice the onionPull the boneless braised short rib into coarse shreds with two forks, discarding any fat or gristle, and toss it with any clinging braising sauce so every strand stays glossy. Dice the white onion into small, even pieces and set both beside the tortillas. Cold filling is easier to handle and keeps the tortillas from steaming apart as they roll.Look for The beef should pull apart with no knife, in long juicy strands, not crumble into dry dust.Tip Moisten dry shreds with a spoonful of warmed birria consommé or chili oil.
- Warm the corn tortillasHeat a dry skillet or comal over medium heat and warm the tortillas about 20 seconds per side, until they smell toasty and bend cleanly without cracking. Stack them under a clean kitchen towel as they come off the heat so the steam keeps them supple. Warm tortillas roll tightly around the filling instead of splitting down the middle.Look for A warmed tortilla folds over your finger with no white cracks along the bend.Tip Press each tortilla down for a few seconds with a spatula to puff it and wake up the corn flavor.
- Butter the baking dishRub the bottom and sides of a 9x13 ceramic baking dish with the butter until every corner gleams. This thin film keeps the corn tortillas from welding themselves to the ceramic during the bake and gives the exposed edges a lightly crisped, golden finish. Set the dish near your rolling board so the enchiladas go straight from hand to pan.Look for The dish should shine evenly, with no dry patches where tortillas could stick.Tip Use the wrapper to spread the butter and keep your hands free for rolling.
By the end of the first phase, the shredded birria should look glossy and hold together loosely when pinched, the onion diced into even confetti, and the tortillas stacked and steaming under their towel, bending without cracking.
The buttered dish should gleam in every corner, and the oven should be at 375°F with a rack centered. If the beef feels dry, work in a little consommé now — once the enchiladas are rolled there is no fixing it.
Roll, sauce and cheese
- Fill and roll the enchiladasLay a warm tortilla flat, spoon a generous line of shredded birria just below its center, and scatter a pinch of diced onion over the meat. Roll the tortilla tightly around the filling and set it seam-side down in the buttered dish. Repeat with the remaining tortillas, packing the rolls close together so they support one another as they bake.Look for Each roll should hold its shape with no filling peeking out at the ends.Tip Keep the filling line narrow; an overstuffed tortilla bursts open in the oven.
- Smother with poblano cream saucePour the roasted poblano cream sauce evenly over the rolled enchiladas, letting it seep into the gaps between them and coat every exposed edge. Nudge the sauce with the back of a spoon so no tortilla stays dry. The cream base is what makes these suizas — it keeps the rolls tender while the top turns golden.Look for Every roll should glisten under a thin, even layer with the seams still visible.Tip Reserve a few spoonfuls of sauce to stir into leftover filling for tacos the next day.
- Blanket with Oaxaca cheeseScatter the shredded Oaxaca cheese over the sauced enchiladas in an even layer, reaching all the way to the corners of the dish. Oaxaca melts into long, stretchy strands that brown in spots, so full coverage matters more than depth. Press the cheese down gently so it meets the sauce underneath.Look for No sauce should show through the cheese layer, or those spots will dry out.Tip Shred the cheese yourself rather than buying pre-shredded; it melts far more smoothly.
The assembled pan should hold eight tight, seam-side-down rolls packed shoulder to shoulder, glistening under an even layer of poblano cream with no dry tortilla showing, and capped edge to edge with shredded Oaxaca. Tip the dish slightly: the sauce should settle into the gaps but not flood above the cheese. Anything left dry now stays dry after baking, so this is the moment to correct coverage.
Bake, drizzle and serve
- Bake until golden and bubblingBake at 375°F (190°C) for 18 minutes, positioning the dish in the center of the oven so the cheese melts evenly before the edges overbrown. The sauce should be bubbling at the edges of the dish and the cheese should be fully melted, golden in patches and just beginning to blister. If the top needs more color, run it briefly under the broiler, watching constantly.Look for Listen for a quiet sizzle and look for bubbles breaking at the dish's edges.Tip Rotate the dish halfway through if your oven browns one side faster than the other.
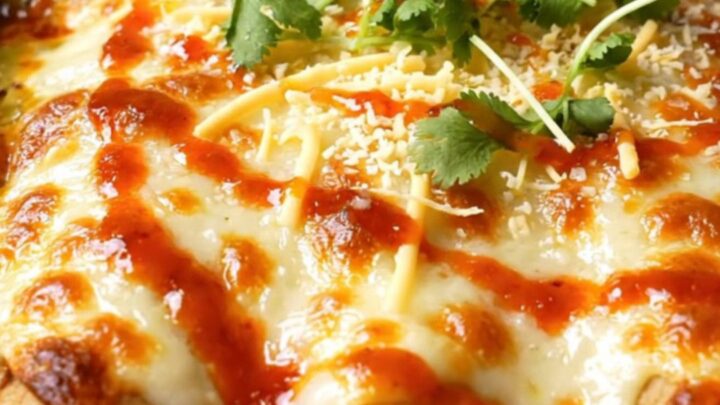
- Finish with birria chili oil and microgreensPull the dish from the oven and let it rest 5 minutes so the sauce settles and the cheese firms enough to lift cleanly. Swirl the red birria chili oil over the blistered cheese surface in thin ribbons, then scatter cilantro microgreens on top. Serve straight from the dish while the cheese still pulls in long strands with each spoonful.Look for The oil should slide across the warm cheese in glossy red ribbons, not pool in one corner.Tip Drizzle the oil in a loose spiral from the center outward for the most striking finish.
Out of the oven, the cheese should be fully melted, golden in patches and lightly blistered, with sauce bubbling at the edges of the dish and a quiet sizzle still audible. After five minutes of rest the rolls should lift cleanly with a spoon, the cheese pulling in long strands. Finish with ribbons of red birria chili oil and a scatter of cilantro microgreens, and serve while the pull is at its best.
Common mistakes
The three most common failures are all preventable. Overstuffed tortillas burst in the oven, so keep the birria line narrow and roll tightly, seam-side down. Cold or stale tortillas crack along the fold — warm them on a dry comal and hold them under a towel until each one is rolled.
And uneven cheese coverage leaves bald spots where the cream dries out instead of bubbling; scatter the Oaxaca all the way to the corners and press it lightly into the sauce. Finally, resist opening the oven before minute fifteen: every peek drops the temperature and dulls the blister on top.
How to tell it’s done
The enchiladas are done when the poblano cream sauce is bubbling actively at the edges of the dish and the Oaxaca cheese has melted completely into a glossy blanket, golden in patches and lightly blistered on top. A spoon pressed against the center roll should meet no resistance, and the sauce should look thick enough to cling to the tortillas rather than pooling thin around them.
After the five-minute rest, each enchilada should lift cleanly from the dish with the cheese pulling in long strands, and the filling inside should be steaming hot all the way through. If the top has color but the center still seems cool, cover the dish with foil and give it a few more minutes before finishing with the chili oil and microgreens.
Up next · Part 3 of 3
4 variations · storage & make-ahead · 5 answers · printable card
Tips, FAQ & printable recipe (Part 3)← Back to the ingredients (Part 1)