Dinner · Part 2 of 3: Instructions
Quick Sheet Pan Garlic Pepper Chicken Tenders and Broccoli Step-by-step instructions
- Prep
- Cook
- Total
- Serves
- 4
Before you start
Before you begin, heat the oven to 400°F (200°C) and line a sheet pan with parchment paper for easy cleanup. Pat the chicken tenders dry with paper towels to help them brown better. Wash and trim the broccoli, cutting it into bite-size florets.
If you prefer, you can mix the garlic powder and black pepper together in a small bowl for even sprinkling. Melt the butter in a small saucepan or microwave-safe bowl. Have everything ready on the counter so you can assemble the pan quickly and get it into the oven without delay.
Ingredients at a glance (5)
- 1 1/2 lb chicken tenders
- 4 cups broccoli florets
- 2 tsp garlic powder
- 1 tsp coarsely ground black pepper
- 1/4 cup unsalted butter, melted
Instructions
Prepare and season
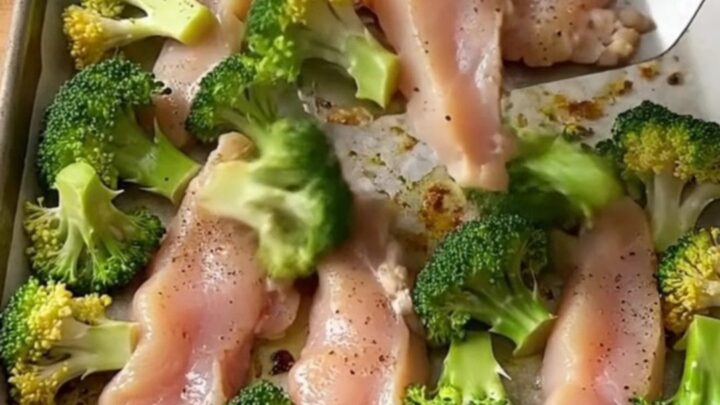
- Prepare the pan and seasonHeat the oven to 400°F (200°C). Line a sheet pan with parchment paper. Arrange the chicken tenders and broccoli florets in a single layer on the prepared pan, tucking any larger florets between the chicken so everything cooks evenly. Sprinkle the garlic powder and coarsely ground black pepper over the chicken and broccoli.Look for The chicken and broccoli should be in one even layer, not overlapping.Tip If the tenders are very thick, pound them lightly to an even thickness for uniform cooking.
- Drizzle with butterPour the melted butter evenly over the chicken and broccoli. Use a spoon or pastry brush to lightly coat the tops if needed, but avoid stirring too much—you want the seasoning to stay on the surface.Look for The butter sizzles slightly as it hits the pan.Tip Melt the butter in a small bowl in the microwave or on the stovetop just before using.
At this stage, the chicken tenders and broccoli are arranged in a single layer on the parchment-lined pan. The garlic powder and black pepper are sprinkled evenly over the top, and the melted butter is drizzled over everything. The pan looks colorful—bright green broccoli against the pale pink chicken—with visible specks of black pepper and a glossy sheen from the butter. Before proceeding, ensure the ingredients are evenly coated and not piled on top of each other.
Roast to perfection
- Roast until chicken is cooked throughPlace the sheet pan in the oven and roast for 18–22 minutes, until the chicken is opaque, no longer pink in the center, and the broccoli is golden at the tips. The chicken should reach an internal temperature of 165°F (74°C) when checked with an instant-read thermometer.Look for The chicken is white throughout and the broccoli edges are lightly charred.Safe temperature 165°F (74°C) internal temperature (poultry)Tip Check the chicken at the thickest tender; if not done, return to the oven for 2–3 more minutes.
After about 18 minutes, the kitchen fills with the aroma of roasted garlic and butter. The chicken is now opaque white with golden-tan spots where the pepper and butter have caramelized. The broccoli has turned a deeper green with brown, crispy tips. When you insert a thermometer into the thickest chicken tender, it reads 165°F (74°C). The edges of the broccoli are slightly charred, adding a smoky flavor. The pan is sizzling gently, and the chicken is juicy, not dry.
Serve and enjoy
- Serve hotRemove the pan from the oven and let it rest for 2 minutes. Using a metal spatula, lift the chicken and broccoli onto plates or a serving platter. Serve immediately.Look for The juices run clear and the broccoli is tender-crisp.Tip For extra color, broil for the last 1–2 minutes, watching closely to avoid burning.
The final dish is a beautiful medley of golden-brown chicken and vibrant broccoli. The chicken is tender and juicy, with a savory garlic-pepper crust. The broccoli is crisp-tender with a slight crunch and a rich, buttery flavor.
The pan has a light glaze of butter and seasonings, which you can spoon over the chicken for extra moisture. The dish is ready to be served immediately, and the colors are appetizing—white and golden chicken, bright green broccoli, and dark flecks of pepper.
Common mistakes
One common mistake is overcrowding the pan, which traps steam and prevents browning. Spread the chicken and broccoli in a single layer with a little space between pieces. Another pitfall is over-seasoning with salt—remember that butter and the natural juices provide some seasoning, so taste before adding extra salt.
Also, avoid stirring the ingredients too much during roasting; you want the butter and spices to stay on top for a flavorful crust. Finally, be careful not to overcook the chicken, as it can become dry; use a thermometer and remove the pan as soon as the chicken reaches 165°F (74°C).
How to tell it’s done
The chicken is done when it is opaque throughout, with no pink in the center, and the juices run clear. The internal temperature should read 165°F (74°C) on an instant-read thermometer inserted into the thickest part of a tender. The broccoli should be tender when pierced with a fork, with golden-brown tips and a slightly crisp texture.
If the chicken is not yet up to temperature, return the pan to the oven for a few more minutes, checking frequently to avoid overcooking the broccoli. The total roasting time is typically 18–22 minutes, but ovens vary, so rely on the thermometer for accuracy.
- Poultry: 165°F (74°C) in the thickest part
Up next · Part 3 of 3
4 variations · storage & make-ahead · 5 answers · printable card
Tips, FAQ & printable recipe (Part 3)← Back to the ingredients (Part 1)