Dinner · Part 2 of 3: Instructions
Sheet-Pan Garlic Herb Roasted Chicken with Crispy Potatoes Step-by-step instructions
- Prep
- Cook
- Total
- Serves
- 4
Before you start
Before starting, ensure all ingredients are properly prepped and ready for the sheet pan. Wash and thoroughly dry the mini Yukon Gold potatoes, keeping them whole as shown. Trim the ends of the green beans and set them aside.
Most importantly, use paper towels to pat the chicken thighs completely dry on both sides; any moisture left on the skin will create steam and prevent it from becoming ultra-crispy. Melt the butter and finely chop the fresh parsley and garlic so the seasoning mixture comes together quickly.
Ingredients at a glance (6)
- 4 bone-in, skin-on chicken thighs (about 2 pounds)
- 1 lb mini Yukon Gold potatoes
- 12 oz green beans, trimmed
- 1/2 cup butter, melted
- 4 cloves garlic, minced
- 1/4 cup fresh parsley, finely chopped
Instructions
Prep and Seasoning
- Prepare the Garlic Herb ButterPreheat the oven to 400°F (200°C). In a small mixing bowl, combine the melted butter, minced garlic, and a portion of the finely chopped fresh parsley. Whisk the mixture thoroughly until the garlic and parsley are evenly distributed throughout the melted butter.Look for The butter mixture should be highly fragrant and well combined.Tip Warm the bowl slightly if the butter begins to solidify.
- Arrange and Coat the IngredientsPat the bone-in, skin-on chicken thighs completely dry with paper towels to ensure the skin gets ultra-crispy. Arrange the chicken thighs, whole mini Yukon Gold potatoes, and trimmed green beans in a single layer on a heavy-duty rimmed sheet pan. Drizzle the prepared garlic-herb butter evenly over the chicken, potatoes, and green beans, using a pastry brush to coat all surfaces.Look for Ensure everything is in a single layer to roast evenly.Tip Keep raw poultry separate on cutting boards during prep to prevent cross-contamination.
At the end of this prep phase, the chicken thighs, whole potatoes, and green beans should be arranged in a single layer across the sheet pan, with no ingredients piled on top of one another. The entire pan should be evenly coated in the fragrant, melted garlic-herb butter, with visible flecks of green parsley clinging to the chicken skin and vegetables. The oven should be fully preheated and radiating a steady, dry heat.
Roasting and Crisping
- Roast the Chicken and VegetablesPlace the sheet pan in the preheated oven and roast for 35 to 40 minutes. The chicken skin should become deeply golden brown and ultra-crispy, while the potatoes become tender and the green beans turn vibrant and crisp-tender. Ensure the chicken reaches a safe internal temperature of 165°F (74°C) when checked with an instant-read meat thermometer in the thickest part of the thigh, avoiding the bone.Look for Listen for a loud sizzling sound and look for bubbling butter juices.Safe temperature 165°F (74°C) internal temperature (poultry)Tip Rotate the sheet pan halfway through cooking for the most even browning.
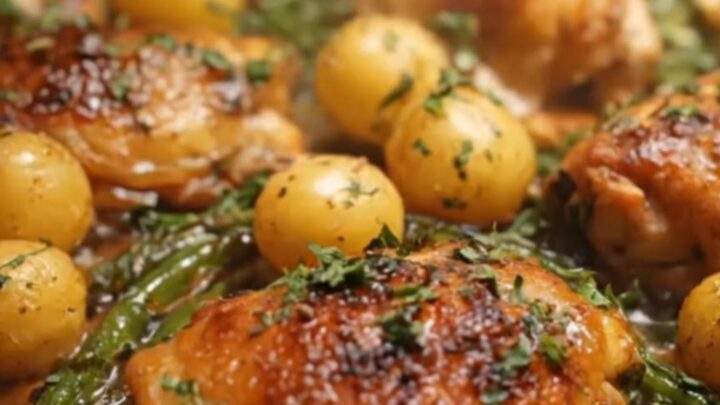
As this roasting phase concludes, the kitchen will fill with the irresistible aroma of sizzling chicken fat, roasted garlic, and butter. The chicken skin should appear deeply golden-brown, bubbly, and visibly crisp to the touch. The potatoes will have caramelized, browned edges, and the green beans will look slightly blistered but still hold their shape. A meat thermometer inserted into the thickest part of the chicken must read 165°F (74°C).
Finishing and Garnishing
- Garnish and RestRemove the sheet pan from the oven. Immediately sprinkle the remaining chopped fresh parsley over the hot chicken, potatoes, and green beans as a garnish. Allow the chicken to rest on the sheet pan for 5 minutes before serving, which helps the juices redistribute throughout the meat for maximum juiciness.Look for The fresh parsley will release a bright aroma as it hits the hot pan.Tip Do not cover the pan with foil while resting, or the steam will soften the crispy chicken skin.
At the final checkpoint, the sheet pan is removed from the oven, and the hot ingredients are immediately showered with the remaining freshly chopped parsley. The parsley will wilt slightly and release a bright, clean fragrance as it contacts the hot butter.
After resting for five minutes, the chicken skin remains incredibly crispy, while the rich, savory juices have locked inside the meat, leaving a glossy, beautiful sheen over the entire dish.
Common mistakes
The most common mistake when making this recipe is overcrowding the sheet pan. If the chicken thighs, potatoes, and green beans are packed too tightly together, they will steam in their own moisture rather than roast.
This results in soggy chicken skin and mushy vegetables instead of crispy, golden textures. Another frequent error is failing to dry the chicken skin thoroughly before applying the herb butter. Always use paper towels to remove excess moisture from the poultry to guarantee that perfect, crackling skin.
How to tell it’s done
To determine when the dish is perfectly cooked, rely on both visual cues and a digital meat thermometer. The chicken thighs are done when the skin is golden brown and crispy, and the internal temperature reaches 165°F (74°C) in the thickest part without touching the bone.
The potatoes should be easily pierced with a fork, showing a fluffy interior and crispy exterior. The green beans should be tender but still retain a slight bite, showing a slightly blistered appearance from the high-heat roasting.
- Poultry: 165°F (74°C) in the thickest part
Up next · Part 3 of 3
2 variations · storage & make-ahead · 3 answers · printable card
Tips, FAQ & printable recipe (Part 3)← Back to the ingredients (Part 1)