Breakfast · Part 2 of 3: Instructions
Savory Gruyère and Prosciutto Dutch Baby Step-by-step instructions
- Prep
- Cook
- Total
- Serves
- 2
Before you start
Before you begin, gather all your ingredients and ensure your oven is fully preheated to 425°F (220°C). It is crucial that the cast-iron skillet is placed in the oven during the preheating process so it becomes scorching hot.
Have your herbs chopped and the Gruyère cheese shredded so you can move quickly once the batter is ready. Preparing your poaching water in a separate pot at the same time will ensure the egg is ready to be placed on the Dutch baby the moment it comes out of the oven.
Ingredients at a glance (9)
- 3 large eggs
- 1/2 cup milk (approx. 120 ml)
- 1/2 cup all-purpose flour (approx. 65 grams)
- 10 grams chopped fresh thyme and chives
- 50 grams shredded cave-aged Gruyère cheese
- 2 tbsp unsalted butter
- 40 grams Parma prosciutto
- 1 handful fresh arugula
- 1 large poached egg
Instructions
Batter Preparation
- Prepare the batterIn a large mixing bowl, combine the eggs, milk, flour, chopped fresh thyme, chives, and shredded Gruyère cheese. Whisk the mixture vigorously until smooth and well-combined. Ensure there are no large lumps of flour remaining in the batter, as this ensures an even rise in the oven. Set the batter aside for a few minutes while the oven preheats to ensure the flour hydrates properly for a better structure.Look for The batter should be smooth with a consistency similar to heavy cream.Tip Letting the batter rest for 10 minutes can help the starch in the flour absorb the liquid, leading to a taller puff.
The batter should be completely smooth, with no visible lumps of flour. It should be thin, similar in viscosity to heavy cream, which allows it to spread evenly across the hot skillet. If the batter appears too thick, add a tiny splash of milk. Ensure the herbs and cheese are evenly distributed throughout the mixture so that every bite is packed with savory goodness and the cheese can melt properly.
Baking Transformation
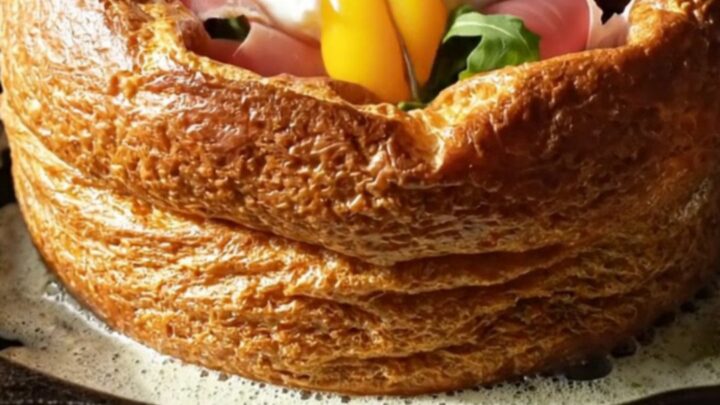
- Heat the skillet and bakePlace a 10-inch cast-iron skillet into the oven as it preheats to 425°F (220°C). Once the oven is hot, carefully remove the skillet, add the butter, and swirl it until melted and bubbling. Pour the batter immediately into the hot skillet. Bake for 15 minutes until the cheese-crusted walls have puffed sky-high and the edges are blistered and dark golden brown. Avoid opening the oven door during the first 12 minutes to prevent the pancake from collapsing.Look for The Dutch baby should be golden brown, puffed significantly, and the cheese should appear bubbly and crisp.Tip Using a hot pan is the secret to getting the dramatic rise that defines a perfect Dutch baby.
As the Dutch baby bakes, the magic happens. The edges should start to curl upward and turn a beautiful golden brown. You will notice the cheese bubbling and creating a crispy crust along the sides. The center will remain slightly lower than the edges, creating a natural well that is perfect for holding your toppings. Keep an eye on the color; you are looking for a deep, rich golden brown that indicates the crust is crisp and flavorful.
Final Assembly
- Assemble and serveRemove the skillet from the oven. Immediately drape the ribbons of Parma prosciutto, fresh arugula, and the carefully poached egg in the center. The residual heat from the skillet will gently wilt the arugula. Serve immediately while the pancake is crisp and the egg yolk is runny. To ensure food safety, the egg yolk should be cooked until the white is fully set and the yolk reaches 160°F (71°C) if desired firm, though traditionally served runny here.Look for The prosciutto should look silky against the crisp, golden walls of the Dutch baby.Safe temperature 160°F (71°C) internal temperature (egg dishes)Tip Use a sharp knife to slice the Dutch baby into wedges, ensuring everyone gets a bit of the crispy edge and the savory center.
The final assembly requires speed. Once the skillet is pulled from the oven, the Dutch baby will be at its peak volume. Immediately add the prosciutto ribbons, which will soften slightly from the heat.
Carefully place the poached egg in the center so it does not break prematurely. The arugula should be added last, providing a peppery crunch. Serve immediately while the center is warm and the edges remain crisp to ensure the best texture for your guests.
Common mistakes
A common mistake is using a cold skillet, which prevents the immediate steam production necessary for the pancake to rise. Another error is opening the oven door too early, which causes the temperature to drop and the pancake to deflate immediately.
Ensure the oven is at the correct temperature before you start. Avoid over-mixing the batter to the point of toughness; it should be smooth but not overworked. Finally, do not wait too long to serve, as the Dutch baby will naturally begin to lose its height as it cools.
How to tell it’s done
The Dutch baby is done when it has puffed significantly above the rim of the skillet and the edges are a deep, blistered golden brown. The cheese should be melted throughout, and the center should be set but still moist.
When serving with a poached egg, ensure the egg white is opaque and fully set, reaching an internal temperature of 160°F (71°C) for safety. The contrast between the crispy, browned edges and the tender, custard-like center is the hallmark of a perfectly executed Dutch baby.
- Egg dishes: 160°F (71°C) in the thickest part
Up next · Part 3 of 3
2 variations · storage & make-ahead · 3 answers · printable card
Tips, FAQ & printable recipe (Part 3)← Back to the ingredients (Part 1)