Drinks · Part 2 of 3: Instructions
Salted Date Caramel Tahini Espresso Cream Shake Step-by-step instructions
- Prep
- Cook
- Total
- Serves
- 2
Before you start
Before starting, ensure the banana is frozen (peel and slice it, then freeze for at least 2 hours). Have all ingredients measured and ready.
Grate the chocolate curls and chop the walnuts. If you prefer a colder shake, chill the cold brew and heavy cream in the refrigerator for 30 minutes beforehand.
Ingredients at a glance (9)
- 6 pitted Medjool dates, diced
- 1/4 cup toasted walnuts, chopped
- 2 oz milk chocolate (from a solid block), grated into curls
- 1 frozen banana, peeled and sliced
- 2 tbsp roasted tahini
- 1/2 cup cold brew espresso
- 1/2 cup heavy cream
- whipped cream, for topping, to taste
- milk chocolate curls, for topping, to taste
Instructions
Prep the Toppings
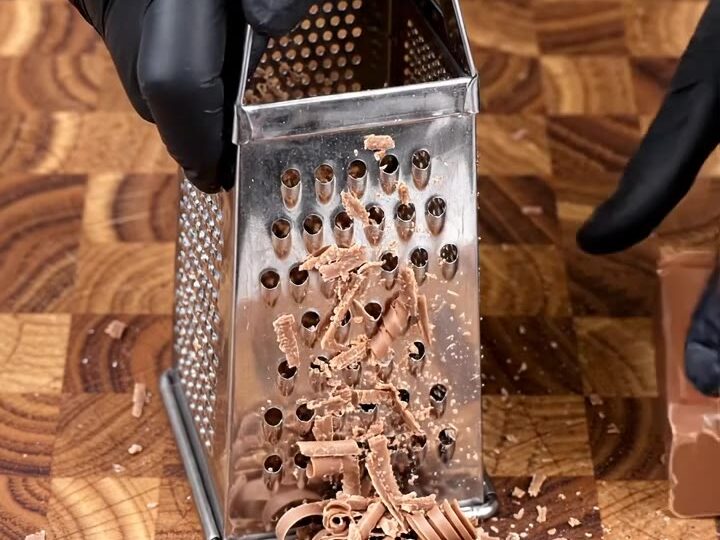
- Prep the toppingsSlice the pitted Medjool dates into small dice and set aside. Chop the toasted walnuts into small pieces. Grate the solid block of milk chocolate on the large holes of a box grater to create a pile of chocolate curls. Set all toppings aside.Look for The dates are sticky and diced; the chocolate forms delicate curls.Tip Chill the chocolate block for 10 minutes before grating for cleaner curls.
- Gather the shake basePlace the diced dates, frozen banana slices, roasted tahini, cold brew espresso, and heavy cream into a glass blender pitcher. Ensure the frozen banana is broken into chunks so it blends evenly.Look for All ingredients are in the pitcher, ready to blend.Tip If the dates are very firm, soak them in warm water for 5 minutes, then drain before adding.
You should have a small bowl of diced dates, a pile of chopped walnuts, and a separate bowl of milk chocolate curls. The chocolate curls should be delicate and not melted. The dates should be sticky and sweet, and the walnuts should be fragrantly toasted. Everything is ready for the blender.
Blend the Shake
- Blend until thickLock the lid on the blender pitcher. Start on low speed and gradually increase to high. Blend until the mixture is completely smooth and has a thick, swirling, frosty consistency. Stop and scrape down the sides if needed.Look for The shake is thick, creamy, and moves slowly when the blender stops.Tip Do not over-blend or the shake may thin out; blend just until smooth.
The shake should be thick, smooth, and frosty, with a uniform caramel color. It should have a strong coffee and tahini aroma, and the texture should be creamy with no ice crystals or chunks. When you stop the blender, the mixture should slowly settle, not be runny.
Pour and Garnish
- Pour and garnishPour the thick shake into a crystal glass or serving glasses. Top with a generous swirl of whipped cream and sprinkle with the milk chocolate curls and a few chopped walnuts. Serve immediately.Look for The shake is frosty, topped with cream and chocolate curls.Tip For a salted touch, sprinkle a pinch of flaky sea salt over the top, if desired.
The shake is poured into glasses, topped with a generous swirl of whipped cream, and sprinkled with chocolate curls and walnuts.
The presentation is café-worthy, with the cream slightly sinking into the shake and the chocolate adding a decorative contrast. Serve immediately before the cream melts.
Common mistakes
One common mistake is over-blending, which can incorporate too much air and make the shake thin. Blend just until smooth, about 30 to 45 seconds. Another is using unripe bananas that aren't frozen, which results in a less creamy texture.
If the shake is too thick, add a splash of cold brew or milk, but do so sparingly. Also, ensure the dates are diced small enough to blend completely.
How to tell it’s done
The shake is done when it is completely smooth, thick, and frosty, with no visible chunks of dates or banana. It should pour slowly from the blender and hold a slight swirl when poured into a glass.
The color will be a light caramel brown, and the aroma will be strongly coffee and nutty. Taste a spoonful to check sweetness and adjust with a little extra tahini or coffee if needed.
Up next · Part 3 of 3
4 variations · storage & make-ahead · 5 answers · printable card
Tips, FAQ & printable recipe (Part 3)← Back to the ingredients (Part 1)