Desserts · Part 2 of 3: Instructions
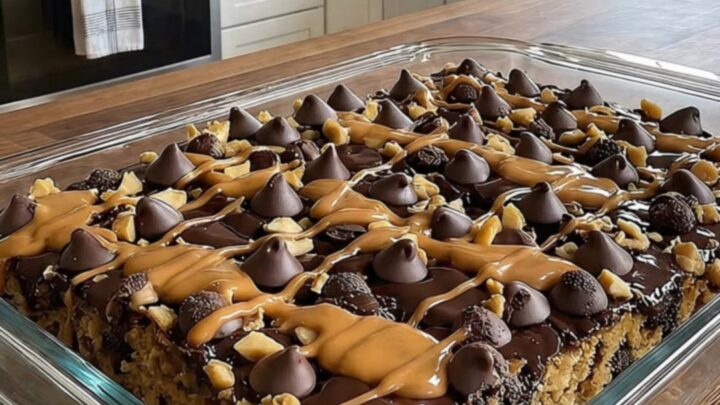
Rich Peanut Butter Cup Chocolate Dump Cake Step-by-step instructions
- Prep
- Cook
- Total
- Serves
- 8
Before you start
Before beginning the assembly, ensure the oven is fully preheated to 350°F (175°C) to guarantee consistent baking from the moment the dish enters. Prepare the workspace by clearing sufficient room to spread the cake mix and distribute the toppings.
Have the butter melted and ready, and chop the peanut butter cups and nuts into medium-sized pieces so they are prepared for immediate scattering. Using a clear glass baking dish allows for easy monitoring of the browning process during the final minutes of baking.
Ingredients at a glance (5)
- 1 box chocolate cake mix
- 1 cup unsalted butter, melted
- 1 cup peanut butter cups, chopped
- 1/2 cup chopped peanuts
- 1/2 cup creamy peanut butter, warmed
Instructions
Preparing the base
- Prepare the basePreheat your oven to 350°F (175°C). Lightly grease a 9x13 inch glass baking dish. Pour the dry chocolate cake mix evenly into the bottom of the prepared dish, spreading it out to create a uniform layer for the base.Look for The cake mix should be spread in an even layer across the entire bottom of the baking dish without any large clumps remaining.Tip Tap the sides of the dish gently to level the dry mix before adding the butter.
The dry chocolate cake mix should be spread evenly across the bottom of the glass baking dish. It should look like a smooth, dark powder covering the entire surface without any large gaps or uneven mounds, providing a solid foundation for the subsequent layers of butter and candy.
Assembling and baking
- Assemble and bakeDrizzle the melted butter evenly over the dry cake mix to moisten it. Sprinkle the chopped peanut butter cups and chopped peanuts over the top. Bake in the preheated oven for 45 minutes until the cake is set and the edges are slightly crisp.Look for The center of the cake should be set and the edges should look slightly golden and firm.Tip Ensure the butter covers as much of the dry mix as possible to prevent powdery spots.
The cake should look uniformly moist after the butter is added and the toppings are scattered. During baking, the kitchen will fill with a rich chocolate aroma, and the top will transition from a loose collection of dry ingredients to a cohesive, slightly crackled surface that is firm to the touch.
Adding final sauce
- Add final sauceRemove the baking dish from the oven and let it rest for 10 minutes. While the cake rests, gently warm the peanut butter in a microwave-safe bowl until it reaches a pourable consistency. Drizzle the warm peanut butter over the finished cake before serving.Look for The peanut butter should be smooth and liquid enough to cascade over the cake in thin ribbons.Tip Use a spoon or a piping bag to create artistic drizzles across the surface of the cake.
The final step involves the visual appeal of the warm peanut butter drizzle. The sauce should be smooth and fluid, cascading over the cake to create beautiful, glossy ribbons. Once the drizzle is applied, the cake is ready to be portioned and served warm to guests.
Common mistakes
Avoid over-mixing the ingredients once they are in the pan, as the charm of a dump cake lies in the distinct layers that form during baking.
Another common error is neglecting to cover as much of the dry cake mix as possible with the melted butter; powdery spots can remain if the butter is poured in one concentrated location rather than drizzled evenly.
Finally, do not skip the resting period, as this allows the structure to set and the flavors to meld together perfectly before serving.
How to tell it’s done
The cake is done when the top has developed a light crust and the center is firm to the touch. The edges should appear slightly darker and pulled away from the sides of the pan.
Because this is a dump-style dessert, a toothpick inserted into the center should come out with a few moist crumbs, but not raw batter. The peanut butter cups should be softened and partially melted into the cake structure, creating delicious, gooey pockets of flavor throughout the finished dish.
Up next · Part 3 of 3
2 variations · storage & make-ahead · 3 answers · printable card
Tips, FAQ & printable recipe (Part 3)← Back to the ingredients (Part 1)