Desserts · Part 2 of 3: Instructions
Pistachio Rose Milk Chocolate Bars with Cardamom and Candied Orange Step-by-step instructions
- Prep
- Cook
- Total
- Serves
- 12
Before you start
Gather the nuts, candied orange peel, chocolate, rose petals and ground pistachios before you start, so the chocolate can be spread while it is still warm. Line a metal baking sheet with parchment paper and set it on a flat counter. Put the wooden cutting board, the chef's knife and the handheld box grater within reach.
Chill the chocolate for about 10 minutes so it grates cleanly without smearing. Set up a heatproof bowl over a saucepan of barely simmering water, or prepare a microwave-safe bowl. Put on food-safe gloves for drawing the swirls. Having everything ready keeps the chocolate workable and the topping placed while the surface is still soft.
Ingredients at a glance (7)
- 1/2 cup shelled pistachios, chopped, plus extra for topping
- 1/4 cup whole almonds, chopped
- 1/4 cup pecans, chopped
- 1/4 cup candied orange peel, chopped
- 12 oz milk chocolate flavored with cardamom, grated
- 2 tbsp dried rose petals, food-grade
- 2 tbsp finely ground pistachios, for the green swirls
Instructions
Chop nuts and grate chocolate
- Chop the nuts and fruitPlace the pistachios, almonds, pecans and candied orange peel on a wooden cutting board. Chop them with a chef's knife until you have a coarse, mixed pile of nut and fruit pieces. Set the pile aside within easy reach of the chocolate.Look for Pieces should be varied in size, with no fine dust, and the candied peel should be in small bits.Tip Keep some pieces larger so the bars show visible pistachio and fruit on top.
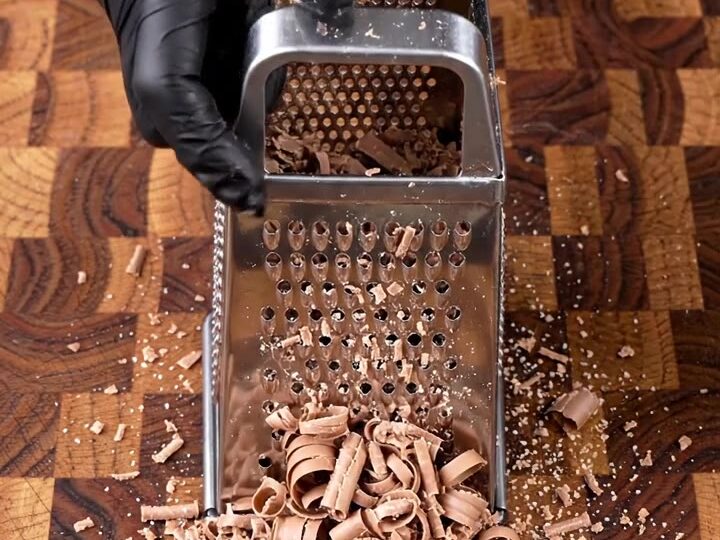
- Grate the cardamom chocolateHold a handheld box grater over the board and grate the milk chocolate flavored with cardamom. The fine curls and shavings will fall onto the surface. Collect the grated chocolate in a heatproof bowl.Look for Fine curls and shavings should fall in a soft pile, ready to melt evenly.Tip Chill the chocolate for 10 minutes first so it grates cleanly without smearing.
At the end of this phase you should have a coarse pile of mixed pistachios, almonds, pecans and candied orange peel, along with a bowl of fine chocolate curls and shavings. The nut pieces should vary in size with no fine dust, and the chocolate should be grated evenly without large chunks.
Check that the grater is clean and that the chocolate is still cold and firm, not softened from the warmth of your hands. If the chocolate starts to soften while grating, return it to the refrigerator for a few minutes before continuing to melt it smoothly.
Melt and layer the chocolate
- Melt and spread the chocolateMelt the grated chocolate in a heatproof bowl set over barely simmering water, stirring until smooth and glossy. Line a metal baking sheet with parchment paper and pour the melted chocolate onto it. Spread it into a thick, even layer.Look for The chocolate should look smooth and glossy with no lumps when stirred.Tip Keep the bowl off direct heat so the chocolate does not seize or scorch.
- Press the nut and fruit toppingWhile the chocolate is still warm, press the chopped pistachios, almonds, pecans and candied orange peel into the surface. Sprinkle the dried rose petals over the top. Keep the topping spread across the whole sheet.Look for The topping should sit into the chocolate without sliding off the surface.Tip Work quickly while the chocolate is warm so the pieces stick firmly.
- Draw the pistachio swirlsSprinkle the ground pistachios over the warm chocolate. Using gloved fingers, drag them gently through the surface in loose swirls to create green streaks. Avoid overworking the chocolate so the pattern stays visible.Look for Green swirls should be visible against the brown chocolate.Tip Wear food-safe gloves so the chocolate stays clean and the swirls look sharp.
Once the chocolate has melted, it should look smooth, glossy and free of lumps. Pour it onto the parchment-lined sheet and spread it into a thick, even layer that reaches all the edges. The surface should look even and shiny with no thin patches. Check the texture by stirring, and make sure no water has splashed into the bowl, because even a few drops can make the chocolate seize. If it starts to thicken before you finish spreading, work quickly, since the topping needs the chocolate to still be warm.
Top, swirl and set
- Let the chocolate setLeave the sheet at cool room temperature, or in the refrigerator for a faster set, until the chocolate is firm and glossy with no soft spots. Do not move it while it sets.Look for The surface should look glossy and feel firm to a gentle touch with no soft spots.Tip Refrigerate for about 30 minutes if your kitchen is warm.
- Cut into rectangular barsLift the set chocolate slab from the baking sheet using the parchment. Cut it into rectangular bars with a long knife, wiping the blade between cuts for clean edges. Serve the bars topped with visible pistachio pieces and pink rose petals.Look for Cut edges should look clean, with the nut and petal topping still visible.Tip Warm the knife slightly under hot water and dry it for cleaner cuts.
At the end of this phase the topping should be pressed into the warm chocolate and the green pistachio swirls should be visible across the surface. Look for even coverage of nuts, fruit and rose petals, with no bare patches. The chocolate should feel firm and glossy when left to set, with no soft spots. Before cutting, check that the surface is no longer tacky and that the topping stays in place when you lift the corner of the parchment. Let the sheet rest until the chocolate is set through to the center.
Common mistakes
The most common mistake is letting the chocolate get too hot. Overheated chocolate turns dull and grainy, and it can seize when stirred. Melt it gently over barely simmering water and keep steam and drops away from the bowl. Another frequent problem is adding the topping after the chocolate has already firmed up, which leaves the nuts sitting loosely on top and falling off when cut.
Press the pieces in while the chocolate is still warm. Over-swirling the green pistachio is also common: a few gentle drags make an attractive pattern, while too much mixing muddies the chocolate. Finally, cutting too early can tear the slab, so wait until the surface is firm and glossy before you cut.
How to tell it’s done
The bars are ready when the chocolate is firm and glossy across the whole surface, with no soft spots or tacky areas. Press gently at the center and the edge; the surface should feel solid and the topping should stay fixed. Lift a corner of the parchment: the slab should release cleanly from the paper and hold its shape.
A cut line should look crisp, not smeared. There is no protein in this recipe, so no internal temperature is needed. If the chocolate still looks dull or feels soft, give it more time in a cool place or the refrigerator for about 30 minutes, then check again before slicing into bars.
Up next · Part 3 of 3
4 variations · storage & make-ahead · 5 answers · printable card
Tips, FAQ & printable recipe (Part 3)← Back to the ingredients (Part 1)