Desserts · Part 2 of 3: Instructions
Pistachio Rose Cardamom Milk Chocolate Bars You Can Make in One Tray Step-by-step instructions
- Prep
- Cook
- Total
- Serves
- 12
Before you start
Before you start, line the metal baking tray with parchment paper so the slab lifts out cleanly once set. Set the box grater on a wooden board where you can work without moving it. Chill the chocolate block for about 10 minutes, which firms it so it grates into clean curls instead of smearing. Chop the pistachios roughly and set them in a small bowl. Measure the dried rose petals and the ground cardamom into separate small dishes so they are ready to scatter. Fill the squeeze bottle with the pistachio paste, warming it briefly if it is stiff. Have a sharp knife, a clean cloth and a cutting board nearby for the final cuts.
Ingredients at a glance (5)
- 8 oz milk chocolate, in one block
- 1/3 cup shelled pistachios, roughly chopped
- 1 tbsp dried rose petals
- 1/4 tsp ground cardamom
- 2 tbsp green pistachio paste
Instructions
Grate, melt and spread
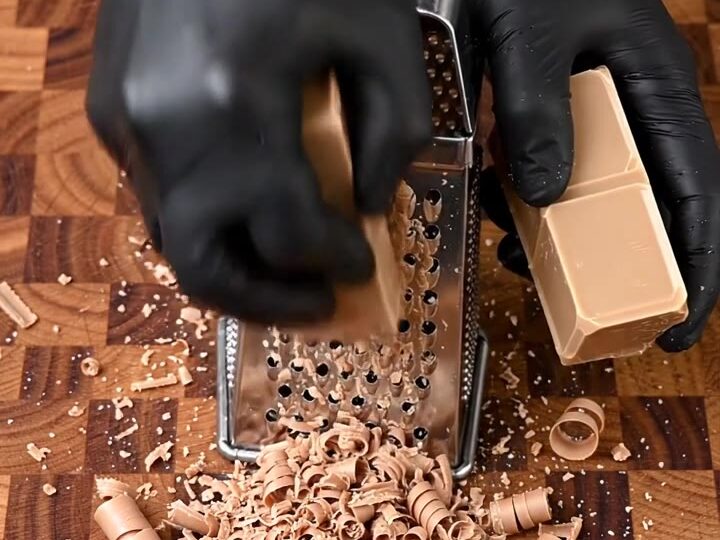
- Grate the milk chocolateSet a box grater over a wooden board and grate the block of milk chocolate against the large holes. Keep going until you have fine curls and shavings. Let them fall directly onto the board so the chocolate stays loose and easy to scatter.Look for Fine curls and shavings collect on the board, with no large pieces left.Tip Chill the block for 10 minutes first so it grates cleanly without smearing.
- Melt the chocolateTransfer the grated chocolate to a small microwave-safe bowl. Heat in short bursts of 20 seconds, stirring between each, until smooth and glossy. Spread it evenly over the parchment-lined metal baking tray.Look for The chocolate turns smooth, fluid and glossy when stirred.Tip Stop heating while a few small lumps remain, then stir them out with residual heat.
The grated chocolate should look like fine curls and shavings with no large pieces left on the board. When melted, the chocolate should be smooth, fluid and glossy, with no lumps and no grainy patches. Spread it evenly across the parchment so the layer has the same thickness from edge to edge. Before moving on, check that the surface still looks wet and glossy, because the toppings need to bond while the chocolate is soft. If it has started to thicken, stir it briefly over gentle heat in the microwave, then spread again. The chocolate should look shiny and easy to work with, ready for the toppings.
Scatter and swirl the toppings
- Add the toppings while wetWhile the chocolate is still wet, scatter the chopped pistachios over the surface. Sprinkle the dried rose petals evenly over the top, then add a light dusting of ground cardamom.Look for The chocolate still looks glossy and wet when the toppings land.Tip Work quickly, because the chocolate starts to thicken as it cools.
- Drizzle the pistachio swirlsFill a squeeze bottle with the green pistachio paste. Drizzle it across the chocolate in wavy lines, moving the bottle back and forth in long curves. Keep the lines spaced to show the green clearly.Look for Bright green wavy lines stand out clearly on the dark chocolate.Tip Warm the paste for 5 seconds in the microwave if it is too thick to flow.
The pistachios, rose petals and cardamom should sit on a still-wet surface, and the chocolate should look glossy with the toppings partly sinking in. Look for even coverage across the whole slab, with no bare patches and no clumps of petals. The pistachio paste should flow easily from the squeeze bottle and form bright green wavy lines that stand out clearly against the dark chocolate.
If the paste looks too thick to flow, warm it for a few seconds and try again. Check that the swirls are spaced across the slab rather than bunched in one area. A quick glance at the colour contrast tells you the decoration is balanced and ready to set.
Set and cut the bars
- Set the slabLeave the tray at cool room temperature until the chocolate is completely firm, about 1 hour. Do not put it in the refrigerator unless it will not set, since fast cooling can dull the gloss.Look for The surface feels firm and no longer tacky when lightly touched.Tip A cool kitchen sets the chocolate faster and keeps a glossy finish.
- Cut into rectangular barsOnce solid, lift the slab from the tray using the parchment. Cut it lengthwise and then crosswise with a sharp knife into neat rectangular bars. Wipe the knife between cuts for clean edges.Look for The slab snaps cleanly along the cut lines with crisp edges.Tip Warm the knife under hot water and dry it before each cut for cleaner bars.
The finished slab should feel firm and no longer tacky when lightly touched, and the surface should look dry and evenly glossy. The toppings should be fixed in place, with no pistachios or petals sliding off when the tray is tilted gently. Lift the slab using the parchment and check the underside for an even, smooth finish.
Cut lengthwise and then crosswise with a warmed, dry knife, and watch for crisp edges that snap cleanly along each line. If the chocolate cracks unevenly, it is probably too cold, so let the slab stand a few minutes before cutting again. The bars should look neat and uniform, each showing pistachio, rose and green swirl in its top.
Common mistakes
The most common problem is adding the toppings after the chocolate has begun to set. Once the surface is dull and thick, the pistachios and petals will sit on top rather than bonding, and they can drop off when you cut the bars. Work quickly from melting to decorating so the chocolate is still wet. Another frequent mistake is overheating the chocolate.
Milk chocolate can turn grainy or seize if it is heated too long in one go, so melt it in short bursts and stir between each one. Chilling the slab too hard can also cause a dull finish and sharp cracks, so set it at cool room temperature rather than in a very cold fridge. Using finely ground pistachios or too much cardamom can overpower the bars, so keep the chopped nuts coarse and the spice light.
How to tell it’s done
The bars are ready when the slab is completely firm to the touch and no longer tacky, and the chocolate has a glossy, even surface with no soft spots. A small test helps: press a fingertip gently into an edge, and it should feel solid without leaving a mark. The toppings should be fixed in place, and the chocolate should snap cleanly when cut.
Because this recipe contains no raw meat, poultry, fish or eggs, no internal temperature check is needed. The bars are finished when they are set, glossy and crisp at the edges, and ready to be served at cool room temperature. If the chocolate feels soft in a warm kitchen, return the slab to a cool spot for a short time before cutting.
Up next · Part 3 of 3
4 variations · storage & make-ahead · 5 answers · printable card
Tips, FAQ & printable recipe (Part 3)← Back to the ingredients (Part 1)