Desserts · Part 1 of 3: Ingredients
Pecan Praline Fudge Maple Milk Chocolate Slab: Rich, Crunchy, Easy
- Prep
- Cook
- Total
- Serves
- 16
This Pecan Praline Fudge Maple Milk Chocolate Slab is a candy lover's dream: a thick, marbled slab of velvety maple milk chocolate fudge loaded with crunchy candied pecans and maple sugar brittle, all swirled with golden caramel praline.
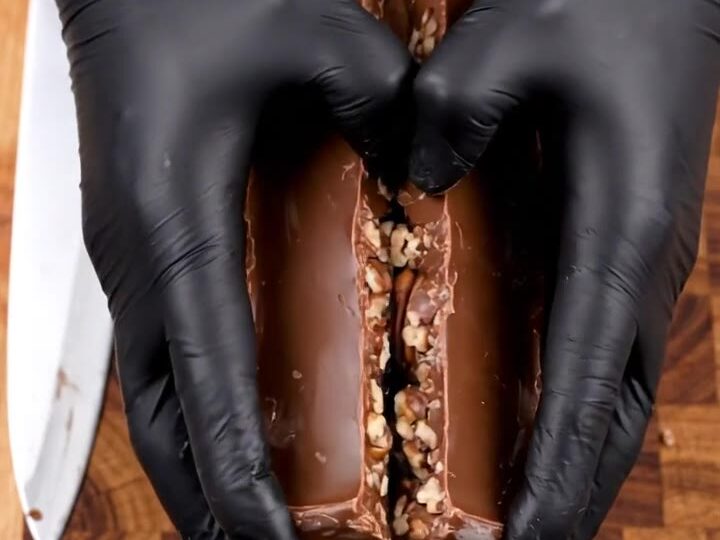
Slice it into thick bars, snap one in half, and watch the layered cross-section reveal its treasures. It's a stunning homemade candy that's surprisingly easy to make, with no candy thermometer or oven required. Perfect for gifting, holiday trays, or simply indulging at home.
This slab combines the rich, creamy texture of milk chocolate fudge with the satisfying crunch of praline pecans and maple sugar brittle. The maple flavor infuses every bite, while the caramel swirl adds a gooey, buttery note.
Grated milk chocolate curls melt into the fudge, creating a smoother, more luxurious mouthfeel. The result is a candy that looks like it came from a high-end chocolatier but comes together in minutes. Each thick bar is a study in contrast: smooth fudge, crunchy nuts, and brittle shards that shatter with every bite.
Ingredients
Praline Mix
- 1 1/2 cups candied praline pecans
- 3/4 cup maple sugar brittle pieces
Chocolate Base
- 1 lb milk chocolate block
- 3 cups maple milk chocolate fudge
Swirl
- 1/2 cup golden caramel praline sauce
Why this recipe works
The method relies on a base of ready-made maple milk chocolate fudge, which provides a stable, creamy foundation without the need for boiling sugar or tempering chocolate. Warming the fudge slightly makes it pourable and easy to mix, while the added grated chocolate curls enrich the texture and help the slab set into a firm, sliceable block. The caramel praline sauce is swirled in at the end, keeping its distinct ribbons for a beautiful marbled effect.
Chilling is the key to clean slicing and that satisfying snap. The cold sets the fudge into a firm slab that can be cut into neat bars, while the praline pieces remain crunchy, providing a textural contrast to the smooth fudge.
The parchment lining ensures easy removal, and the final snap reveals the layered cross-section—a visual promise of the crunchy, creamy experience inside. This method is forgiving, adaptable, and produces a candy that looks and tastes professionally made.
Notes and substitutions
For the best flavor, use high-quality maple milk chocolate fudge, either homemade or from a trusted chocolatier. The candied praline pecans should be fresh and crunchy; if they have softened, toast them briefly in a dry skillet to revive their crispness.
Maple sugar brittle can be found in specialty stores or online; if unavailable, any hard caramel brittle works. The golden caramel praline sauce should be thick and pourable—if it's too thin, it will sink into the fudge instead of swirling.
A 9x13-inch metal tray is ideal for a slab about 3/4 inch thick. Line it with parchment paper, leaving overhang on two sides for easy lifting. If you don't have a box grater, you can chop the chocolate into fine pieces with a knife, but the curls create a nicer texture. The slab can be customized with different nuts or a dark chocolate fudge for a less sweet version. Store leftovers in the refrigerator to maintain the firm, snappy texture.
- candied praline pecans: Use any candied pecans or praline nuts; if unavailable, substitute with toasted pecans tossed in maple syrup and a pinch of salt.
- maple sugar brittle pieces: Replace with any hard caramel brittle or toffee pieces, or use crushed maple candy.
- maple milk chocolate fudge: Use a store-bought fudge or make a simple fudge with sweetened condensed milk and maple extract.
- golden caramel praline sauce: Use any thick caramel sauce; stir in a few chopped pecans for praline texture.
Equipment
- Sharp chef's knife
- Box grater
- Parchment-lined metal tray (9x13-inch)
- Large mixing bowl
- Rubber spatula
- Offset spatula
- Cutting board
Up next · Part 2 of 3
9 steps · 10 min of cooking · what to look for at each stage
Step-by-step instructions (Part 2)