Desserts · Part 2 of 3: Instructions
Decadent Peanut Fudge Brownie Trifle for Easy Entertaining Step-by-step instructions
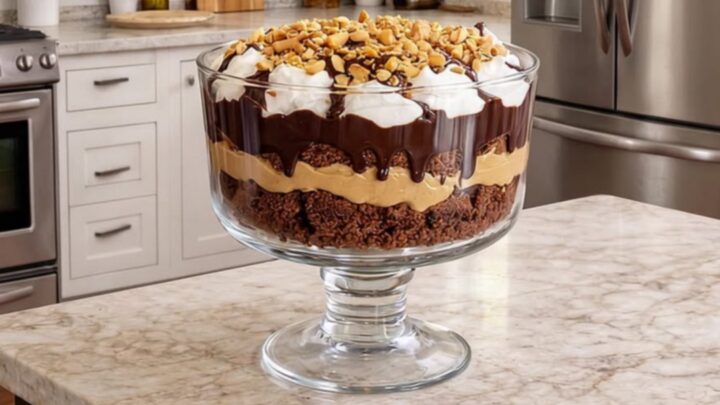
- Prep
- Cook
- Total
- Serves
- 8
Before you start
Before beginning the assembly, ensure all components are prepared and at the correct temperatures. The brownies must be cooled completely if baked fresh, and cut into uniform cubes.
Both the whipped cream and peanut butter cream should be chilled in the refrigerator to ensure they maintain their volume and texture during the layering process.
Having all ingredients organized and ready on the counter will make the assembly smooth and efficient.
Ingredients at a glance (5)
- 1 lb brownies, store-bought or made ahead, cut into 1-inch cubes
- 2 cups heavy whipped cream
- 1 cup peanut butter cream
- 1/2 cup chocolate fudge sauce
- 1/2 cup crushed peanuts
Instructions
Layer Preparation
- Prepare the layersCut the brownies into uniform one-inch cubes to ensure they fit perfectly in the glass bowl. Prepare the peanut butter cream and whipped cream in separate bowls, ensuring they are chilled and ready for assembly. This careful preparation ensures the layers remain distinct and stable when building the trifle.Look for Brownies are cut into consistent cubes for even layering.Tip Use a room temperature knife to cut the brownies to prevent them from sticking.
The brownie cubes are uniform and the creams are whipped to soft peaks. Everything is ready for the assembly phase, ensuring a smooth workflow without any delays that could affect the temperature of the ingredients.
Trifle Assembly
- Assemble the triflePlace a layer of brownie cubes at the bottom of the glass bowl. Drizzle a portion of the chocolate fudge sauce over the brownie layer. Add a layer of whipped cream, followed by a layer of peanut butter cream. Repeat these steps, alternating layers until the bowl is filled to the top.Look for Layers are visible through the glass side of the bowl.Tip Ensure the fudge sauce is slightly warm so it cascades down the glass sides beautifully.
The layers are clearly visible through the glass, with the chocolate fudge sauce creating beautiful streaks between the brownies and the cream. The bowl is filled to the top, showing a balanced distribution of all components.
Setting and Garnish
- Cook eggs and finishIf using fresh eggs for the cream base, ensure they are cooked in a double boiler until they reach a safe internal temperature of 160°F (71°C), stirring constantly to prevent curdling. Once cooled, finish the top of the trifle with a dollop of whipped cream and a sprinkle of crushed peanuts. Chill for at least one hour before serving.Look for The trifle looks set and the peanuts are evenly distributed on top.Safe temperature 160°F (71°C) internal temperature (egg dishes)Tip Cover the trifle loosely with plastic wrap to prevent the cream from picking up fridge odors.
The trifle has chilled in the refrigerator, and the layers are firm. The top is garnished with fresh cream and peanuts, and the dish is ready to be presented as a stunning, multi-layered dessert.
Common mistakes
A common mistake is using warm brownies, which will cause the whipped cream and peanut butter cream to melt and lose their structure, resulting in a messy appearance.
Another error is over-mixing the cream layers, which can lead to a dense, buttery texture rather than a light, airy one. Finally, avoid rushing the chilling time, as the trifle requires this period to set properly for easy serving.
How to tell it’s done
There is no actual cooking involved in the assembly process, so doneness is determined by the visual setting of the layers. The trifle is ready to serve once the cream has firmed up slightly after at least one hour of refrigeration.
The layers should appear distinct, and the fudge sauce should have created a beautiful, stable pattern against the sides of the glass container. Ensure any egg-based components reach 160°F (71°C).
- Egg dishes: 160°F (71°C) in the thickest part
Up next · Part 3 of 3
2 variations · storage & make-ahead · 3 answers · printable card
Tips, FAQ & printable recipe (Part 3)← Back to the ingredients (Part 1)