Desserts · Part 2 of 3: Instructions
Peanut Butter Crunch Lasagna: A Decadent Layered Dessert Step-by-step instructions
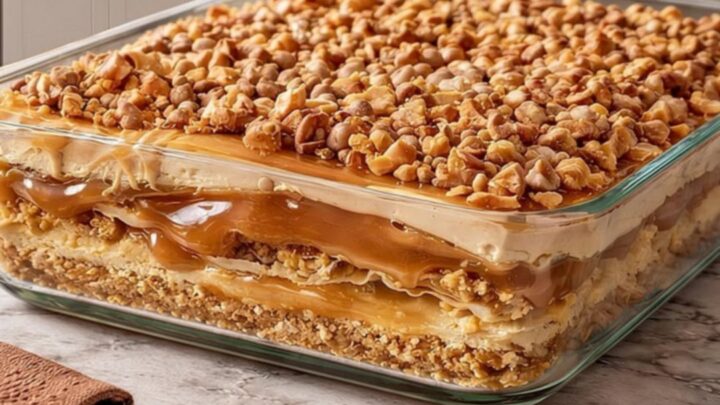
- Prep
- Cook
- Total
- Serves
- 8
Before you start
Before you begin assembling your Peanut Butter Crunch Lasagna, ensure your workspace is clean and organized. Have your 9x13 inch glass baking dish ready on a flat, stable surface.
If you are using pre-made whipped cream and caramel, ensure they are at the correct consistency by checking their labels or keeping them at a cool room temperature. Verify that your crust is prepared and cooled, and ensure your peanuts are chopped uniformly.
Ingredients at a glance (4)
- 1 package crust, prepared as per package instructions
- 2 cups whipped peanut butter cream, store-bought or made ahead
- 1 cup thick caramel sauce, store-bought or made ahead
- 1/2 cup chopped peanuts, for garnish
Instructions
Base assembly
- Prepare the BaseSpread the prepared crust evenly across the bottom of the 9x13 inch glass baking dish. Press it down firmly with the back of a spatula to create a uniform and compact foundation for the subsequent layers.Look for The crust should form an even, flat layer covering the bottom of the dish.Tip Ensure the layer is tightly packed so it holds together when you serve the dessert.
The crust should form a flat, even layer that covers the entire bottom of the glass dish. Pressing the base down firmly is essential to ensure the foundation remains stable when you apply the creamy layers on top. Check that the edges are clean and that no loose crumbs are sticking to the sides of the dish above the base level.
Layering the fillings
- Layering the Cream and CaramelSpread the whipped peanut butter cream evenly over the crust base. Carefully drizzle the thick caramel sauce over the cream layer, using a spatula to spread it gently if needed, ensuring the caramel reaches the edges for a beautiful appearance.Look for The cream should be smooth and the caramel should create a glossy, consistent layer.Tip Work quickly so the whipped texture of the cream remains light and airy.
The whipped peanut butter cream should be spread smoothly from corner to corner. When you add the caramel, it should form a distinct, glossy layer on top of the cream. Ensure the caramel is distributed evenly across the surface, as this will define the visual appeal of each slice when the dessert is eventually cut and plated for serving.
Finishing touches
- Finishing and ChillingSprinkle the chopped peanuts generously over the top of the caramel layer. Place the dish in the refrigerator to set for at least two hours before slicing and serving. This resting period allows the layers to firm up for clean, beautiful cuts.Look for The dessert should feel firm to the touch and the layers should look distinct.Tip Use a warm knife to slice through the layers for perfect, clean edges on each serving.
The chopped peanuts should be distributed evenly across the surface, creating a textured top layer. After the dessert has spent its time in the refrigerator, it should feel cool and firm to the touch.
The final check is to ensure that the layers have bonded together, allowing for clean, sharp slices that showcase the beautiful stratification of the finished dish.
Common mistakes
Avoid using a crust that is too thick, as it may become difficult to slice. Do not skip the chilling time, as the dessert needs to firm up to be sliced properly.
Be careful not to spread the cream too forcefully, or you might disrupt the base layer. Finally, ensure the caramel is not too hot when adding it to the cream, as excess heat can cause the whipped cream to deflate and lose its airy consistency.
How to tell it’s done
This dessert is ready when it has chilled in the refrigerator for at least two hours. You will know it is set when the filling feels firm and does not leave a residue on your finger when touched lightly.
The caramel should be stable and not runny. When you slice into the lasagna, the layers should remain distinct and intact, providing a clean, professional look that showcases the beautiful structure you have carefully assembled.
Up next · Part 3 of 3
2 variations · storage & make-ahead · 3 answers · printable card
Tips, FAQ & printable recipe (Part 3)← Back to the ingredients (Part 1)