Desserts · Part 2 of 3: Instructions
Peanut Butter Crunch Lasagna: A Decadent Layered Dessert Step-by-step instructions
- Prep
- Cook
- Total
- Serves
- 8
Before you start
Before beginning, ensure that the cream cheese is softened to room temperature, which typically requires about 30 to 45 minutes on the counter. Having all ingredients measured and ready, along with the electric mixer and baking dish, will streamline the process.
Clear a space in the refrigerator large enough to accommodate the 9x13-inch baking dish horizontally, as keeping the dish level is crucial for maintaining the integrity of the layers while they set.
Ingredients at a glance (4)
- 2 cups creamy peanut butter
- 16 oz cream cheese, softened
- 1 cup caramel sauce
- 1/2 cup peanuts, chopped
Instructions
Cream Preparation
- Prepare the peanut butter creamIn a large mixing bowl, combine the softened cream cheese and creamy peanut butter. Using an electric hand mixer, beat the mixture on medium speed until it is smooth, thick, and fully blended without any lumps remaining.Look for mixture is completely smooth and uniform in colorTip Ensure the cream cheese is fully softened at room temperature to prevent lumps in the filling.
The peanut butter and cream cheese mixture should be entirely smooth, with a uniform color and no visible lumps of cream cheese. The consistency should be thick enough to hold its shape when lifted with a spatula, indicating that it is ready to be spread into the dish.
Layering Assembly
- Layer the lasagnaSpread half of the peanut butter cream mixture evenly across the bottom of a 9x13-inch glass baking dish. Drizzle half of the caramel sauce over the cream layer, then repeat the process with the remaining peanut butter cream and caramel sauce to form clean, alternating layers.Look for layers are visually distinct and level across the dishTip Use an offset spatula to smooth the surface of the cream layers evenly for neat presentation.
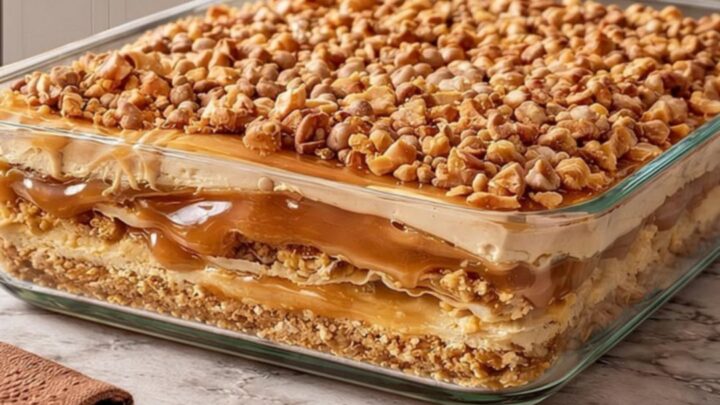
After spreading the cream and caramel, the layers should look clean and distinct from the side of the glass dish. The caramel should be evenly distributed without pooling in one corner, and the top surface should be relatively level before moving on to the final topping stage.
Chilling and Finishing
- Add topping and chillScatter the chopped peanuts evenly over the final caramel layer to create the crunch topping. Transfer the baking dish to the refrigerator and chill for at least one hour before slicing. This resting period lets the structure firm up so clean slices can be lifted with a metal spatula.Look for the dessert is chilled and firm to the touchTip Chill for extra time if the kitchen is warm to ensure clean and stable slices.
The finished dessert should be completely firm throughout, with the peanuts embedded slightly into the top caramel layer. When a slice is lifted with a metal spatula, the piece should remain intact, showing clear, professional layers of peanut butter cream and caramel.
Common mistakes
Avoid over-mixing the cream layer, as this can incorporate too much air and change the desired dense, velvety consistency.
Another common mistake is failing to allow the dessert to chill for the full hour; rushing this step often results in layers that bleed into one another when sliced.
Finally, ensure the caramel sauce is not too thin, as a runny sauce will not hold its position between the thicker peanut butter layers.
How to tell it’s done
The dessert is ready once it has been chilled for at least one hour, or until the peanut butter cream feels firm and set to the touch. When slicing, the knife should pass through the layers easily without dragging or mixing them together.
If the dessert appears soft or the layers seem to lose their definition, return it to the refrigerator for an additional 30 minutes to ensure it is sufficiently firm before serving.
Up next · Part 3 of 3
2 variations · storage & make-ahead · 3 answers · printable card
Tips, FAQ & printable recipe (Part 3)← Back to the ingredients (Part 1)