Desserts · Part 2 of 3: Instructions
Peanut Butter Caramel Crunch Dark Chocolate Fudge Slab Step-by-step instructions
- Prep
- Cook
- Total
- Serves
- 16
Before you start
Set up everything before you melt the chocolate, because the fudge moves quickly once it is poured. Cut a sheet of parchment paper to fit an 8-inch square metal pan, lining the bottom and two opposite sides so the slab can be lifted out. Chop the roasted peanuts and break the banana chips into smaller pieces. Chop the caramel pieces into small bits.
Keep the peanut butter caramel at room temperature so it is thick but spreadable. Place a dark chocolate bar in the refrigerator for about 10 minutes so it grates cleanly. Measure the butter, condensed milk and vanilla extract, and set a spoon and a long, sharp knife within reach. A cutting board, a box grater and a heatproof bowl should be ready before the heat goes on.
Ingredients at a glance (9)
- 8 oz dark chocolate, plus extra bar for grating
- 1/2 cup unsalted butter
- 14 oz sweetened condensed milk
- 1 tsp vanilla extract
- 1/2 cup thick peanut butter caramel sauce
- 1/2 cup roasted peanuts, chopped
- 1/2 cup banana chips, broken into pieces
- 1/3 cup chopped caramel pieces
- flaky sea salt, to taste, plus a pinch for finishing
Instructions
Melt and pour the base
- Melt the chocolate baseLine the metal pan with parchment paper, letting it overhang the sides. Melt the dark chocolate, butter and sweetened condensed milk together over low heat, stirring until smooth and glossy. Stir in the vanilla extract and remove from the heat.Look for The mixture turns smooth, dark and glossy with no visible streaks of butter.Tip Keep the heat low so the chocolate does not seize or scorch on the bottom of the pan.
- Prepare the crunch mixOn a cutting board, combine the roasted peanuts, banana chips, chopped caramel pieces and a pinch of flaky sea salt. Chop with a knife, gathering the pile back together several times, until the crunchy toppings are evenly mixed.Look for The peanuts, chips and caramel pieces look evenly distributed in a fine, rough mix.Tip Chop only until the pieces are uniform, so the banana chips keep some crunch.
The chocolate, butter and condensed milk form one smooth, glossy mixture with no streaks. Before going on, check that the mixture has spread into an even layer across the lined pan, covering the bottom fully and reaching the corners.
The surface should look shiny and unbroken, with no grainy spots or pools of oil. If the layer has set unevenly or looks dull, gently warm it again over low heat before moving to the swirl stage, so the caramel can blend into it smoothly and the slab sets with an even texture.
Swirl and top the slab
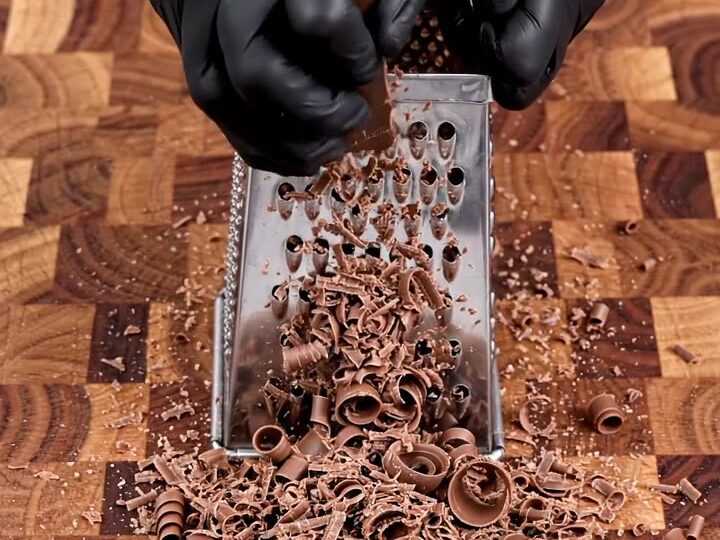
- Grate the chocolate shavingsHold an extra dark chocolate bar against a box grater and grate it over the cutting board. The fine, curled shavings will fall onto the board. Set them aside for the topping.Look for Fine, curled chocolate shavings collect on the board.Tip Chill the bar for 10 minutes first so it grates cleanly without softening.
- Pour and swirl the fudgePour the chocolate base into the parchment-lined pan and spread it until it covers the bottom in a smooth, even layer. Warm the peanut butter caramel slightly if needed, then drizzle it across the chocolate and swirl it into ribbon-like streaks with a spoon.Look for The chocolate layer is smooth and glossy with caramel ribbons running across it.Tip Swirl gently with a few strokes so the caramel stays visible as streaks.
The caramel sits in ribbon-like streaks across the chocolate, and the crunch mixture covers the top in an even scatter. Before chilling, check that the toppings are pressed lightly into the surface and that the grated chocolate shavings and final pinch of flaky sea salt are spread across the slab. The caramel should look visible and glossy rather than blended into a single color. If one area is bare, add a few more pieces by hand, so every cut square has a balanced mix of crunch, caramel and chocolate.
Set and cut the fudge
- Top and set the slabScatter the peanut and caramel crunch mixture over the top, pressing it lightly so it adheres. Add the grated chocolate shavings and finish with a pinch of flaky sea salt. Refrigerate until firm, about 2 hours.Look for The slab feels firm to the touch and the top looks glossy and evenly covered.Tip Press the toppings lightly so they stay put when the slab is cut.
- Cut the slabLift the set fudge out of the pan using the parchment overhang. Cut the slab in half with a long, sharp knife, then cut each half into even pieces. Wipe the knife between cuts for clean edges.Look for The cut edges look dense and dark, edged with caramel and crunchy toppings.Tip Warm the knife under hot water and dry it between cuts for clean squares.
The slab feels firm and holds its shape when lightly pressed, and the surface looks glossy with the caramel swirl still visible. Before cutting, check that the slab has rested in the refrigerator for about 2 hours and that the parchment lets you lift it out cleanly. The cut edges should look dense and dark, edged with caramel and crunchy toppings. If the slab is still soft in the center, return it to the refrigerator for another 30 minutes before slicing, so the squares keep clean edges.
Common mistakes
The most common mistake is overheating the chocolate. When the heat is too high or the mixture is left on the burner too long, the chocolate can seize, turn grainy or scorch on the bottom of the pan. Melt everything over low heat and stir steadily until smooth. Another frequent error is swirling the caramel too much.
A few deliberate strokes keep the ribbons visible, while heavy stirring blends the caramel into a single color and dulls the swirl. Skipping the parchment overhang also causes trouble, since the slab becomes hard to lift and cut cleanly. Finally, cutting too early leads to squashed squares and toppings that slide off. Let the slab set fully before you slice it.
How to tell it’s done
The fudge is done when the slab is firm all the way through and holds a clean edge when cut. Press the center lightly with a fingertip: it should spring back slightly and feel cool, not tacky. The surface should look glossy, with the caramel swirl and crunchy toppings still visible.
Because this is a no-bake dessert, there is no oven temperature to check. Instead, confirm the slab has rested in the refrigerator for about 2 hours. If the center still feels soft or sticks to your finger, chill it longer. A firm, glossy, evenly set slab cuts into neat squares with a dense, dark chocolate interior.
Up next · Part 3 of 3
4 variations · storage & make-ahead · 5 answers · printable card
Tips, FAQ & printable recipe (Part 3)← Back to the ingredients (Part 1)