Desserts · Part 2 of 3: Instructions
Peanut Butter Caramel Crunch Dark Chocolate Fudge in One Pan Step-by-step instructions
- Prep
- Cook
- Total
- Serves
- 16
Before you start
Gather all the ingredients and equipment before you start, so the fudge comes together without pauses. Line an 8-inch baking pan with parchment paper, leaving an overhang on two sides so you can lift the slab out later. Chill the block of dark chocolate for about 10 minutes so it grates cleanly on the box grater.
Chop the peanut butter caramel into small chunks, coarsely chop the crunchy caramel pieces and the salted peanuts, and keep them in separate small bowls. Set out the flaky sea salt. Warm the peanut butter caramel until it is pourable but not hot. Clear a stable area on the wooden board for chopping, grating and slicing, and have a clean chef's knife ready for the final cuts.
Ingredients at a glance (6)
- 8 oz peanut butter caramel, chopped into chunks
- 1/2 cup crunchy caramel pieces, chopped
- 1 cup salted peanuts, divided and roughly chopped
- 1 tsp flaky sea salt, plus more for finishing
- 12 oz dark chocolate, in a block, for grating and melting
- 1/2 cup peanut butter caramel, warmed until pourable
Instructions
Chocolate base is ready
- Chop the caramel and peanutsChop the peanut butter caramel into small chunks, coarsely chop the crunchy caramel pieces and the salted peanuts with a chef's knife on the cutting board. Pile them together and sprinkle flaky sea salt over the pile.Look for Pieces are uneven and mixed, with peanut pieces visible among the caramel.Tip Keep the chunks fairly small so they distribute evenly through the fudge.
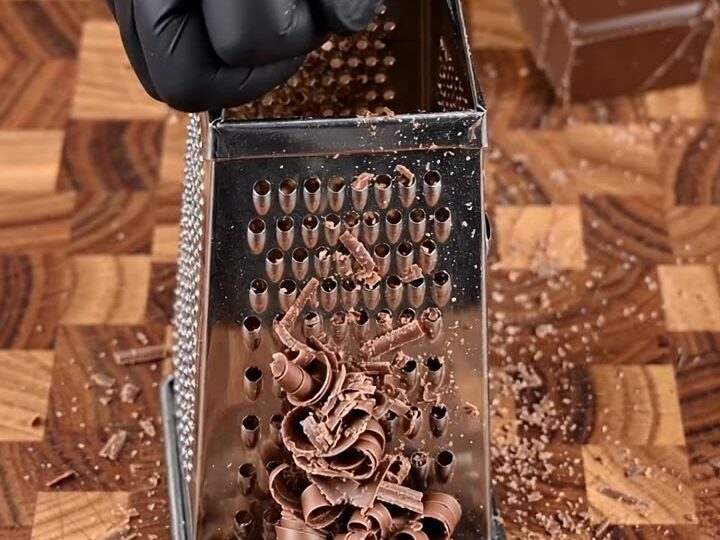
- Grate the dark chocolateGrate the block of dark chocolate with a box grater over the board. Let the fine curls and shavings fall onto the board, and set aside a small handful of shavings for finishing the fudge.Look for Fine curls and shavings collect on the board.Tip Chill the chocolate block for 10 minutes first so it grates cleanly without softening.
After you grate and melt the chocolate and spread it into the lined pan, the surface should look smooth and glossy with an even layer across the bottom. The chocolate should flow easily and show no lumps or streaks. Before moving on, check that the base reaches the corners of the pan and that the parchment lies flat. Any uneven patches should be smoothed with a spatula now, because they will show on the finished slab. The base should look shiny and feel ready to take the caramel swirl without drying or thickening.
Caramel swirl and topping
- Melt and spread the chocolate baseMelt the grated dark chocolate in a heatproof bowl over simmering water or in short microwave bursts, stirring until smooth. Spread it into a parchment-lined rectangular baking pan to form an even base.Look for The chocolate is smooth, glossy and spreads easily.Tip Stir between bursts so the chocolate does not scorch.
- Swirl the caramelWarm the peanut butter caramel until pourable. Drizzle it over the chocolate base and swirl it through in ribbons with the tip of a knife, keeping the chocolate visible between the ribbons.Look for Caramel ribbons hold their shape and sit on the glossy chocolate.Tip Work quickly while the caramel is warm so the swirls stay defined.
- Add the crunch toppingScatter handfuls of salted peanuts and crunchy caramel pieces over the top, pressing them lightly so they stay in place. Finish with a sprinkle of flaky sea salt.Look for The top is evenly covered with peanuts and caramel pieces.Tip Press the toppings in gently so they do not sink into the chocolate.
After you drizzle and swirl the warm peanut butter caramel and scatter the peanuts and crunchy caramel pieces, the top should show visible ribbons of caramel against the dark chocolate, with the toppings spread evenly. The caramel should look glossy and hold its shape, and the peanuts should sit on the surface without sinking. Before you refrigerate the pan, check that the topping covers the surface and that no large patch of chocolate is left bare. A light sprinkle of flaky sea salt should be visible across the top.
Set and slice the fudge
- Set the fudge until firmRefrigerate the pan until the fudge is firm and glossy, about 90 minutes. Keep it covered loosely so the surface stays smooth.Look for The surface looks glossy and the slab feels firm when lightly pressed.Tip Set the fudge on a flat shelf so it cools evenly.
- Lift and slice the slabLift the slab from the pan using the parchment overhang and place it on the cutting board. Slice it with a chef's knife into neat pieces, wiping the blade between cuts for clean edges.Look for Clean layers of chocolate, caramel and crunch show in each slice.Tip Warm the knife briefly under hot water for the cleanest cuts.
- Arrange and finishArrange the fudge pieces neatly on the board. Dust them with sea salt and the reserved chocolate shavings before serving.Look for Pieces are neat, with salt and shavings on top.Tip Serve at room temperature for the best texture.
After the fudge has chilled, the surface should look glossy and the slab should feel firm when pressed lightly with a fingertip. The layers should look clean, with the chocolate base, caramel swirl and crunch distinct when you check an edge.
Before slicing, lift the slab using the parchment overhang and let it rest a few minutes at room temperature so the knife cuts cleanly. Each slice should show clean layers, with no smearing of the caramel into the chocolate. Make sure the pieces are firm enough to hold their shape on the board.
Common mistakes
The most common mistake is overheating the dark chocolate, which can turn it grainy or dull. Melt it gently and stir between short bursts in the microwave, or keep the bowl over simmering water without letting steam or water touch the chocolate. Another frequent error is spreading the caramel too thickly, which hides the chocolate and makes the swirl muddy.
Warm the caramel until it pours easily and drizzle it in thin lines. Avoid pressing the toppings too hard, because they can sink into the base and disappear. Finally, slicing before the fudge is firm causes the layers to smear, so give the slab the full chilling time and wipe the knife between cuts for clean edges.
How to tell it’s done
The fudge is ready to slice when the surface looks glossy and the slab feels firm when you press it lightly with a fingertip. The chocolate should no longer feel soft, and the caramel swirl should look set rather than sticky. A clean cut should show distinct layers of dark chocolate, caramel and crunch with no smearing along the edges.
Because this is a no-bake fudge, there is no protein or internal temperature to reach. If the surface is still tacky or the knife drags through the caramel, return the pan to the refrigerator and check again after another 20 to 30 minutes.
Up next · Part 3 of 3
4 variations · storage & make-ahead · 5 answers · printable card
Tips, FAQ & printable recipe (Part 3)← Back to the ingredients (Part 1)