Dinner · Part 2 of 3: Instructions
Pan-Seared Chilean Sea Bass with Lemon Caper Butter Step-by-step instructions
- Prep
- Cook
- Total
- Serves
- 4
Before you start
Before starting, pat the sea bass fillets dry with paper towels and season them with salt and pepper. Slice the lemon into thin wheels and chop the parsley. Grate the cheese into a fluffy mound.
Have all the ingredients measured and within reach, as the cooking process moves quickly. Preheat a large skillet over medium-high heat for a couple of minutes before adding the oil, so it shimmers when the fish goes in.
Ingredients at a glance (8)
- 4 Chilean sea bass fillets (6 oz each)
- 1 tsp kosher salt
- 1/2 tsp black pepper
- 2 tbsp olive oil
- 3 tbsp unsalted butter
- 2 tbsp capers, drained
- 1 lemon, sliced into wheels
- 2 tbsp fresh parsley, chopped
Instructions
Prepare the fish and aromatics
- Prep the fish and aromaticsPat the Chilean sea bass fillets dry with paper towels. Season both sides evenly with kosher salt and black pepper. Slice the lemon into thin wheels and chop the parsley. Set everything near the stove so it is ready to go.Look for The fillets are evenly seasoned and the lemon and parsley are prepped.Tip Drying the fish well ensures a golden crust when searing.
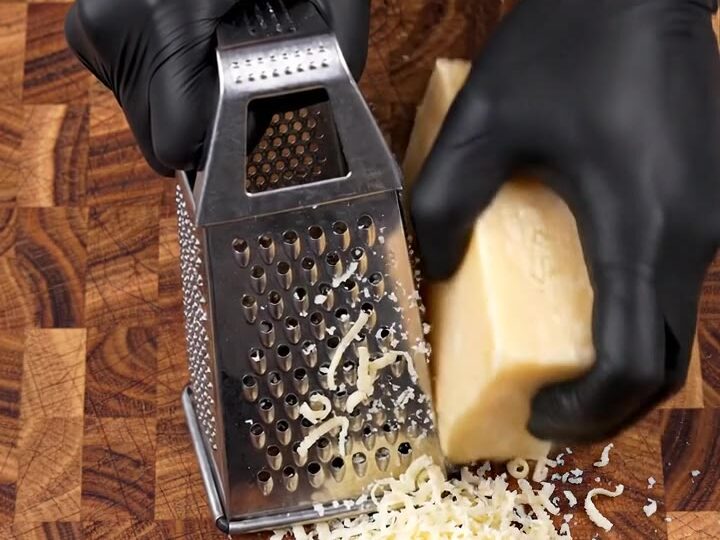
- Grate the cheeseUsing a stainless steel box grater, freshly grate a solid block of cheese (such as Parmesan) into a fluffy mound. Set aside for later use.Look for The cheese is finely grated and light and airy.Tip Freshly grated cheese melts more smoothly than pre-shredded.
At this stage, the fish is seasoned and ready, the lemon is sliced into wheels, and the parsley is chopped. The cheese is grated into a light, fluffy mound.
Everything is organized and within reach, so the cooking process will be smooth and efficient. The kitchen smells fresh with citrus and herbs, and the stage is set for a delicious meal.
Sear and sauce
- Heat the pan and sear the fishHeat the olive oil in a large skillet over medium-high heat until shimmering. Carefully place the seasoned sea bass fillets in the pan, skin-side down if they have skin. Cook without moving for 3-4 minutes until the bottom is golden and crispy.Look for The fish releases easily from the pan and has a deep golden crust.Tip Resist the urge to move the fish; let it develop a crust before flipping.
- Flip and cook throughFlip the fillets gently with a fish spatula. Continue cooking for another 3-4 minutes until the fish is opaque and flakes easily with a fork. The internal temperature should reach 145°F (63°C).Look for The fish is opaque throughout and flakes easily.Safe temperature 145°F (63°C) internal temperature (fish)Tip Use a thermometer to check doneness for perfect results.
- Add butter, capers, and lemonReduce the heat to medium. Add the butter to the skillet, letting it melt and sizzle. Add the capers and lemon wheels to the pan, spooning the bubbling butter over the fish as it cooks for another minute.Look for The butter is foamy and the lemon wheels are softening in the pan.Tip Spooning the butter over the fish keeps it moist and flavorful.
- Finish with cheese and parsleySprinkle the freshly grated cheese over the fish and into the sauce. Let it melt into the butter. Add the chopped parsley and give the pan a gentle swirl to combine.Look for The cheese has melted into the sauce and the parsley adds fresh color.Tip The cheese adds a savory depth to the sauce.
The fish is seared to a deep golden brown on both sides, with a crisp crust. The butter has melted and is bubbling with capers and lemon wheels, creating a fragrant, savory sauce. The cheese has melted into the butter, and the parsley adds a bright green finish. The pan is glossy and the sauce is ready to be spooned over the fish.
Serve hot
- Slice and serveCarefully transfer the sea bass to serving plates. Spoon the lemon caper butter sauce over each fillet. Slice through the center of the fish to show the flaky interior, then serve hot.Look for The fish is flaky and the sauce is glossy.Tip Slicing the fish before serving makes for a beautiful presentation.
The sea bass is plated with the lemon caper butter sauce spooned over the top. Slicing through the center reveals the moist, flaky interior. The dish looks elegant and inviting, with the golden crust and vibrant sauce. It’s ready to serve immediately, while the fish is still warm and the sauce is bubbling.
Common mistakes
One common mistake is overcrowding the pan, which lowers the temperature and steams the fish instead of searing it. Use a large skillet and cook in batches if needed.
Another is moving the fish too soon; let it cook undisturbed until it naturally releases from the pan. Overcooking is also a risk—keep an eye on the clock and use a thermometer. Finally, don’t skip the fresh cheese; it adds a savory note that balances the sauce.
How to tell it’s done
The sea bass is done when it flakes easily with a fork and the internal temperature reaches 145°F (63°C). The flesh should be opaque throughout, with no translucent spots. The exterior should be deeply golden and crisp.
If the fish resists flaking, it needs another minute or two. Be careful not to overcook, as the fish can become dry. The sauce should be bubbly and slightly thickened, with the butter fully melted and the lemon wheels softened.
- Fish: 145°F (63°C) in the thickest part
Up next · Part 3 of 3
4 variations · storage & make-ahead · 5 answers · printable card
Tips, FAQ & printable recipe (Part 3)← Back to the ingredients (Part 1)